1. Tổng quan tra cứu ảnh
1.1. Content-based image retrieval
Tra cứu ảnh dựa vào nội dung có nghĩa là tra cứu sẽ phân tích nội dung của ảnh thay vì dựa vào các siêu dữ liệu như từ khóa, thẻ và các mô tả văn bản đi kèm với ảnh. Thuật ngữ nội dung ở đây được hiểu là mầu, hình dạng, kết cấu hoặc bất cứ một thông tin nào mà có thể lấy ra từ bản thân ảnh. Ưu điểm của phương pháp này là việc trích chọn đặc trưng được thực hiện một cách tự động và nội dung của ảnh thì luôn luôn nhất quán.
1.2. Tra cứu ảnh sử dụng phân cụm Spectral Clustering
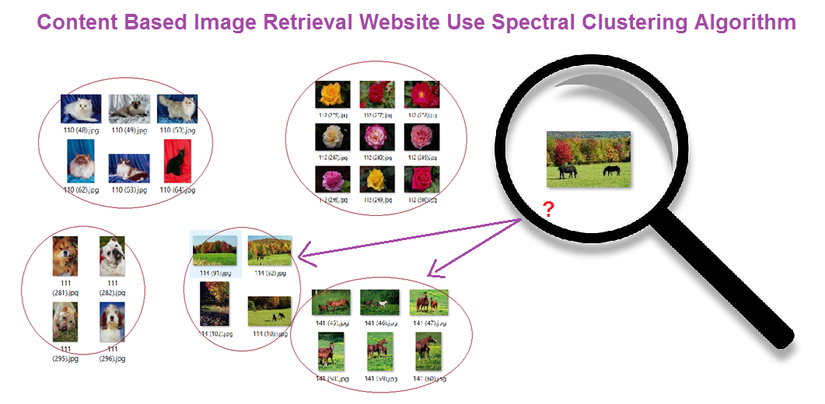
Hệ thống tra cứu ảnh dựa trên nội dung hiện đang là phương pháp được sử dụng phổ biến và cho thấy những kết quả ưu việt ở một số phương diện hơn so với tra cứu ảnh dựa trên văn bản. Tuy nhiên nếu chỉ sử dụng độ tương tự để so véc tơ đặc trưng ảnh truy vấn với lần lượt các véc tơ trong cơ sở dữ liệu đặc trưng thì rất tốn thời gian và tài nguyên để tính toán, nhất là với cơ sở dữ liệu ảnh lớn hàng trăm nghìn ảnh trở lên, điều này gây khó khăn vô cùng. Để cải thiện nhược điểm này, rất nhiều phương pháp đã được đề xuất và đem lại hiệu quả tốt hơn, trong đó có phương pháp tra cứu ảnh sử dụng phân cụm.
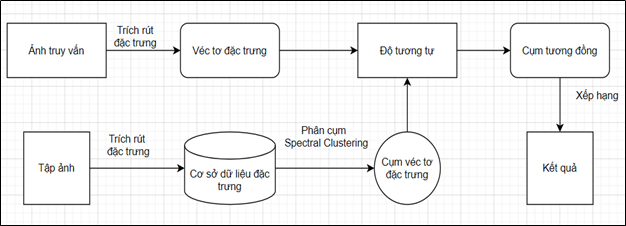
Ta coi tập ảnh như là một đồ thị, với mỗi đỉnh của đồ thị ứng với một bức ảnh. Thuật toán Spectral Clustering phân cụm đồ thị sẽ phân các bức ảnh trong tập ảnh thành các cụm với nội dung liên quan đên nhau, với mỗi cụm có một tâm cụm. Khi tra cứu ảnh, thay vì so sánh tính toán độ tương đồng giữa véc tơ đặc trưng của ảnh truy vấn với từng véc tơ đặc trưng của các bức ảnh trong tập ảnh thì giờ đây ta chỉ phải so sánh nó với véc tơ đặc trưng của tâm của mỗi cụm.
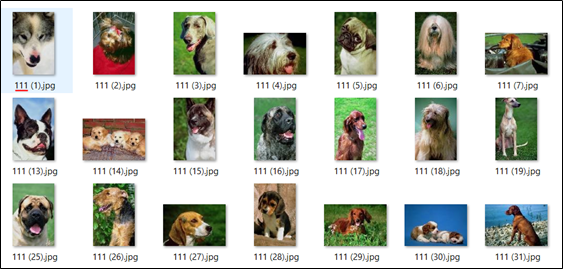
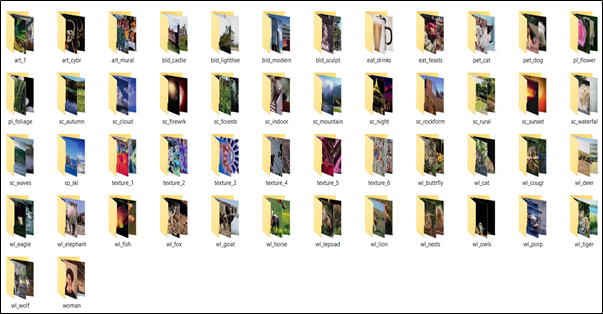
2. Tập ảnh thực nghiệm
Tập ảnh thực nghiệm là tập con của Corel. Đã được phân lớp ảnh theo nội dung từ phía người dùng. Tập ảnh có tổng cộng 7080 ảnh. Có tổng dung lượng là 23.1 MB. Các ảnh có kích thước khác nhau. Có 50 thư mục tương ứng với 50 nội dung. Ảnh có dùng nội dung được cho vào một thư mục. Từng ảnh trong mỗi thư mục được đánh dấu mã nội dung bằng 3 kí tự đầu ở tên file.
Các bạn có thể tải dataset tại đây: https://drive.google.com/drive/folders/1ZQeuECcgtdv5C7_OfuktVoZoo2rJ9vjJ?usp=sharing
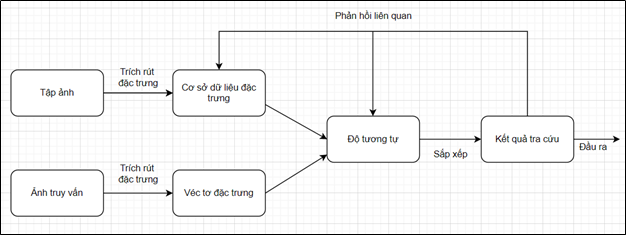
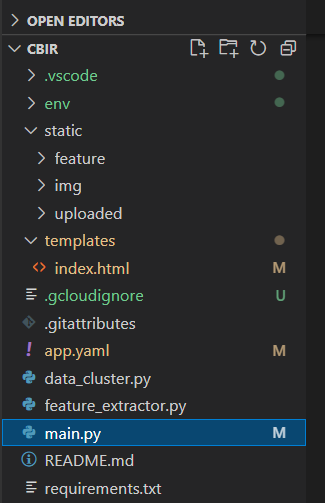
3. Xây dựng trang web tra cứu ảnh
Project CBIR sẽ gồm các thư mục và file chính:
- static/feature: lưu trữ các dữ liệu về đặc trưng, cụm và tâm cụm của ảnh
- static/image: tập ảnh
- static/uploaded: lưu ảnh người dùng upload lên để tra cứu
- templates/index.html: giao diện html của trang web
- feature_extractor.py: trích xuất đặc trưng tập ảnh
- data_cluster.py: phân cụm cho tập ảnh
- main.py: tra cứu ảnh và đánh giá, trả về kết quả, run website.
Và một số file config website khác.
3.1 Trích xuất đặc trưng ảnh bằng VGG16
Sử dụng pretrained VGG16 ImageNet để trích xuất đặc trưng từ ảnh truy vấn và tập ảnh. Với tập ảnh, các véc tơ đặc trưng được trích xuất sẽ được lưu lại thành cơ sở dữ liệu đặc trưng. Các véc tơ đặc trưng được trích xuất sẽ lưu vào dưới dạng một DataFrame.
- File featrue_extractor.py:
import math
import os
from tensorflow.keras.preprocessing import image
from tensorflow.keras.applications.vgg16 import VGG16, preprocess_input
from tensorflow.keras.models import  Model
from PIL import Image
import numpy as np
import pandas as pd

# Ham tien xu ly, chuyen doi hinh anh thanh tensor
def image_preprocess(img):
    img = img.resize((224,224))
    img = img.convert("RGB")
    x = image.img_to_array(img)
    x = np.expand_dims(x, axis=0)
    x = preprocess_input(x)
    return x

# Ham trich xuat dac trung anh
def extract_vector(model, image_path):
    print("Xu ly : ", image_path)
    img = Image.open(image_path)
    img_tensor = image_preprocess(img)
    # Trich dac trung
    vector = model.predict(img_tensor)[0]
    # Chuan hoa vector = chia chia L2 norm (tu google search)
    vector = vector / np.linalg.norm(vector)
    return vector

# Ham tao model
def get_extract_model():
    vgg16_model = VGG16(weights="imagenet")
    extract_model = Model(inputs=vgg16_model.inputs, outputs = vgg16_model.get_layer("fc1").output)
    return extract_model

# Dinh nghia thu muc data

data_folder = "./static/img/DATA3/img_data"

# Khoi tao model
model = get_extract_model()

vectors = []
paths = []
contents = []

for folder_name in os.listdir(data_folder):
    folder_path_full=os.path.join(data_folder,folder_name)
    for image_path in os.listdir(folder_path_full):
      # Noi full path
      content = str(image_path[0:3])
      image_path_full = os.path.join(data_folder,folder_name,image_path)
      # Trich dac trung
      image_vector = extract_vector(model,image_path_full)
      # Add dac trung va full path vao list
      vectors.append(image_vector)
      paths.append(image_path_full)
      contents.append(content)

# Create the dataframe
df = pd.DataFrame(np.array(vectors))
df['Content'] = pd.Series(contents, index=df.index)
df['Path'] = pd.Series(paths, index=df.index)

df.to_csv("./static/feature/features.csv", index = False)
DataFrame giống như kiểu một bảng, gồm các hàng và các cột. Mỗi một hàng giờ đây sẽ lưu véc tơ đặc trưng của một ảnh trong tập ảnh. Các cột từ 0-4095 lưu các phần tử của véc tơ đặc trưng 4096 chiều. Để phục vụ cho việc đánh giá độ chính xác của tra cứu ảnh, các cảnh trong tập ảnh đã được đánh nhãn nội dung ở tên ảnh và ghi vào cột “Content” (cột dữ liệu này chỉ phục vụ cho việc so sánh, đánh giá đúng sai ảnh kết quả được trả về, không sử dụng vào phần tra cứu ảnh). Cột “Path” lưu đường dẫn thư mục tới ảnh được trích xuất đặc trưng. Sau đó DataFrame này sẽ được lưu vào file features.csv. Mở bằng phần mềm Microsoft Excel, ta có thể thấy rõ được kết quả trích xuất đặc trưng và các thông tin đi kèm bên trên của ảnh.
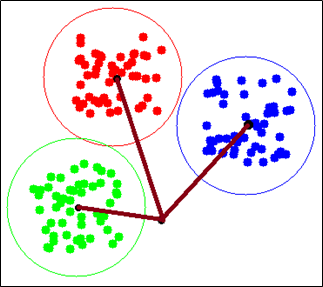
3.2 Phân cụm tập ảnh với Spectral clustering
Coi tập ảnh là một đồ thị, với mỗi đỉnh trên đồ thị ấy là một ảnh, độ tương tự giữa hai ảnh với nhau là cạnh nối giữa hai đỉnh. Cạnh càng ngắn chứng tỏ hai đỉnh càng gần nhau và hai ảnh đó càng giống nhau. Tập ảnh gồm nhiều nội dung, những ảnh có cùng nội dung thì có độ tưởng đồng giống nhau giống nhau và những đỉnh tương ứng trên đồ thị cũng gần nhau, tạo thành một cụm. Vậy nên ta được một đồ thị ứng với tập ảnh, đồ thị có các cụm bao gồm các đỉnh, tương ứng các nội dung với ảnh của chúng.
Và sau quá trình trích xuất, chúng ta sẽ có n véc tơ đặc trưng tương ứng với n ảnh trong tập ảnh. Biểu diễn dưới dạng đồ thị sẽ là n đỉnh của đồ thị G trong không gian 4096 chiều. Với đồ thị G này, cho vào model Spectral Clustering sẽ phân được các đỉnh trong G thành các cụm. Bằng việc biểu diễn đồ thị G sang ma trận kề, tính ma trận Laplacian, chọn ra k véc tơ riêng của ma trận Laplacian, thuật toán đã ánh xạ dữ liệu sang một chiều thấp hơn, có tính phổ (bởi các giá trị riêng) để phân cụm dễ dàng hơn với K-means sau đó. Từ các cụm đỉnh được phân, ta sẽ tính được tâm của mỗi cụm, phục vụ cho việc so sánh độ tương tự với ảnh truy vấn ở phần tiếp theo.
Đọc thêm về lý thuyết thuật toán Spectral Clustering: https://viblo.asia/p/tim-hieu-thuat-toan-phan-cum-spectral-clustering-RQqKLBp0l7z
- File data_cluster.py:
import numpy as np
import pandas as pd
from sklearn.neighbors import kneighbors_graph
from scipy import sparse
from sklearn.cluster import KMeans
from scipy import linalg

#load data
# load features
df= pd.read_csv('./static/feature/features.csv')

#phan cum features bang thuat toan spectral clustering

#tinh ma tran lalapcian
def generate_graph_laplacian(df, nn):
    # Adjacency Matrix.
    connectivity = kneighbors_graph(X=df, n_neighbors=nn, mode='connectivity')
    adjacency_matrix_w = (1/2)*(connectivity + connectivity.T)
    # Graph Laplacian.
    graph_laplacian_s = sparse.csgraph.laplacian(csgraph=adjacency_matrix_w, normed=False)
    graph_laplacian = graph_laplacian_s.toarray()
    return graph_laplacian

#tinh gia tri rieng, vector rieng

def compute_spectrum_graph_laplacian(graph_laplacian):
    eigenvals, eigenvcts = linalg.eig(graph_laplacian)
    eigenvals = np.real(eigenvals)
    eigenvcts = np.real(eigenvcts)
    return eigenvals, eigenvcts

#chon k vector rieng dau tien
def project_and_transpose(eigenvals, eigenvcts, num_ev):
    eigenvals_sorted_indices = np.argsort(eigenvals)
    indices = eigenvals_sorted_indices[: num_ev]

    proj_df = pd.DataFrame(eigenvcts[:, indices.squeeze()])
    proj_df.columns = ['v_' + str(c) for c in proj_df.columns]
    return proj_df

#phan cum voi kmeans
def run_k_means(df, n_clusters):
    k_means = KMeans(n_clusters=n_clusters)
    k_means.fit(df)
    cluster = k_means.predict(df)
    return cluster

#Spectral clustering
def spectral_clustering(df, n_neighbors, num_ev, n_clusters):
    graph_laplacian = generate_graph_laplacian(df, n_neighbors)
    eigenvals, eigenvcts = compute_spectrum_graph_laplacian(graph_laplacian)
    proj_df = project_and_transpose(eigenvals, eigenvcts, num_ev)
    cluster = run_k_means(proj_df, n_clusters)
    return cluster

# #phan cum tinh centroids
cluster = spectral_clustering(df=df[df.columns[0:4096]], n_neighbors=8,num_ev=30, n_clusters=40)
df['cluster'] = pd.Series(cluster, index=df.index)
Centroids = df.groupby(["cluster"]).mean()

# #save data
df.to_csv("./static/feature/clusters.csv", index = False)
Centroids.to_csv("./static/feature/centroids.csv", index = False)
Các ảnh sẽ được gán cụm bằng việc thêm một cột mới vào DataFrame có tên là “cluster”. DataFrame mới này sẽ được lưu vào file clusters.csv. Sau đó tính véc tơ đặc trưng của tâm mỗi cụm. Các véc tơ đặc trưng tâm cụm này sẽ được lưu vào file centroids.csv. Các dữ liệu này sẽ phục vụ cho việc tính khoảng cách Euclid với véc tơ đặc trưng của ảnh truy vấn.
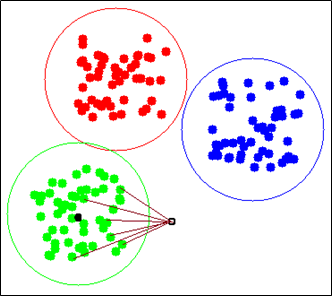
3.3 So sánh độ tương tự đặc trưng ảnh bằng độ đo Euclid
Sử dụng độ đo Euclid để tính khoảng cách giữa các tâm cụm và điểm ảnh truy vấn. Chọn lấy ra cụm mà tâm cụm khoảng cách ngắn nhất tới điểm ảnh truy vấn.
Sau khi tìm được cụm gần nhất với điểm ảnh truy vấn rồi. Chúng ta lần nữa sử dụng khoảng cách Euclid để tính khoảng cách giữ điểm ảnh truy vấn và các điểm trong cụm gần nhất đó. Sau đó sắp xếp lại các điểm trong cụm theo thứ tự tăng dần của khoảng cách tới điểm ảnh truy vấn. Mục đích để lấy ra tối đa 100 điểm có khoảng cách gần nhất. Và những điểm đó chính là những ảnh giống với ảnh truy vấn nhất, là kết quả của phương pháp tra cứu ảnh nhanh.
Hàm tra cứu ảnh và đánh giá kết quả trong file main.py:
from tensorflow.keras.models import  Model
from PIL import Image
import numpy as np
import pandas as pd
from tensorflow.keras.preprocessing import image
from tensorflow.keras.applications.vgg16 import VGG16, preprocess_input
from tensorflow.keras.models import  Model
from flask import Flask, request, render_template

# Ham tien xu ly, chuyen doi hinh anh thanh tensor
def image_preprocess(img):
    img = img.resize((224,224))
    img = img.convert("RGB")
    x = image.img_to_array(img)
    x = np.expand_dims(x, axis=0)
    x = preprocess_input(x)
    return x

# Ham trich xuat dac trung anh
def extract_vector(model, image_path):
    print("Xu ly : ", image_path)
    img = Image.open(image_path)
    img_tensor = image_preprocess(img)
    # Trich dac trung
    vector = model.predict(img_tensor)[0]
    # Chuan hoa vector = chia chia L2 norm (tu google search)
    vector = vector / np.linalg.norm(vector)
    return vector

# Ham tao model
def get_extract_model():
    vgg16_model = VGG16(weights="imagenet")
    extract_model = Model(inputs=vgg16_model.inputs, outputs = vgg16_model.get_layer("fc1").output)
    return extract_model

# Đọc vectors từ file csv
global_df_vectors = pd.read_csv('./static/feature/clusters.csv')
# Đọc centroids từ file csv
global_centroids = pd.read_csv('./static/feature/centroids.csv')

#Tra cứu ảnh và đánh giá
def evaluate(image_test, content_img_test, global_df_vectors, global_centroids):
  # Khoi tao model
  model = get_extract_model()
  # Trich dac trung anh search
  search_vector = extract_vector(model,image_test)
  # Đọc vectors từ file csv
  df_vectors = global_df_vectors
  # Đọc centroids từ file csv
  centroids = global_centroids
  # So sánh features của ảnh query với centroid features
  distance = np.linalg.norm(np.array(centroids[centroids.columns[0:4096]])- search_vector, axis=1)

  #Lấy tên cluster min
  min_cluster = list(distance).index(np.min(distance))

  #Lấy ra cluster giống với ảnh query được chọn
  df_vectors = df_vectors[df_vectors["cluster"]== min_cluster]
  #Ranking lại cluster
  distance = np.linalg.norm(np.array(df_vectors[df_vectors.columns[0:4096]])- search_vector, axis=1)
  df_vectors['distance'] = pd.Series(distance, index=df_vectors.index)
  df_vectors['rank'] = df_vectors['distance'].rank(ascending = 1)
  df_vectors = df_vectors.set_index('rank')
  df_vectors = df_vectors.sort_index()

  #Lấy ra cluster giống với ảnh query được chọn
  df_vect = df_vectors[df_vectors["cluster"]== min_cluster]
  #Ranking lại cluster
  distance = np.linalg.norm(np.array(df_vect[df_vect.columns[0:4096]])- search_vector, axis=1)
  df_vect['distance'] = pd.Series(distance, index=df_vect.index)
  df_vect['rank'] = df_vect['distance'].rank(ascending = 1)
  df_vect = df_vect.set_index('rank')
  df_vect = df_vect.sort_index()

  #Lấy ra kết quả tối đa  100 ảnh giống nhất với ảnh query trong cluster
  result = df_vect[0:100]
  #So sánh với nhãn để đánh giá true/false
  content_compare = []
  for content in result['Content']:
    if str(content) == content_img_test:
      content_compare.append(True)
    else:
      content_compare.append(False)
  result['Content_compare'] = pd.Series(content_compare, index=result.index)
  correct_result=content_compare.count(True)
  precision = correct_result/len(content_compare)
  print('Precision:',precision)
  return result,precision
3.4 Tạo web với Plask
Trong trang web tra cứu ảnh nhanh thì sử dụng chủ yếu 2 API RESTful là GET và POST của frame work Flask. Mục đích là để POST ảnh truy vấn và GET ảnh kết quả tìm kiếm và các thông số liên quan. Khi ảnh được người dùng tải lên ta lưu lại vào thư mục uploaded và tiến hành truy vấn. Sau đó gửi kết quả đến giao diện index.html để hiển thị.
- Code trong file main.py:
from urllib import request
from tensorflow.keras.models import  Model
from PIL import Image
import numpy as np
import pandas as pd
from tensorflow.keras.preprocessing import image
from tensorflow.keras.applications.vgg16 import VGG16, preprocess_input
from tensorflow.keras.models import  Model
from flask import Flask, request, render_template

# Ham tien xu ly, chuyen doi hinh anh thanh tensor
def image_preprocess(img):
    img = img.resize((224,224))
    img = img.convert("RGB")
    x = image.img_to_array(img)
    x = np.expand_dims(x, axis=0)
    x = preprocess_input(x)
    return x


# Ham trich xuat dac trung anh
def extract_vector(model, image_path):
    print("Xu ly : ", image_path)
    img = Image.open(image_path)
    img_tensor = image_preprocess(img)
    # Trich dac trung
    vector = model.predict(img_tensor)[0]
    # Chuan hoa vector = chia chia L2 norm (tu google search)
    vector = vector / np.linalg.norm(vector)
    return vector

# Ham tao model
def get_extract_model():
    vgg16_model = VGG16(weights="imagenet")
    extract_model = Model(inputs=vgg16_model.inputs, outputs = vgg16_model.get_layer("fc1").output)
    return extract_model

# Đọc vectors từ file csv
global_df_vectors = pd.read_csv('./static/feature/clusters.csv')
# Đọc centroids từ file csv
global_centroids = pd.read_csv('./static/feature/centroids.csv')

#Tra cứu ảnh và đánh giá
def evaluate(image_test, content_img_test, global_df_vectors, global_centroids):
  # Khoi tao model
  model = get_extract_model()
  # Trich dac trung anh search
  search_vector = extract_vector(model,image_test)
  # Đọc vectors từ file csv
  df_vectors = global_df_vectors
  # Đọc centroids từ file csv
  centroids = global_centroids
  # So sánh features của ảnh query với centroid features
  distance = np.linalg.norm(np.array(centroids[centroids.columns[0:4096]])- search_vector, axis=1)

  #Lấy tên cluster min
  min_cluster = list(distance).index(np.min(distance))

  #Lấy ra cluster giống với ảnh query được chọn
  df_vectors = df_vectors[df_vectors["cluster"]== min_cluster]
  #Ranking lại cluster
  distance = np.linalg.norm(np.array(df_vectors[df_vectors.columns[0:4096]])- search_vector, axis=1)
  df_vectors['distance'] = pd.Series(distance, index=df_vectors.index)
  df_vectors['rank'] = df_vectors['distance'].rank(ascending = 1)
  df_vectors = df_vectors.set_index('rank')
  df_vectors = df_vectors.sort_index()

  #Lấy ra cluster giống với ảnh query được chọn
  df_vect = df_vectors[df_vectors["cluster"]== min_cluster]
  #Ranking lại cluster
  distance = np.linalg.norm(np.array(df_vect[df_vect.columns[0:4096]])- search_vector, axis=1)
  df_vect['distance'] = pd.Series(distance, index=df_vect.index)
  df_vect['rank'] = df_vect['distance'].rank(ascending = 1)
  df_vect = df_vect.set_index('rank')
  df_vect = df_vect.sort_index()

  #Lấy ra kết quả tối đa  100 ảnh giống nhất với ảnh query trong cluster
  result = df_vect[0:100]
  #So sánh với nhãn để đánh giá true/false
  content_compare = []
  for content in result['Content']:
    if str(content) == content_img_test:
      content_compare.append(True)
    else:
      content_compare.append(False)
  result['Content_compare'] = pd.Series(content_compare, index=result.index)
  correct_result=content_compare.count(True)
  precision = correct_result/len(content_compare)
  print('Precision:',precision)
  return result,precision

#build web Flask
app = Flask(__name__)
@app.route('/', methods=['GET', 'POST'])

def index():
    if request.method == 'POST':
        file = request.files['query_img']
        # Save query image
        img = Image.open(file)  # PIL image
        uploaded_img_path = "static/uploaded/"+ file.filename
        img.save(uploaded_img_path)
        # lấy content là 3 kí tự đầu của tên query image để evaluate kết quả
        content_image = file.filename[0:3]
        result, ps = evaluate(uploaded_img_path, content_image, global_df_vectors, global_centroids)
        # Lấy kết quả và gửi đến html
        rs = result[['Path','Content_compare']]
        rs = rs.to_records(index=False)
        rs = list(rs)
        precision = "Precision: "+str(ps)
        return render_template('index.html',
                            query_path=uploaded_img_path,
                            scores=rs,
                            precision = precision)
    else:
        return render_template('index.html')

if __name__=="__main__":
    app.run(host='127.0.0.1', port=8080, debug=True)
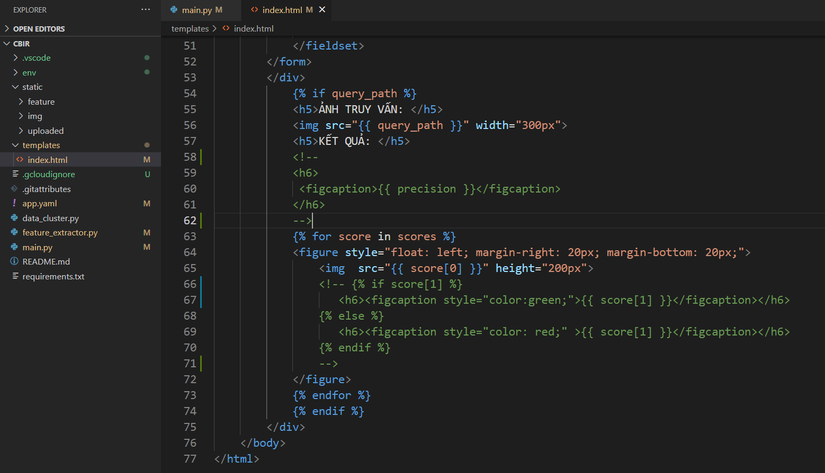
- Code trong file index.html:
<!doctype html>
<html>
    <head>
        <title>Tra cứu ảnh</title>
        <link href="//maxcdn.bootstrapcdn.com/bootstrap/4.1.1/css/bootstrap.min.css" rel="stylesheet" id="bootstrap-css">
        <link rel="stylesheet" href="https://use.fontawesome.com/releases/v5.7.0/css/all.css" integrity="sha384-lZN37f5QGtY3VHgisS14W3ExzMWZxybE1SJSEsQp9S+oqd12jhcu+A56Ebc1zFSJ" crossorigin="anonymous">
        <script src="//maxcdn.bootstrapcdn.com/bootstrap/4.1.1/js/bootstrap.min.js"></script>
        <script src="//cdnjs.cloudflare.com/ajax/libs/jquery/3.2.1/jquery.min.js"></script>
        <meta name="viewport" content="width=device-width, initial-scale=1">
        <style>
            header {
                padding-top:50px;
                text-align: center;
                padding-bottom:30px;
                color: indigo;

            }
            h5{
                padding-top:20px;
                padding-bottom:5px;
                color: indigo;
            }
            body{
                background-color: lavender;
            }
        </style>
    </head>
    <body>
        <div class="container">
        <header><h2>TRA CỨU ẢNH <i class="fas fa-search"></i></h2></header>
        <div class="container" style="margin-left:26%" >
            <form id="fileUploadForm"
                method="POST"
              enctype="multipart/form-data">
            <fieldset>
                <div class="form-horizontal">
                    <div class="form-group">
                        <div class="row">
                        <div class=".col-md-10">
                                <div class="input-group">
                                    <input type="hidden" id="filename" name="filename" value="">
                                    <input type="file" id="uploadedFile" name="query_img" class="form-control form-control-sm">
                                    <div class="input-group-btn">
                                        <input type="submit" value="Tra cứu" class="rounded-0 btn btn-primary">
                                    </div>
                                </div>
                        </div>
                        </div>
                    </div>
                </div>
            </fieldset>
        </form>
        </div>
            {% if query_path %}
            <h5>ẢNH TRUY VẤN: </h5>
            <img src="{{ query_path }}" width="300px">
            <h5>KẾT QUẢ: </h5>
            <h6>
             <figcaption>{{ precision }}</figcaption>
            </h6>
            {% for score in scores %}
            <figure style="float: left; margin-right: 20px; margin-bottom: 20px;">
                <img  src="{{ score[0] }}" height="200px">
                {% if score[1] %}
                   <h6><figcaption style="color:green;">{{ score[1] }}</figcaption></h6>
                {% else %}
                   <h6><figcaption style="color: red;" >{{ score[1] }}</figcaption></h6>
                {% endif %}
            </figure>
            {% endfor %}
            {% endif %}
        </div>
    </body>
</html>
Các bạn có thể xem toàn bộ code của project:https://github.com/nguyenthuy1681999/CBIR.git
4. Kết quả
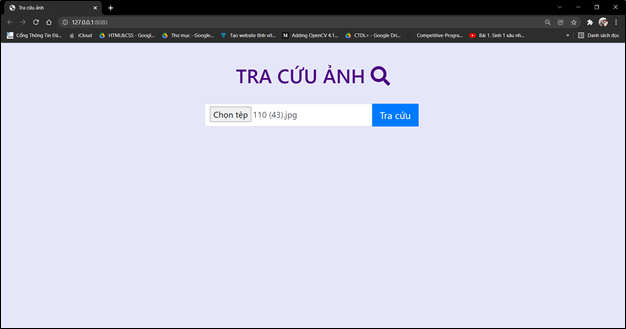
Chạy lệnh: python main.py để run code.
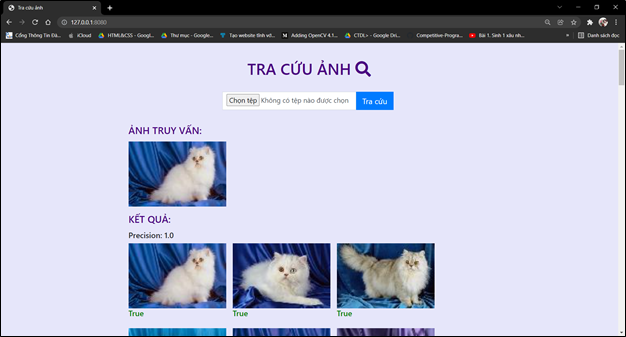
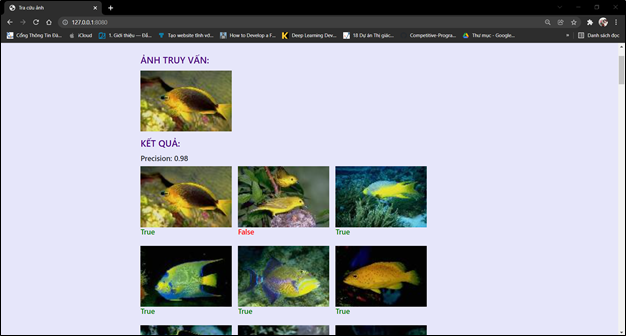
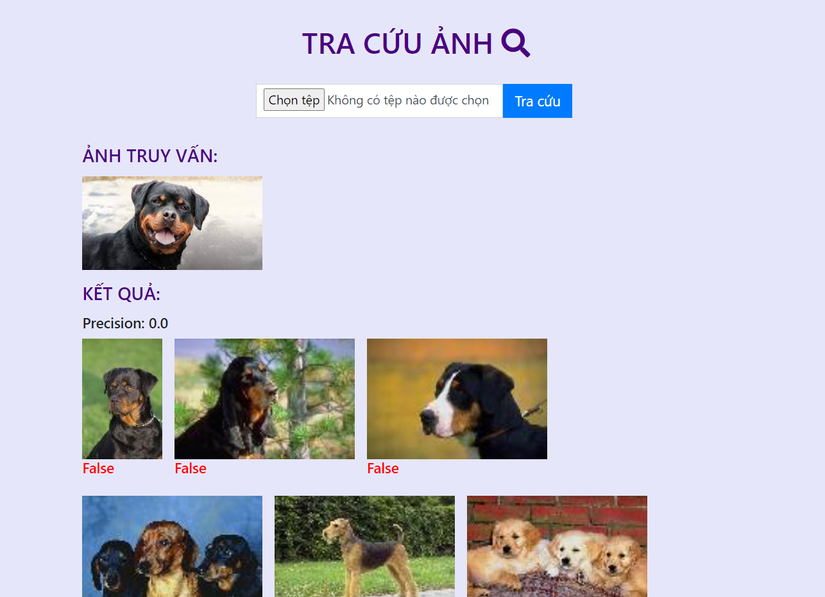
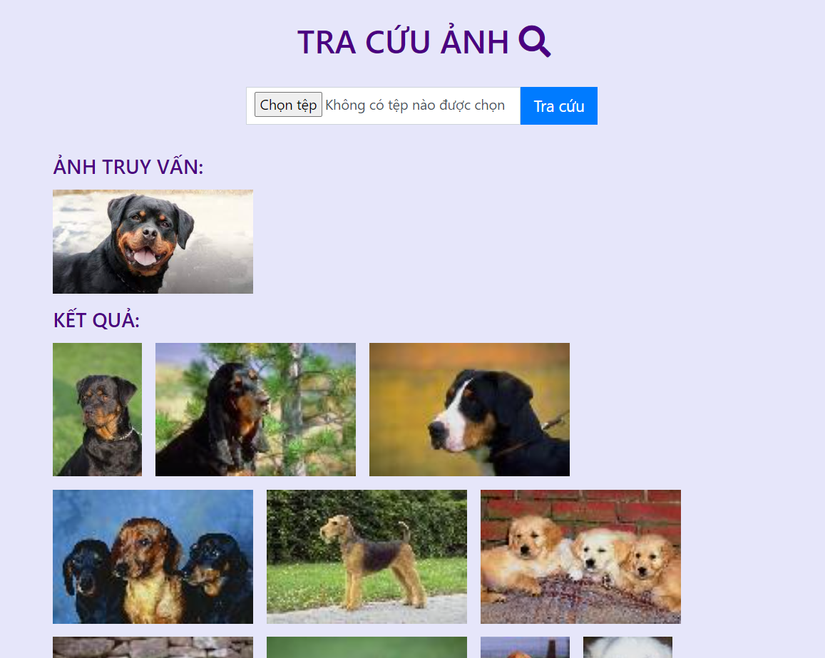
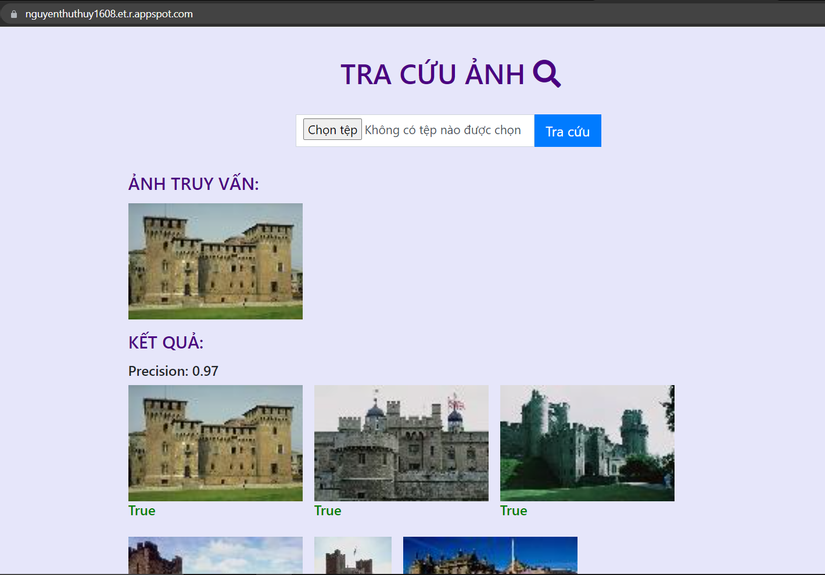
Các ảnh trong tập ảnh thực nghiệm đã được gán nhãn, nên khi lấy ảnh trong tập thực nghiệm truy vấn, trang web có thể đánh giá kết quả ảnh trả về dựa theo nhãn với ảnh truy vấn. Kết quả tra cứu ảnh ở đây sẽ gồm 2 phần:
1. Các ảnh trả về có nội dung giống với ảnh truy vấn(tối đa 100 ảnh)
2. Độ chính xác (precision) của các ảnh trả về.
- Độ chính xác = (Ảnh trả về đúng)/(Tổng số ảnh trả về)
- Ảnh trả về có kết quả đúng sẽ được đánh dấu True (màu xanh) và ngược lại sai sẽ là False (màu đỏ).
![image.png]()
![image.png]()
![image.png]()
Nếu không dùng ảnh trong tập ảnh thực nghiệm làm ảnh truy vấn thì ta sẽ không hiển thị được phần đánh giá chính xác true/false và precision vì chưa được gán nhãn nội dung, tuy nhiên các ảnh trả về vẫn đúng nội dung. Kết quả sẽ như sau:
![image.png]()
Ta có thể tắt phần này đi bằng cách comment lại hiển thị tại index.html. Kết quả chỉ trả về các ảnh:
![image.png]()
![image.png]()
5 Triển khai web với Google App Engine
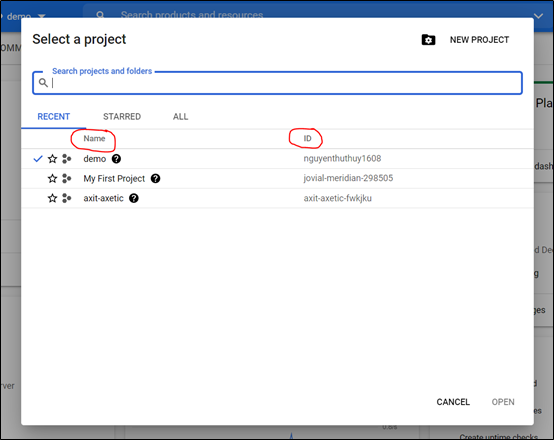
Để triển khai website bằng Google App Engine thì trước hết thì phải có tài khoản Google Cloud Account. Đầu tiên, vào trang Google Cloud Platform để bắt đầu tạo một dự án với tên dự án và ID như sau:
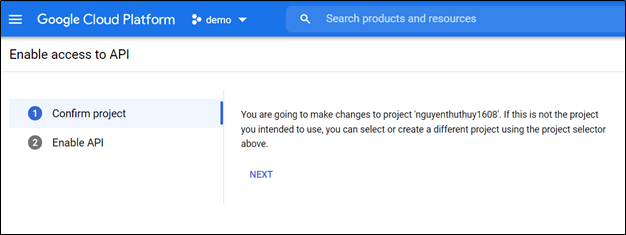
Bước thứ hai, bật Cloud Build API để cho phép truy cập vào API:
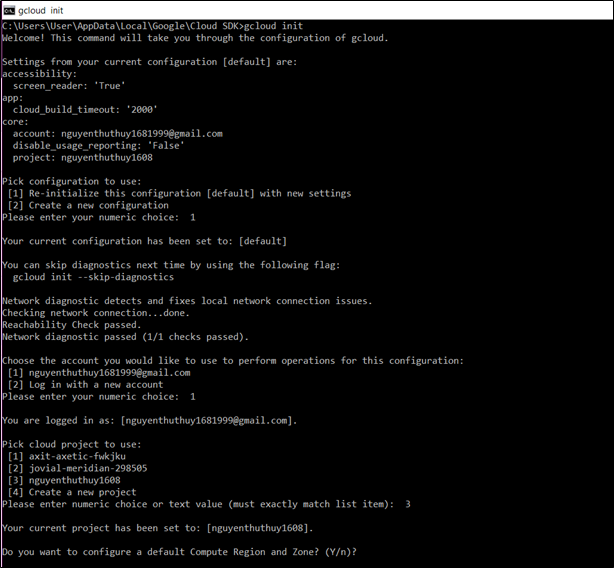
Bước thứ ba, cài đặt và khởi tạo Cloud SDK, chạy lệnh gcloud gcloud app create để bật App Engine và tạo các tài nguyên ứng dụng được liên kết. Chọn đúng ID của dựa án đã tạo trên Google Cloud Platform.
Bước thứ 4, cấu hình dịch vụ web cho App Engine. Để triển khai dịch vụ web của bạn cho App Engine, ta cần có một file app.yaml . File cấu hình này xác định cài đặt dịch vụ web của chúng ta cho App Engine. Tạo file app.yaml trong thư mục gốc của dự án:
# Copyright 2021 Google LLC
#
# Licensed under the Apache License, Version 2.0 (the "License");
# you may not use this file except in compliance with the License.
# You may obtain a copy of the License at
#
#      http://www.apache.org/licenses/LICENSE-2.0
#
# Unless required by applicable law or agreed to in writing, software
# distributed under the License is distributed on an "AS IS" BASIS,
# WITHOUT WARRANTIES OR CONDITIONS OF ANY KIND, either express or implied.
# See the License for the specific language governing permissions and
# limitations under the License.

runtime: python
env: flex
entrypoint: gunicorn -b :$PORT main:app

runtime_config:
  python_version: 3

# This sample incurs costs to run on the App Engine flexible environment.
# The settings below are to reduce costs during testing and are not appropriate
# for production use. For more information, see:
# https://cloud.google.com/appengine/docs/flexible/python/configuring-your-app-with-app-yaml
manual_scaling:
  instances: 1
resources:
  cpu: 1
  memory_gb: 4
  disk_size_gb: 20
Cuối cùng, triển khai website bằng lệnh gcloud app deploy từ thư mục gốc của dự án, nơi chưa file cấu hình app.yaml.
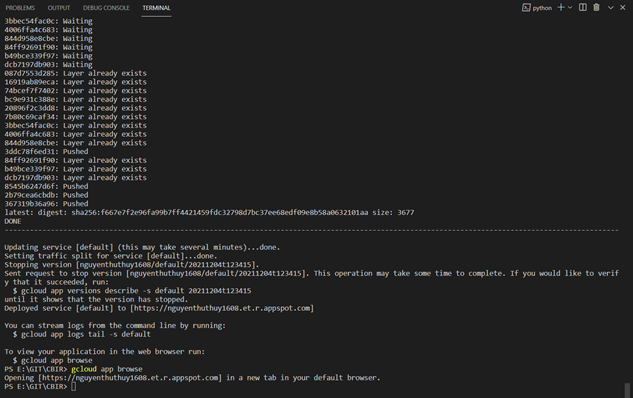
Sau khi triển khai thành công được website, có thể click trực tiếp vào link URL của website hoặc gõ lệnh gcloud app browse để mở trang web trong trình duyệt. Tên miền: nguyenthuthuy1608.et.r.appspot.com ở đây chính là ID “nguyenthuthuy1608” của dự án mà ta tạo trên Google Cloud Platform và “et.r.appspot.com”.
Nguồn: viblo.asia