Mở bài
Hello anh em, hôm nay mình tiếp tuc series Xây dựng app chat realtime với VueJS - NodeJS - Express - SocketIO
Ở phần trước mình đã thực hiện login thành công, phần này mình sẽ cùng anh em xử lý phần chat private nhé.
Phần này mình sẽ chia thành 2 bước:
- Bước 1. Hiện danh sách người tham gia.
- Bước 2. Chat private.
OKE, bắt đầu thôi !
Thân bài
Hiện danh sách người tham gia.
Ở phần xử lý login phía backend từ phần 1, khi user login, server sẽ gửi lại thông tin user kèm socketId mới tạo. Bây giờ ta sẽ sửa lại, ngoài việc gửi thông tin user về, ta sữ gửi thêm danh sách người tham gia về cho client.
Chuẩn bị template
Home.vue
<template><v-main><v-containerfluidclass="home-screen"><v-rowclass="home-screen__row"><v-colclass="d-flex flex-column left-box"cols="4"><div><h2class="title">Friends</h2></div><v-rowclass="friends-box"><v-colcols="12"><v-listdenseclass="friends_list"><v-list-item-groupv-model="selectedFriend"><v-list-itemv-for="(friend, index) in friends":key="friend.socketId":value="friend"class="friend-info"><v-list-item-icon><v-iconv-text="index"></v-icon></v-list-item-icon><v-list-item-content><v-list-item-titlev-text="friend.username"></v-list-item-title></v-list-item-content></v-list-item></v-list-item-group></v-list></v-col></v-row></v-col><v-colclass="d-flex flex-column right-box"cols="8"><!-- right --></v-col></v-row></v-container></v-main></template><script>exportdefault{data(){return{
selectedFriend:null,
friends:[{
socketId:1,
username:"username1",},{
socketId:2,
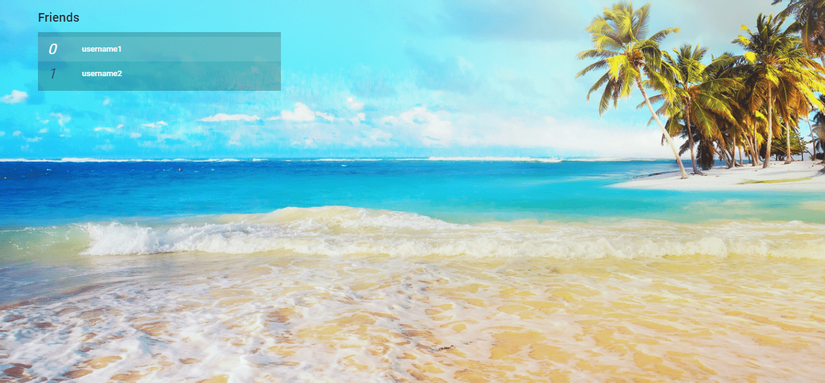
username:"username2",},],};},};</script><stylescoped>main{background-image:url("https://www.wallpaperbetter.com/wallpaper/555/606/469/sea-sky-beach-2K-wallpaper.jpg");background-repeat: no-repeat;background-size: cover;background-position: center;height: 100vh;}.home-screen{padding: 0;height: 100%;max-width: 1264px;}.home-screen__row{margin: 0;height: 100%;max-width: 1264px;}.left-box{height: 100%;}.title{height: 30px;}.friends-box{overflow: auto;margin-top: 10px;margin-bottom: 10px;}.friends-box > .col{padding-top: 0;padding-bottom: 0;}.friends_list{background-color: #0000003b !important;}.friend-info{color: white !important;height: 40px;}</style>Chúng ra có mục Friends có 2 friends mẫu như thế này:
Gửi danh sách người tham gia
- Backend
Gửi danh sách người tham gia cho user vừa mới đăng nhập:
configs/socket.js
io.on("connect", (socket) => {
+ let users = [];
+ // Get all users connected except user(sender)
+ for (let [id, s] of io.of("/").sockets) {
+   if (id !== socket.id) {
+     const user = {
+       socketId: id,
+       username: s.handshake.auth.username,
+     };
+     users.push(user);
+   }
+ }
 // User
 const user = {
   socketId: socket.id,
   username: socket.handshake.auth.username,
 };
 // when connected, send user info to user
 socket.emit("USER_INFO", user);
+ // and send friends list
+ socket.emit("FRIENDS_LIST", users);
});
- Frontend
Thêm mới action, mutation set danh sách bạn bè, thêm getter lấy danh sách bạn bè
store.js
const store = new Vuex.Store({
 plugins: [websocketPlugin],
 state: {
   user: null,
   friends: [],
 },
 mutations: {
   setUser(state, user) {
     state.user = user;
   },
+   setFriends(state, friends) {
+     state.friends.push(...friends);
+   },
 },
 actions: {
   LOGIN({ commit }, user) {
     commit("setUser", user);
   },
+   SET_FRIENDS({ commit }, friends) {
+     commit("setFriends", friends);
+   },
 },
 getters: {
   user(state) {
     return state.user;
   },
+   friends(state) {
+     return state.friends;
+   },
 },
});
Set danh sách bạn bè vào Vuex store sau khi nhận được từ backend:
socket/socket.js
function createWebSocketPlugin(socket) {
 return (store) => {
   store.$socket = socket;
   // Khi socket server gửi thông tin user về thì lưu vào Vuex store
   socket.on("USER_INFO", (user) => store.dispatch("LOGIN", user));
+   socket.on("FRIENDS_LIST", (friends) => {
+     store.dispatch("SET_FRIENDS", friends);
+   });
 };
}
Lấy dữ liệu từ Vuex store để hiển thị lên view:
Home.vue
<script>
export default {
 data() {
   return {
     selectedFriend: null,
-     friends: [
-       {
-         socketId: 1,
-         username: "username1",
-       },
-       {
-         socketId: 2,
-         username: "username2",
-       },
-     ],
   };
 },
+  computed: {
+    friends() {
+      return this.$store.getters.friends;
+    },
};
</script>
Như vậy khi user kết nối đã lấy được danh sách người đang online, nhưng những người đang online vẫn chưa thấy được user đó.
- Backend
configs/socket.js
 io.on("connect", (socket) => {
   let users = [];
   // Get all users connected except user(sender)
   for (let [id, s] of io.of("/").sockets) {
     if (id !== socket.id) {
       const user = {
         socketId: id,
         username: s.handshake.auth.username,
       };
       users.push(user);
     }
   }
   // User
   const user = {
     socketId: socket.id,
     username: socket.handshake.auth.username,
   };
   // when connected, send user info to user
   socket.emit("USER_INFO", user);
   // and send friends list
   socket.emit("FRIENDS_LIST", users);
+   // send user info to other user connected
+   socket.broadcast.emit("FRIEND_CONNECTED", user);
 });
- Frontend
store.js
const store = new Vuex.Store({
 plugins: [websocketPlugin],
 state: {
   user: null,
   friends: [],
 },
 mutations: {
   setUser(state, user) {
     state.user = user;
   },
   setFriends(state, friends) {
     state.friends.push(...friends);
   },
+   addFriend(state, friend) {
+     state.friends.push(friend);
+   },
 },
 actions: {
   LOGIN({ commit }, user) {
     commit("setUser", user);
   },
   SET_FRIENDS({ commit }, friends) {
     commit("setFriends", friends);
   },
+   ADD_FRIEND({ commit }, friend) {
+     commit("addFriend", friend);
+   },
 },
 getters: {
   user(state) {
     return state.user;
   },
   friends(state) {
     return state.friends;
   },
 },
});
socket.js
function createWebSocketPlugin(socket) {
 return (store) => {
   store.$socket = socket;
   // Khi socket server gửi thông tin user về thì lưu vào Vuex store
   socket.on("USER_INFO", (user) => store.dispatch("LOGIN", user));
   socket.on("FRIENDS_LIST", (friends) => {
     store.dispatch("SET_FRIENDS", friends);
   });
+   socket.on("FRIEND_CONNECTED", (friend) => {
+     store.dispatch("ADD_FRIEND", friend);
+   });
 };
}
Kết quả

Chat private
Demo
Giao diện
Home.vue
<template>>
 <v-col class="d-flex flex-column right-box" cols="8">
-   <!-- right -->
+   <div class="message-box">
+     <!-- message-box -->
+   </div>
+   <v-form
+     @submit.prevent="send"
+     class="d-flex flex-row align-center chat-box"
+   >
+     <v-text-field
+       label="Message"
+       placeholder="Message"
+       solo
+       hide-details="auto"
+       v-model="input"
+     ></v-text-field>
+     <v-btn
+       type="submit"
+       class="chat-box__button-send"
+       elevation="2"
+       large
+       >Send</v-btn
+     >
+   </v-form>
 </v-col>
</template>
<style>
+ .message-box {
+   height: 100%;
+   margin: 10px 0;
+   overflow: auto;
+   background-color: #0000003b;
+ }
+ .chat-box {
+   height: 48px;
+ }
+ .chat-box__button-send {
+  height: 48px !important;
+ }
+ .message {
+   display: flex;
+   margin: 10px 20px;
+ }
+ .message-text {
+   padding: 5px 10px;
+   color: white;
+   border-radius: 15px;
+   background-color: #718093;
+   display: flex;
+   max-width: 70%;
+ }
+ .user-message-text {
+   background-color: #2980b9 !important;
+   margin-left: auto;
+ }
</style>
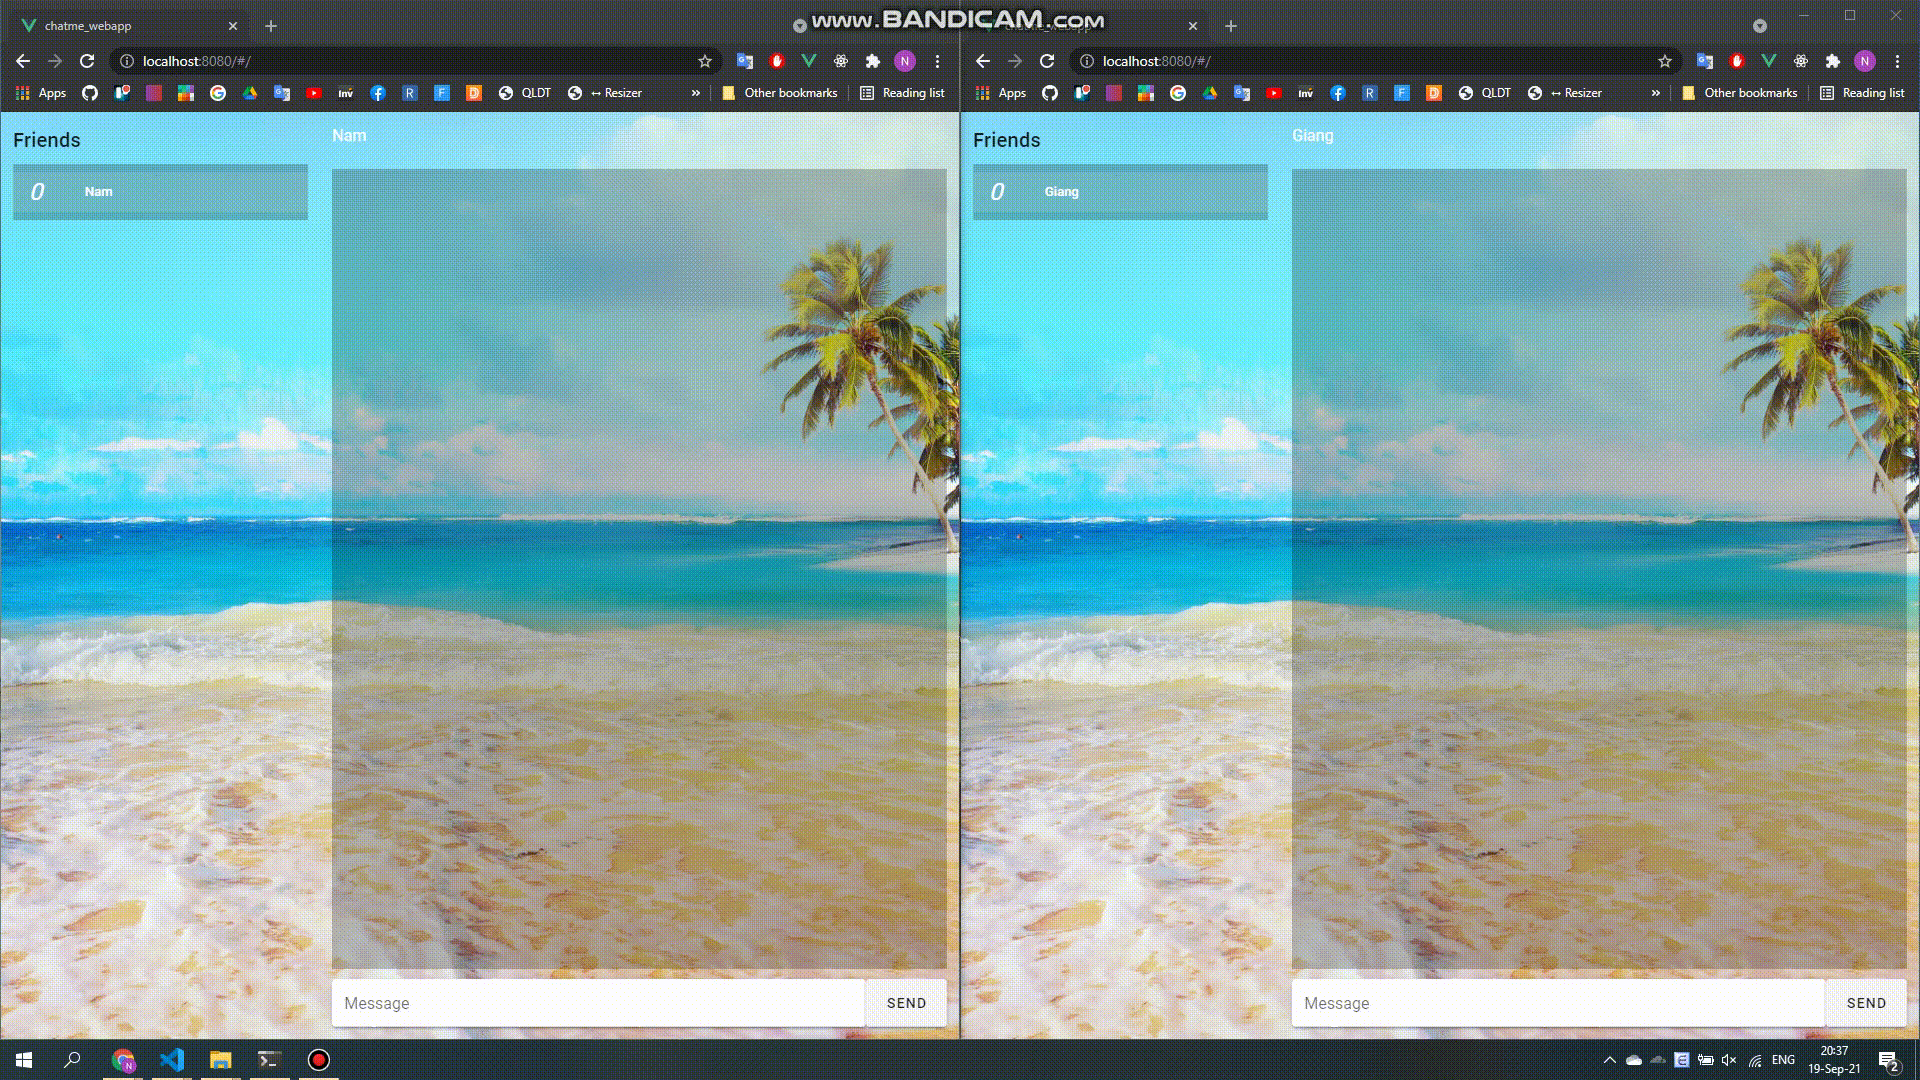
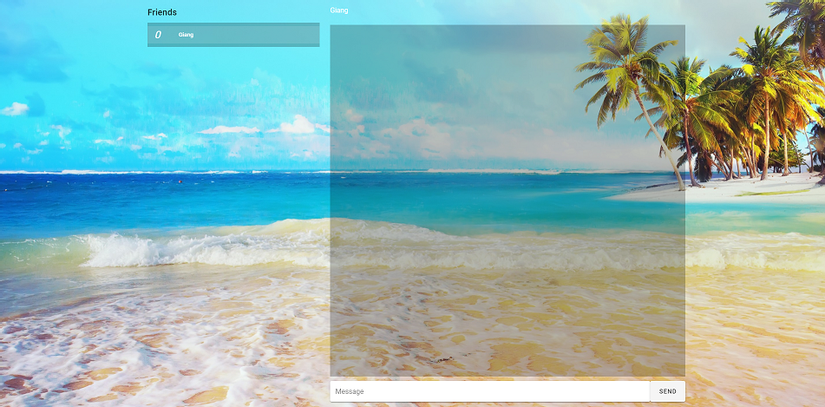
Khi click chọn 1 friend trong list, ta sẽ có giao diện khung chat như thế này
Workflow chat

Frontend gửi tin nhắn
Home.vue
<script>
 export default {
   data() {
     return {
+       input: "",
     };
   },
+   methods: {
+     send() {
+       if (!this.input.length) return;
+       const message = {
+         content: this.input,
+         to: this.selectedFriend.socketId,
+         from: this.user.socketId,
+       };
+       this.$store.dispatch("SEND_MESSAGE", message);
+      this.input = "";
+     },
+   },
+ },
 computed:{
+   user() {
+     return this.$store.getters.user;
+   },
 }
</script>
store/store.js
const store = new Vuex.Store({
 mutations: {
+   addNewMessage(state, message) {
+     const friends = [...state.friends];
+     let receiverIndex = friends.findIndex(
+       (friend) => friend.socketId === message.to
+     );
+     const messages = friends[receiverIndex].messages || [];
+    messages.push(message);
+     friends[receiverIndex].messages = messages;
+    state.friends = friends;
+   },
 },
 actions: {
+   SEND_MESSAGE({ commit }, message) {
+     this.$socket.emit("PRIVATE_MESSAGE", message);
+     commit("addNewMessage", message);
+   },
 },
});
Backend chuyển tin nhắn cho người nhận
configs/socket.js
io.on("connect", (socket) => {
+ socket.on("PRIVATE_MESSAGE", ({ from, content, to }) => {
+   io.to(to).emit("PRIVATE_MESSAGE", {
+     from,
+     content,
+     to,
+   });
+ });
});
Phía client lưu lại tin nhắn nhận được từ backend
store/store.js
const store = new Vuex.Store({
 mutations: {
+    receiveMessage(state, message) {
+      const friends = [...state.friends];
+      const senderIndex = friends.findIndex(
+        (friend) => friend.socketId === message.from
+      );
+      const messages = friends[senderIndex].messages || [];
+     messages.push(message);
+      friends[senderIndex].messages = messages;
+      state.friends = friends;
+    },
 },
 actions: {
+    RECEIVE_MESSAGE({ commit }, message) {
+      commit("receiveMessage", message);
+    },
 },
 getters: {
+    messagesWithFriend(state) {
+      return (socketId) => {
+        const friend = state.friends.find(
+          (friend) => friend.socketId === socketId
+        );
+        if (!friend) {
+          return [];
+        }
+        return friend.messages;
+      };
+    },
 },
});
socket/socket.js
function createWebSocketPlugin(socket) {
 return (store) => {
+   socket.on("PRIVATE_MESSAGE", (message) => {
+     store.dispatch("RECEIVE_MESSAGE", message);
+   });
 };
}
Hiển thị ra view
<template>
 <v-col class="d-flex flex-column right-box" cols="8">
+   <div class="message-box">
+     <div
+       :class="{ message: true }"
+       v-for="message in messages"
+       :key="message.socketId"
+     >
+       <span
+         :class="{
+                 'message-text': true,
+                 'user-message-text': isYourMessage(message),
+               }"
+       >
+         {{ message.content }}
+       </span>
+     </div>
+   </div>
 </v-col>
</template>
<script>
 methods:{
+   isYourMessage(message) {
+     return message.from === this.user.socketId;
+   },
 },
 computed: {
+   messages() {
+     if (!this.selectedFriend) return;
+     const friendSocketId = this.selectedFriend.socketId;
+     return this.$store.getters.messagesWithFriend(friendSocketId);
+   },
 },
</script>
Kết bài
Vậy là ở phần này mình đã chia sẻ cho mọi người phần chat private.
Hẹn gặp lại mọi người ở phần sau nhé.
Nguồn: viblo.asia