Chào mọi người
Bài viết này sẽ hướng dẫn các bạn tạo một dứng dụng Nodejs với TypeORM và GraphQL bằng Typescript
1. Giới thiệu
- Nodejs thì hiện khá phổ biến hiện nay, nó được xây dựng dựa trên JavaScript runtime. Trước khi bắt đầu mọi thứ thì bạn hãy download về và cài đặt vào máy nhé
- TypeORM là một ORM library, dùng để xây dựng các model trong cở sở dữ liệu cũng như việc tương tác với chúng
- Expressjs là một framework dùng để xây dựng ứng dụng Nodejs.
- Typescript là một phiên bản nâng cao của Javascript, nó bổ sung kiểu, lớp và hướng đối tượng giúp cho bạn code dễ hơn và tránh sai sót các lỗi về kiểu
- GraphQL là ngôn ngữ truy vấn các API. Nó cho phép phía client-side chỉ lấy các field cần thiết để xử lý trên Front-end
- TypeGraphQL Khi bạn sử dụng lib này, bạn không cần định nghĩa các schema theo cách thông thường như ở đây, chúng ta sẽ dùng các decorator trực tiếp trên model để GraphQL hiểu các schema của chúng ta
2. Yêu cầu hệ thống
- Node.js 12.0 trở lên
- MacOS, Windows (bao gồm WSL), và Linux cũng được hỗ trợ
3. Bắt đầu
3.1 Khởi tạo project
Sau khi cài đặt Nodejs, bạn tạo 1 folder rỗng và dùng command line gõ lệnh npm init để tạo file tạo file package.json
3.2 Cấu hình Typescript
Đâu tiền bạn gõ các lệnh sau để cài đặt các package dùng để build Typescript
npm i --save-dev npm-run-all tsc tsc-watch rimraf
npm install typescript
Sau đó, bạn tạo file tsconfig.json trong root folder với nội dung cấu hình như bên dưới
{"compilerOptions":{"target":"es6","module":"commonjs","lib":["dom","es6",]/* Specify library files to be included in the compilation. */,"sourceMap":true/* Generates corresponding '.map' file. */,"outDir":"dist"/* Redirect output structure to the directory. */,"rootDir":"src"/* Specify the root directory of input files. Use to control the output directory structure with --outDir. */,/* Module Resolution Options */"moduleResolution":"node"/* Specify module resolution strategy: 'node' (Node.js) or 'classic' (TypeScript pre-1.6). */,"experimentalDecorators":true/* Enables experimental support for ES7 decorators. */,"emitDecoratorMetadata":true/* Enables experimental support for emitting type metadata for decorators. */,"skipLibCheck":true,"esModuleInterop":true},"compileOnSave":true,"exclude":["node_modules"],"include":["src/**/*.ts"]}- Property
includechỉ đường dẫn các file ts sẽ được compile,outDirlà chỉ đường các file js được compile ra, bạn có thể sửa chổ này theo cách của bạn, còn không thì xài mặc định như mình. rootDirchỉ ra root folder của tất cả files ts. Ở đây là thư mục src, vì thế bạn hãy tạo folder này trong thư mục root của bạncompileOnSave: truesẽ tự động build lại các file ts của bạn sau khi save
Xem thêm tại https://www.typescriptlang.org/tsconfig
Bạn mở file package.json, và update lại thuộc tính scripts như sau, Lưu ý là chỉ update chổ thuộc tính scripts thôi nha
"scripts":{"test":"echo "Error: no test specified" && exit 1","clean":"rimraf dist/*","tsc":"tsc","dev":"npm-run-all build watch","build":"npm-run-all clean tsc","watch":"tsc-watch --onSuccess "node dist/index" --onFailure "echo Beep! Compilation Failed" --compiler typescript/bin/tsc"}3.3 Tạo Models bằng TypeORM
3.3.1 Cài đặt
Bạn gõ các lệnh sau để cài đặt các package liên quan
npm i mysql reflect-metadata [email protected]^0.8.0 [email protected]^0.2.37 [email protected]^0.2.3
npm i --save-dev @types/mysql
3.3.2 Tạo models
Product: Bạn tạo file src/models/Product.ts với nội dung như sau
import{
  Column,
  CreateDateColumn,
  Entity,
  PrimaryGeneratedColumn,
  Unique,
  UpdateDateColumn,
  ManyToOne,
JoinColumn,}from"typeorm";import{ Category }from"./Category";@Entity()@Unique(["code"])exportclassProduct{@PrimaryGeneratedColumn()publicreadonly id!:number;@Column({ type:"varchar"})public code!:string;@Column({ type:"varchar"})public name!:string;@CreateDateColumn()public createdAt!: Date;@UpdateDateColumn()public updatedAt!: Date;@ManyToOne((_type)=> Category,(category: Category)=> category.id)@JoinColumn({ name:"categoryId"})public category!: Category;}@Entitybáo cho TypeORM biết đây là 1 bảng trong db, có nhiều options trong decorator này nhưng mình chỉ sử dụng mặc định@PrimaryGeneratedColumnkhoá chính tự động tăng dần@Columnđịnh nghĩa các thuộc tính của cột trong bảng@Uniquexác định cột code sẽ là có giá trị duy nhất trong toàn bộ db@ManyToOnethể hiện mối quan hệ N-1 (nhiều Product thuộc một Category) với khoá ngoại làcategoryIdđược định nghĩa bằng@JoinColumn
Category: Bạn tạo file src/models/Category.ts với nội dung như sau
import{
  Column,
  CreateDateColumn,
  Entity,
  PrimaryGeneratedColumn,
  Unique,
  UpdateDateColumn,
OneToMany,}from"typeorm";import{ Product }from"./Product";@Entity()@Unique(["code"])exportclassCategory{@PrimaryGeneratedColumn()publicreadonly id!:number;@Column({ type:"varchar"})public code!:string;@Column({ type:"varchar"})public name!:string;@CreateDateColumn()public createdAt!: Date;@UpdateDateColumn()public updatedAt!: Date;@OneToMany((_type)=> Product,(product: Product)=> product.category)public products?: Product[];}- Các cú pháp tương tự Product nhé
@OneToManythể hiện mối quan hệ 1-N, nên property này có kiểuarray
Xem thêm tại https://typeorm.io/#/entities
3.3.3 Kết nối database
Bạn tạo file ormconfig.ts ở root folder với nội dung như sau
module.exports ={
  type:"mysql",
  host:"localhost",
  port:3306,
  username:"root",
  password:"root",
  database:"typeorm-graphql-typescript",
  synchronize:true,
  logger:"advanced-console",
  logging: process.env.NODE_ENV==="production"?["error","warn"]:"all",
  cache:true,
  dropSchema:false,
entities:["dist/models/*.js"],};- Thuộc tính entities chỉ đường dẫn tới các file models đã được chuyển đổi sang js nên ở đây bạn thấy đường dẫn bắt đầu từ thư mục
dist. Để thay đổi đường dẫn các file build js, thì bạn update lại thuộc tínhoutDirtrong filetsconfig.json, còn không cứ xài mặc định như mình synchronize: truekhi bạn thêm/xoá thuộc tính trong class Product/Category, TypeORM sẽ modify các table trong db của bạn. Nên setfalsekhi deploy to production để tránh ảnh hưởng db
Xem thêm tại https://typeorm.io/#/using-ormconfig
3.3.4 Test db connection
Bạn tạo file src/index.ts với nội dung như sau
import"reflect-metadata";import{ Container }from"typedi";import*as TypeORM from"typeorm";// register 3rd party IOC container
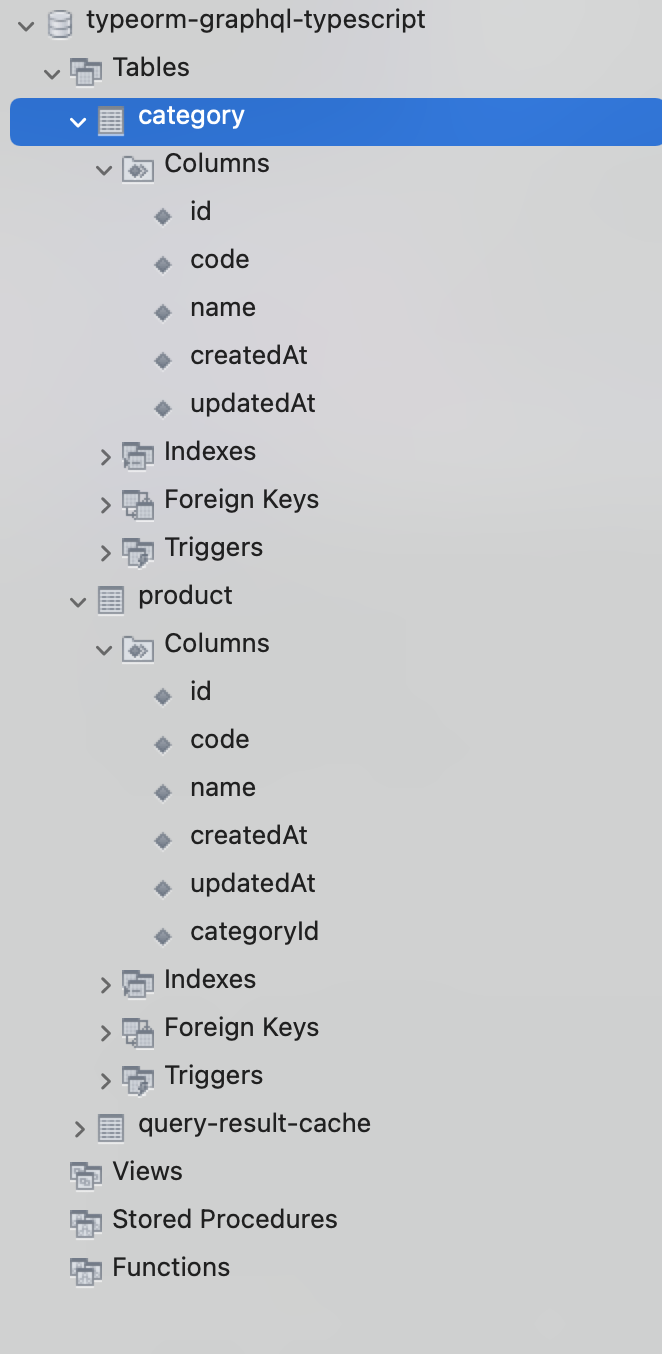
TypeORM.useContainer(Container);constbootstrap=async()=>{try{// create TypeORM connectionawait TypeORM.createConnection();}catch(err){console.error(err);}};bootstrap();Sau đó run npm run dev để chạy ứng dụng. Mở db lên bạn sẽ thấy 2 bảng Product & Category xuất hiện
3.4 Cấu hình GraphQL
3.4.1 Cài đặt
Bạn gõ các lệnh sau để cài đặt các package liên quan
npm i express graphql type-graphql [email protected]^2.9.16 class-validator
npm i --save-dev @types/express @types/graphql
3.4.2 Tạo lược đồ
Bạn update lại model Category như sau
import{ Field, ObjectType }from"type-graphql";import{
  Column,
  CreateDateColumn,
  Entity,
  PrimaryGeneratedColumn,
  Unique,
  UpdateDateColumn,
OneToMany,}from"typeorm";import{ Product }from"./Product";@ObjectType()@Entity()@Unique(["code"])exportclassCategory{@Field((_type)=> Number)@PrimaryGeneratedColumn()publicreadonly id!:number;@Field()@Column({ type:"varchar"})public code!:string;@Field()@Column({ type:"varchar"})public name!:string;@Field()@CreateDateColumn()public createdAt!: Date;@Field()@UpdateDateColumn()public updatedAt!: Date;@Field((_type)=>[Product])@OneToMany((_type)=> Product,(product: Product)=> product.category)public products?: Product[];}@ObjectTypexác định lược đồ GraphQL là class Product@Fieldđể khai báo các thuộc tính của class sẽ ánh xạ tới GraphQL. Ở thuộc tính products, mình định nghĩa kiểu là array[Product]
Các bạn làm tương tự cho model Product. Ở thuộc tính category, mình sẽ định nghĩa là kiểy Object như sau @Field((_type) => Category)
*Rất gọn so với cách thông thường đúng không ^^! *
Xem thêm tại https://typegraphql.com/docs/types-and-fields.html
3.4.3 Tạo Repository
Mục đích của việc tạo Repository là để ta có thể sử dụng được các method của TypeORM và định nghĩa thêm nhiều method khác tuỳ vào mục đích sử dụng.
Bạn tạo một repository src/repositories/CategoryRepository.ts với nội dung như sau
import{ EntityRepository, Repository }from"typeorm";import{ Category }from"../models/Category";@EntityRepository(Category)exportclassCategoryRepositoryextendsRepository<Category>{}Cũng làm tương tự cho src/repositories/ProductRepository.ts nhé
3.4.4 Tạo GraphQL modules
CreateCategory module
Đẻ tạo một module cho việc create 1 Category , bạn cần tạo 1 file src/modules/category/CreateCategoryInput.ts để định nghĩa dữ liệu đầu vào của GraphQL
import{ Field, InputType }from"type-graphql";import{ Category }from"../../models/Category";@InputType()exportclassCreateCategoryInputimplementsPartial<Category>{@Field()public name!:string;@Field()public code!:string;}@InputTypesẽ sinh ra kiểuGraphQLInputType
Sau đó, bạn tạo một module src/modules/category/CreateCategory.ts với nội dung như sau
import{ Arg, Mutation, Resolver }from"type-graphql";import{ getCustomRepository }from"typeorm";import{ Category }from"../../models/Category";import{ CategoryRepository }from"../../repositories/CategoryRepository";import{ CreateCategoryInput }from"./CreateCategoryInput";@Resolver((_type)=> Category)exportclassCreateCategory{@Mutation((_type)=> Category)publicasynccreateCategory(@Arg("data") inputData: CreateCategoryInput
  ):Promise<Category>{const categoryRepository =getCustomRepository(CategoryRepository);const category = categoryRepository.create({
      name: inputData.name,
code: inputData.code,});await categoryRepository.save(category);return category;}}@Resolversẽ biến classCreateGroupthành một REST API@Mutationđịnh nghĩa methodcreateCategorylà một GraphQL mutation@Argsẽ đưa giá trị phía client-side gửi lên vào paraminputDatagetCustomRepositoryChúng ta sử dụng hàm này tạo 1 một thực thểcategoryRepositoryvà sử dụng các method của TypeORM. Đây là một cách đơn giản, mình sẽ hướng dẫn bạn một cách khác ở GetCategories module.
GetCategories module
Bạn tạo một module src/modules/category/GetCategories.ts với nội dung như sau
import{ Resolver, Query }from"type-graphql";import{ InjectRepository }from"typeorm-typedi-extensions";import{ Category }from"../../models/Category";import{ CategoryRepository }from"../../repositories/CategoryRepository";@Resolver((_type)=> Category)exportclassGetCategories{constructor(@InjectRepository()privatereadonly categoryRepository: CategoryRepository
){}@Query((_type)=>[Category])publicasyncgetCategories():Promise<Category[]>{const categories =awaitthis.categoryRepository.find();return categories;}}InjectRepositorysẽ tự động tạo thực thểcategoryRepositoryqua hàm xây dựng. Tuỳ mục đính chúng ta sẽ chọn cách nào phù hợp@Queryđịnh nghĩa methodgetCategoriesnhư là một GraphQL query
3.4.5 Tạo schema
Bạn tạo 1 file src/schema.ts với nội dung như sau. Đây là cú pháp để build các modules của GraphQL, mỗi lần thêm một module mới bạn cần update lại file này và thêm nó vào thuộc tính resolvers như [CreateCategory, GetCategories]
import{ buildSchema }from"type-graphql";import{ CreateCategory }from"./modules/category/CreateCategory";import{ GetCategories }from"./modules/category/GetCategories";exportdefault(Container:any)=>{returnbuildSchema({
    container: Container,
    resolvers:[CreateCategory, GetCategories],});};
3.5 Calling GraphQL API
3.5.1 Tạo GraphQL server
Bạn update lại file src/index.ts như sau
import"reflect-metadata";import{ Container }from"typedi";import*as TypeORM from"typeorm";import{ ApolloServer }from"apollo-server-express";import express from"express";import cors from"cors";import createSchema from"./schema";// register 3rd party IOC container
TypeORM.useContainer(Container);constbootstrap=async()=>{try{// create TypeORM connectionawait TypeORM.createConnection();// build TypeGraphQL executable schemaconst schema =awaitcreateSchema(Container);const app =express();const corsConfig ={
      methods:"GET,HEAD,PUT,PATCH,POST,DELETE,OPTIONS",
      credentials:true,
      origin:[/localhost*/],};
    app.use(cors(corsConfig));const port =3000;// Create GraphQL serverconst server =newApolloServer({
      schema,context:({ req, res })=>({ req, res }),
      debug:true,
      playground:true,});
    server.applyMiddleware({ app, cors: corsConfig });

app.listen({ port },()=>{console.log(`🚀 Server ready at http://localhost:${port}${server.graphqlPath}`);});}catch(err){console.error(err);}};bootstrap();ApolloServertạo GraphQL Server,playground: trueđể có thể test các schema trực tiếp tại localhost. Xem thêm options tại đâycorsConfigỞ đây mình setorigin: [/localhost*/]là để tất cả các app Frontend khác ở localhost có thể gọi được các API của app này, nếu không sẽ bị lỗi Cross-domain. Bạn thể setorigin: [*]để bất kỳ một site nào cũng có thể gọi API từ app của bạn, xem thêm options tại cors-options
Sau đó, chạy lại ứng dụng bằng lệnh npm run dev. Khi mà hình xuất hiện như bên dưới, nghĩa là bạn đã start GraphQL thành công

Sau đó các bạn truy cập vào http://localhost:3000/graphql sẽ được giao diện như bên dưới
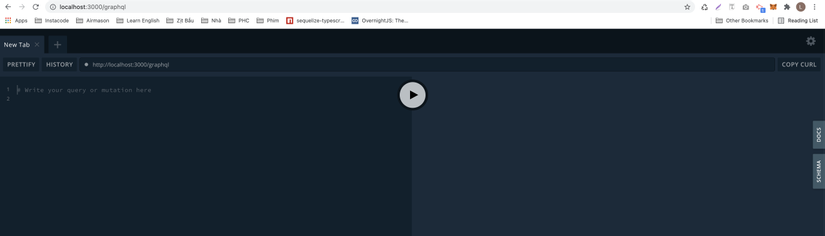
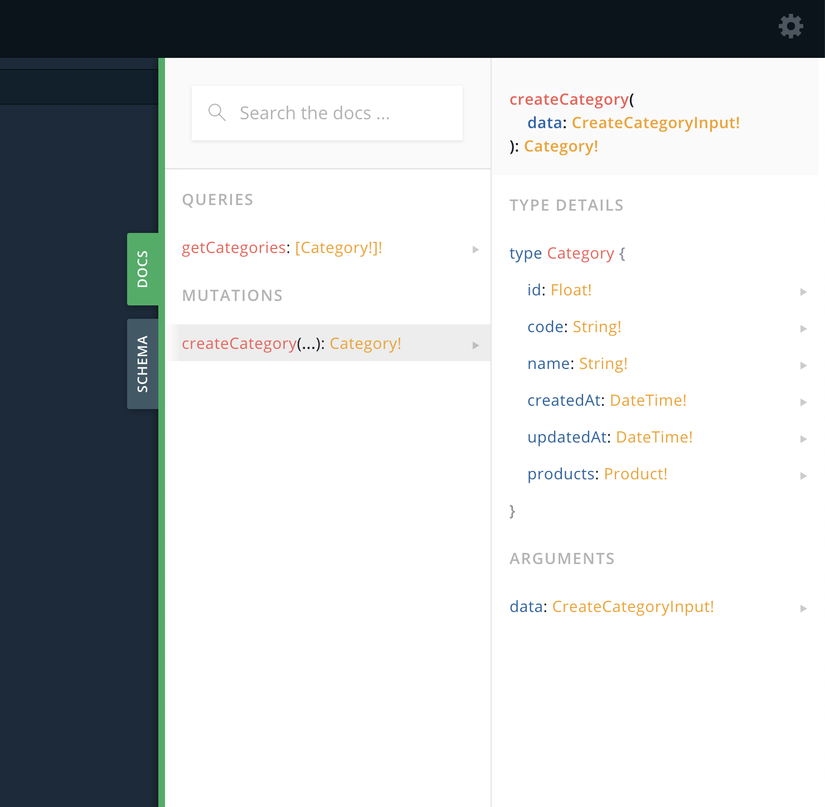
Bạn click vào tab Schema hoặc Docs ở bên phải, sẽ hiển thị các Query, Mutation và kiểu dữ liệu của GraphQL. Chúng ta sẽ dùng nó để call các API mà không cần đọc lại code ^^!
3.5.2 Tạo Category
Bạn call createCategory module với câu truy vấn và data như sau, nhớ click qua tab Query Variables nhé
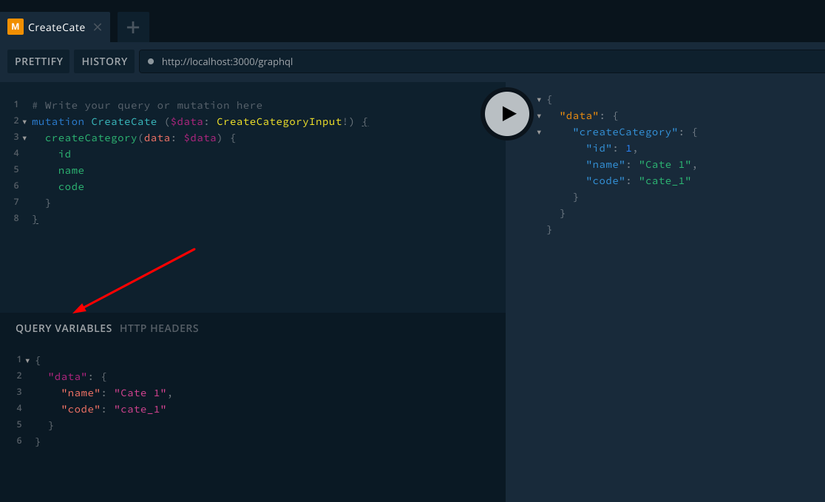
Lưu ý: Nếu bạn tạo trùng category code thì TypeORM sẽ báo lỗi nhé, do trong model minh đã ràng buộc bằng @Unique
3.5.3 Lấy danh sách các categories
Giờ test thử xem data có lưu hay không bằng cách call GetCategories query như bên dưới
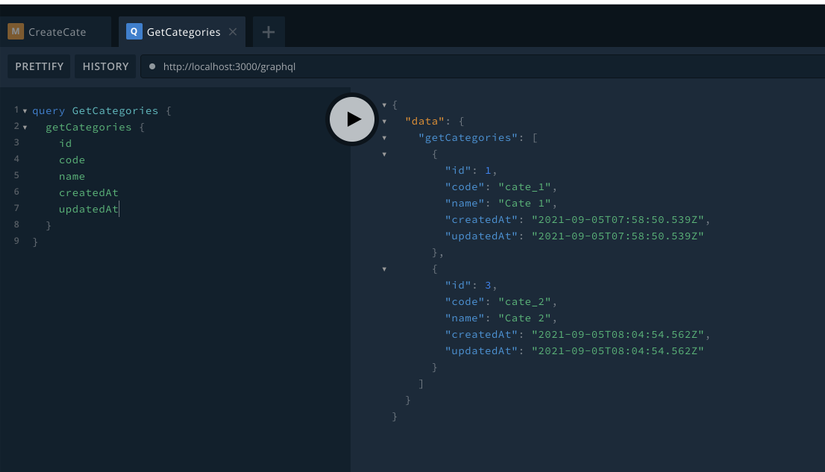
Xem thêm cách call GraphQL API tại đây https://graphql.org/learn/queries/#gatsby-focus-wrapper
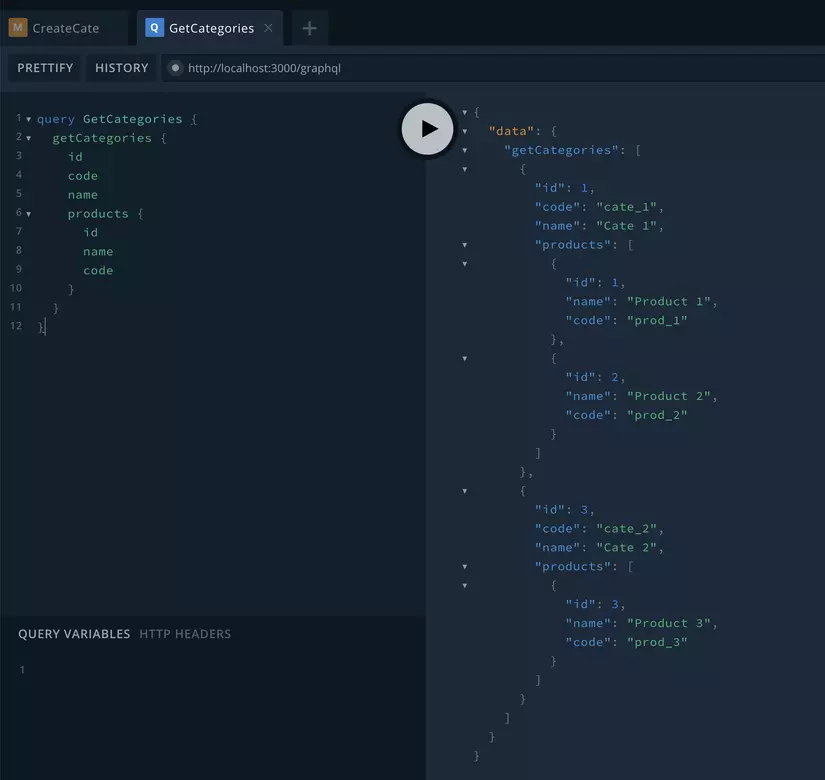
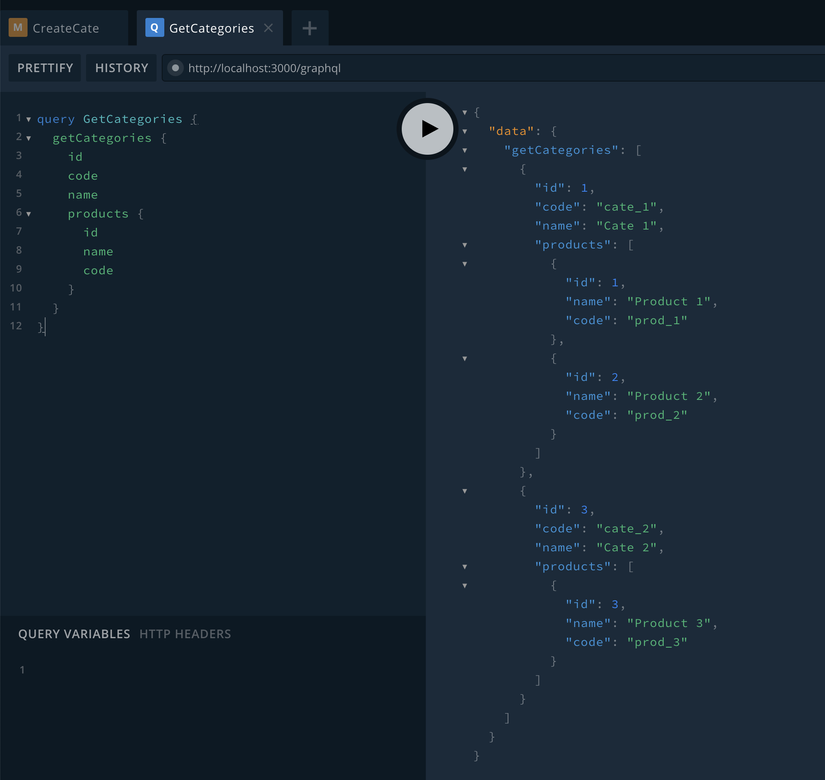
3.5.4 Lấy danh sách các categories với Product list
Bạn tự viết một module để tạo Product xem như luyện tập. Nhớ là phải set khoá ngoại categoryId cho Product nhé
Sau khi tạo được một vài Product rồi, thi bạn update lại getCategories method bằng cách thêm tuỳ chọn relations. Nó được dùng dể query các Model có quan hệ với Model chính, ở đây là Category
@Query((_type)=>[Category])publicasyncgetCategories():Promise<Category[]>{const categories =awaitthis.categoryRepository.find({
    relations:["products"],});return categories;}
Sau đó, bạn update lại câu truy vấn như bên dưới để lấy được các Categories và Product của nó
Xem thêm tại https://typeorm.io/#/find-options
4. Source code
Đây là full source code sau khi làm xong các bước trên (dành cho những bạn nào muốn run trước learn sau 😄). Sau khi tải về bạn chỉ cần run 2 lệnh sau để cài đặt và chạy ứng dụng
npm i
npm run dev
5. Frontend App
Đây là bài viết hướng dẫn Tạo ứng dụng React bằng Gatsby + Apollo Client (GraphQL in Client), bạn có thể tham khảo và run ở local để call thử các API vừa tạo nhé ^^!
Enjoy!!
Nguồn: viblo.asia