Trong bài viết này mình sẽ chia sẽ cách sử dụng một số kiến thức liên quan đến data binding trong angular như: Interpolation
, Attribute binding, Class and style binding, Event binding, Property binding, Two-way binding. Các bạn hãy theo dõi các ví dụ bên dưới để hiểu hơn nhé.
Create New App:
Nếu bạn chưa tạo ứng dụng thì hãy tạo ứng dụng angular bằng command sau:
ng new first-app
Sử dụng interpolation
Để sử dụng interpolation, theo mặc định angular sử dụng dấu ngoặc nhọn kép {{ }} làm dấu phân cách. Ví dụ:
Tạo một component tên là binding
ng g c binding
Sau khi chạy command, nó sẽ sinh cho ta component như sau: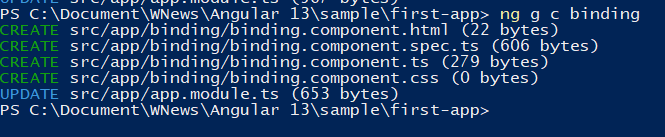
src/app/binding/binding.component.ts
Trong component này mình định nghĩa 2 thuộc tính currentCustomer, ageCustomer và phương thức showInfoCustomer()
import{ Component, OnInit }from'@angular/core';

@Component({
  selector:'app-binding',
  templateUrl:'./binding.component.html',
  styleUrls:['./binding.component.css']})exportclassBindingComponentimplementsOnInit{
  currentCustomer: string ='Maria';
  ageCustomer: number =30;showInfoCustomer(){returnthis.currentCustomer +' '+this.ageCustomer;}constructor(){}ngOnInit():void{}}
src/app/binding/binding.component.html
Sử dụng interpolation để hiển thị các thuộc tính currentCustomer, ageCustomer và phương thức showInfoCustomer() trong file component template tương ứng:
<h3>Current customer:{{ currentCustomer }}</h3><h3>Age customer:{{ ageCustomer }}</h3><h3>Info customer:{{showInfoCustomer()}}</h3>Chạy ứng dụng và xem output của chúng ta sẽ như bên dưới:
Current customer: Maria
Age customer: 30
Info customer: Maria 30
Sử dụng attribute binding
Attribute binding trong angular giúp bạn gán các giá trị cho các thuộc tính trục tiếp. Với attribute binding, bạn có thể cải thiện khả năng truy cập, tạo kiểu động cho ứng dụng của mình và quản lý nhiều classes CSS hoặc styles đồng thời.
Cú pháp:
<p [attr.attribute-you-are-targeting]="expression"></p>Ví dụ, để liên kết với một thuộc tính ARIA
src/app/app.component.ts
import{ Component }from'@angular/core';

@Component({
  selector:'app-root',
  templateUrl:'./app.component.html',
  styleUrls:['./app.component.css']})exportclassAppComponent{
  actionName ='test';}
src/app/app.component.html
<!-- create and set an aria attribute for assistive technology --><button type="button"[attr.aria-label]="actionName">{{actionName}}with Aria</button>Sử dụng class and style binding
Sử dụng class and style binding để thêm và xóa name class từ một thành phần.
Binding to a single CSS class
Để tạo một class binding, hãy sử dụng cú pháp sau:
[class.sale]="onSale"
Angular sẽ thêm class sale nếu onSale là true, ngược lại onSale là false thì class sale sẽ không được hiển thị
Binding to multiple CSS classes
Cú pháp:
[class]="classExpression"
Bảng sau đây tóm tắt cách sử dụng.
| BINDING TYPE | SYNTAX | INPUT TYPE | EXAMPLE INPUT VALUES |
|---|---|---|---|
| Single class binding | [class.sale]=”onSale” | boolean , undefined , null | true, false |
| Multi-class binding | [class]=”classExpression” | string | “my-class-1 my-class-2 my-class-3” |
| Multi-class binding | [class]=”classExpression” | Record<string, boolean , undefined , null> | {foo: true, bar: false} |
| Multi-class binding | [class]=”classExpression” | Array<string> | [‘foo’, ‘bar’] |
Binding to a single style
Để tạo một single style binding, chúng ta sử dụng prefix style theo sau là một dấu chấm và tên của style.
[style.width]="width"
- Ví dụ viết một style với kiểu dash-case:
<nav [style.background-color]="expression">test01</nav>
- Ví dụ viết một style với kiểu camelCase:
<nav [style.backgroundColor]="expression">test02</nav>
Binding to multiple styles
Bảng sau đây tóm tắt cách sử dụng.
| BINDING TYPE | SYNTAX | INPUT TYPE | EXAMPLE INPUT VALUES |
|---|---|---|---|
| Single style binding | [style.width]=”width” | string , undefined , null | “100px” |
| Single style binding with units | [style.width.px]=”width” | number , undefined , null | 100 |
| Multi-style binding | [style]=”styleExpression” | string | “width: 100px; height: 100px” |
| Multi-style binding | [style]=”styleExpression” | Record<string, string , undefined , null> | {width: ‘100px’, height: ‘100px’} |
Sử dụng Event binding
Cú pháp:
<button (click)="onSave()">Save</button>
Ví dụ:
src/app/app.component.ts
Update code file app.component.ts như dưới:
import{ Component }from'@angular/core';

@Component({
  selector:'app-root',
  templateUrl:'./app.component.html',
  styleUrls:['./app.component.css']})exportclassAppComponent{onSave(){
    console.log('onSave');}}
src/app/app.component.html
<button(click)="onSave()">Save</button>Output:
onSave
Bạn cũng có thể truyền $event vào sự kiện để sử dụng khi cần như bên dưới:
<button (click)="onSave($event)">Save</button>
Sử dụng Property binding
Property binding trong Angular giúp bạn thiết lập giá trị cho thuộc tính của các thành phần HTML hoặc chỉ thị . Sử dụng property binding để thực hiện những việc như button chuyển đổi chức năng, đặt đường dẫn theo chương trình và chia sẻ giá trị giữa các components.
Binding to a property
Để liên kết với thuộc tính của một phần tử, hãy đặt nó trong dấu ngoặc vuông, []. Cái xác định thuộc tính là thuộc tính đích.
Cú pháp:
<img alt="item" [src]="itemImageUrl">
Setting an element property to a component property value
Hãy cập nhât code như dưới:
src/app/app.component.ts
import{ Component }from'@angular/core';

@Component({
  selector:'app-root',
  templateUrl:'./app.component.html',
  styleUrls:['./app.component.css']})exportclassAppComponent{
    itemImageUrl: string ='https://www.w3schools.com/html/img_chania.jpg';}
app/app.component.html
<img alt="item"[src]="itemImageUrl">Output:
Toggling button functionality
Để disable chức năng của một button, chúng ta có thể dựa vào giá trị của thuộc tính disabled là true hay false, ví dụ:
src/app/app.component.ts
<!-- Bind button disabled state to `isUnchanged` property --><button type="button"[disabled]="isUnchanged">Disabled Button</button>Nếu giá trị của thuộc tính isUnchanged là true trong AppComponent, Angular sẽ vô hiệu hóa nút này.
src/app/app.component.html
isUnchanged =true;Sử dụng Two-way binding
Two-way binding cho phép các components trong ứng dụng của bạn một cách để chia sẻ dữ liệu. Sử dụng Two-way binding để lắng nghe các sự kiện và cập nhật giá trị đồng thời giữa các components cha và con.
Two-way binding kết hợp property binding với event binding:
Adding two-way data binding
Cú pháp Two-way binding của Angular là sự kết hợp của dấu ngoặc vuông và dấu ngoặc đơn, [()].
Cú pháp [()] kết hợp dấu ngoặc vuông của property binding, [] và dấu ngoặc đơn của event binding, () như dưới.
src/app/app.component.html
<app-sizer [(size)]="fontSizePx"></app-sizer>
How two-way binding works
Để two-way data binding làm việc, thuộc tính @Output() phải sử dụng theo mẫu inputChange, với input là name của thuộc tính @Input().
Ví dụ, nếu thuộc tính @Input() là size thì thuộc tính @Output() phải là sizeChange .
Ví dụ sizerComponent có một giá trị thuộc tính size và một sự kiện sizeChange . thuộc tính size là một @Input(), sự kiện sizeChange là một thuộc tính @Output(), cái cho phép dữ liệu trong sizerComponent có thể sử dụng trong thành phần cha.
Tiếp theo, có 2 phương thức dec() để giảm cỡ chữ và inc() để tăng cỡ chữ. Hai phương thức này sử dụng resize() để thay đổi giá trị của thuộc tính size trong các ràng buộc giá trị min / max và để tạo ra một sự kiện truyền tải giá trị kích thước mới.
Đầu tiên, nếu bạn chưa tạo component sizer, thì hãy chạy command sau:
ng g c sizer
src/app/sizer.component.ts
Thêm code vào sizer.component.ts như dưới:
import{ Component, OnInit, Input, Output, EventEmitter }from'@angular/core';

@Component({
  selector:'app-sizer',
  templateUrl:'./sizer.component.html',
  styleUrls:['./sizer.component.css']})exportclassSizerComponentimplementsOnInit{constructor(){}ngOnInit():void{}

    @Input()  size!: number | string;
    @Output() sizeChange =newEventEmitter<number>();dec(){this.resize(-1);}inc(){this.resize(+1);}resize(delta: number){this.size = Math.min(40, Math.max(8,+this.size + delta));this.sizeChange.emit(this.size);}}
src/app/sizer.component.html
<div><button type="button"(click)="dec()" title="smaller">-</button><button type="button"(click)="inc()" title="bigger">+</button><span [style.font-size.px]="size">FontSize:{{size}}px</span></div>src/app/app.component.html
<app-sizer [(size)]="fontSizePx"></app-sizer><div [style.font-size.px]="fontSizePx">Resizable Text</div>src/app/app.component.ts
import{ Component }from'@angular/core';

@Component({
  selector:'app-root',
  templateUrl:'./app.component.html',
  styleUrls:['./app.component.css']})exportclassAppComponent{
    fontSizePx =16;}
Cuối cùng, chạy ứng dụng và kiểm tra kết quả:
ng serve
Mở link sau trên trình duyệt:
http://localhost:4200/
Nguồn: viblo.asia