Giới thiệu
Chào mọi người đến với series practice về kubernetes. Ở bài này chúng ta sẽ tìm hiểu cách cài đặt Logstash và FluentD trên kubernetes để thiết kế một hệ thống thu lập log.
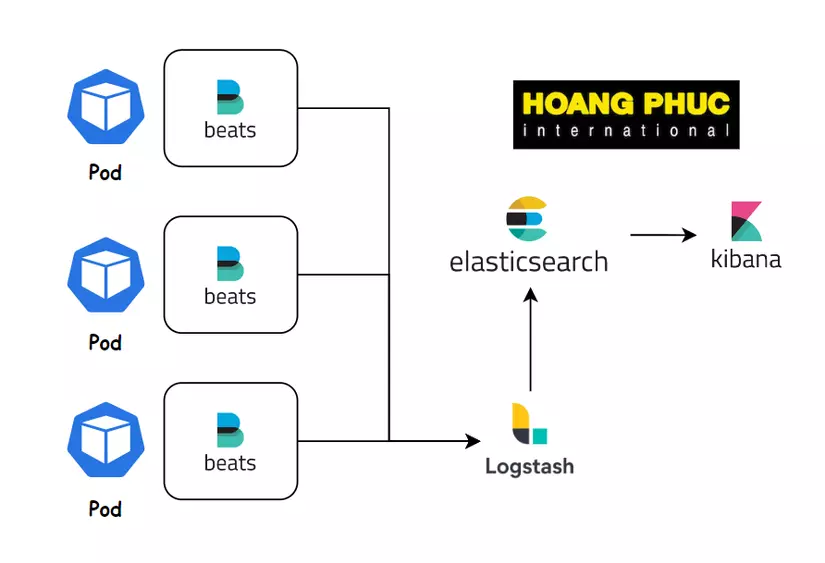
Đối với bất kì hệ thống nào thì việc ghi log và tổng hợp log đều rất quan trọng. Khi ta sử dụng kubernetes để triển khai ứng dụng, log của ta chỉ tồn tại trên một Pod, nếu Pod đó bị xóa đi thì log cũng mất theo. Do đó, nếu ta muốn truy vết được lỗi của hệ thống thì ta phải có công cụ để thu thập log về một chỗ. Hai tech stack phổ biến nhất hiện nay cho việc log là ELK (Elasticsearch Logstash Kibana) và EFK (Elasticsearch FluentD Kibana).
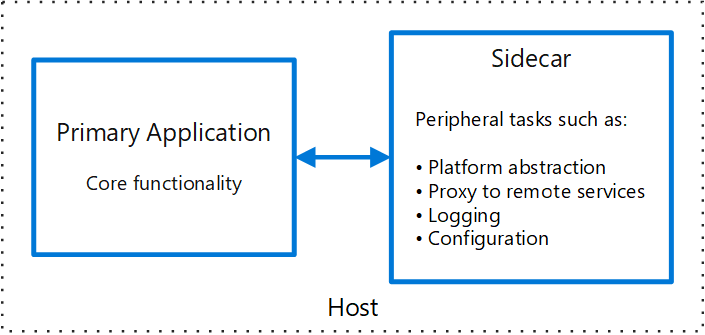
Chúng ta sẽ sử dụng sidecar container để cài đặt Logstash và FluentD lên trên từng Pod cho việc thu thập log.
Sidecar container
Thay vì để application container thực hiện việc thu thập log, ta có thể tách công việc đó ra cho một container khác để tránh làm ảnh hưởng tới hiệu suất của application container.
Container mà sẽ thực hiện các công việc hỗ trợ cho application container được gọi là sidecar container, mình sẽ giải thích kĩ trong bài Kubernetes Patterns – Structural Patterns: Sidecar Container.
Logging with Logstash
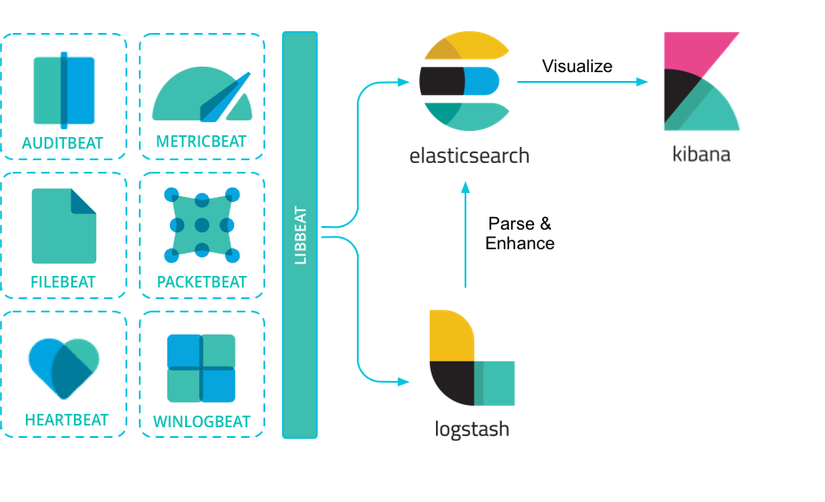
Ta có thể dùng Logstash để thu thập log từ hệ thống, nhưng từ năm 2015 Elastichsearch đã ra mắt Filebeat để chuyên cho việc theo dõi log, thu thập log và chuyển log đi chỗ khác. Logstash thì tập trung vào việc nhận log từ nhiều đầu và tiến hành phân tích, lọc và chuyển đổi log thành dạng phù hợp để lưu vào Elasticsearch.
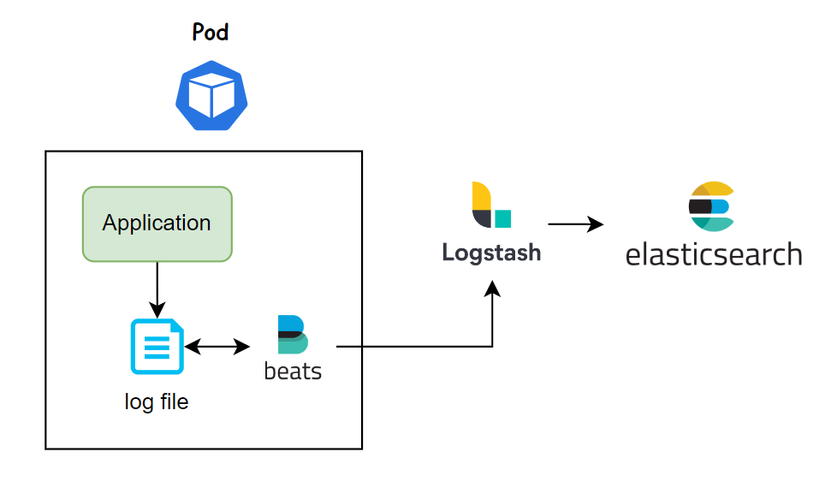
Giờ ta bắt tay vào làm nào, đầu tiên ta deploy một Pod có application container sẽ ghi log vào file /var/log/access.log và có một sidecar container chạy filebeat để thu thập log và bắn tới Logstash.
Tạo một file tên là filebeat.cm.yaml để chứa cấu hình filebeat.
apiVersion: v1
kind: ConfigMap
metadata:name: filebeat-config
  labels:component: filebeat
data:conf.yaml:|
    filebeat.inputs:
    - type: log
      paths:
        - '/var/log/*.log'
    output:
      logstash:
        hosts: [ "logstash:5044" ]
Input của filebeat ta đọc từ file /var/log/*.log, sau đó ta output log này tới logstash. Tiếp theo ta tạo file deployment application.yaml.
apiVersion: apps/v1
kind: Deployment
metadata:name: busybox
  labels:component: busybox
spec:strategy:type: Recreate
  selector:matchLabels:component: busybox
  template:metadata:labels:component: busybox
    spec:containers:-name: busybox
          image: busybox
          args:- sh
            --c
            ->
              while true;
              do
                echo $(date) - filebeat log >> /var/log/access.log;
                sleep 10;
              donevolumeMounts:-name: log
              mountPath: /var/log
        -name: filebeat
          image: elastic/filebeat:7.16.3
          args:--c
            - /etc/filebeat/conf.yaml
            --e
          volumeMounts:-name: filebeat-config
              mountPath: /etc/filebeat
            -name: log
              mountPath: /var/log
      volumes:-name: log
          emptyDir:{}-name: filebeat-config
          configMap:name: filebeat-config
Trong Pod ở trên ta sẽ mount config của filebeat vào file /etc/filebeat/conf.yaml và sử dụng thuộc tính args để chỉ định file config đó cho filbeat. Application container của ta ghi log vào file /var/log/access.log 10s một lần. Ta dùng emptyDir volumes để share storage giữa hai container.
Tạo file logstash.cm.yaml để chứa cấu hình của logstash.
apiVersion: v1
kind: ConfigMap
metadata:name: logstash
  labels:component: logstash
data:access-log.conf:|
    input {
      beats {
        port => "5044"
      }
    }

    output {
      elasticsearch {
        hosts =>["elasticsearch:9200"]}}
Input ta lấy từ filebeat, sau đó nó output log ra cho elasticsearch. Tạo file deployment để chạy logstash.
apiVersion: apps/v1
kind: Deployment
metadata:name: logstash
  labels:component: logstash
spec:strategy:type: Recreate
  selector:matchLabels:component: logstash
  template:metadata:labels:component: logstash
    spec:containers:-name: logstash
          image: logstash:7.16.3
          ports:-containerPort:5044volumeMounts:-name: logstash-config
              mountPath: /usr/share/logstash/pipeline
      volumes:-name: logstash-config
          configMap:name: logstash

---apiVersion: v1
kind: Service
metadata:name: logstash
  labels:component: logstash
spec:ports:-port:5044selector:component: logstash
Ta mount cấu hình vào folder /usr/share/logstash/pipeline, logstash sẽ đọc cấu hình từ folder này.
Tạo elasticsearch và kibana, này chỉ là test thôi nhé, để tạo elasticsearch và kibana trên môi trường production, các bạn xem bài này nhé Kubernetes Practice – Elasticsearch Cloud on Kubernetes (ECK).
apiVersion: apps/v1
kind: Deployment
metadata:name: elasticsearch
  labels:component: elasticsearch
spec:strategy:type: Recreate
  selector:matchLabels:component: elasticsearch
  template:metadata:labels:component: elasticsearch
    spec:containers:-name: elasticsearch
          image: elasticsearch:7.16.3
          ports:-containerPort:9200name: client
            -containerPort:9300name: nodes
          env:-name: JAVA_TOOL_OPTIONS
              value:-Xmx256m -Xms256m
            -name: discovery.type
              value: single-node
          resources:requests:memory: 500Mi
              cpu:0.5limits:memory: 500Mi
              cpu:0.5---apiVersion: v1
kind: Service
metadata:name: elasticsearch
  labels:component: elasticsearch
spec:ports:-port:9200name: client
  -port:9300name: nodes
  selector:component: elasticsearch
Kibana.
apiVersion: apps/v1
kind: Deployment
metadata:name: kibana
  labels:component: kibana
spec:strategy:type: Recreate
  selector:matchLabels:component: kibana
  template:metadata:labels:component: kibana
    spec:containers:-name: kibana
          image: kibana:7.16.3
          ports:-containerPort:5601---apiVersion: v1
kind: Service
metadata:name: kibana
  labels:component: kibana
spec:ports:-port:5601selector:component: kibana
Giờ ta tạo toàn bộ resource nào.
kubectl apply -f . --recursive
Dùng port-forward để truy cập kibana.
kubectl port-forward svc/kibana 5601:5601
Vào mục Stack Management > Index patterns, sau đó vào mục Discover bạn sẽ thấy log mà ta thu thập được từ busybox container.
Logging with FluentD
FluentD cũng là một công cụ dùng để thu thập log giống như Filebeat và Logstash. FluentD bao gồm các tính năng như theo dõi log, thu thập, phân tích và chuyển đổi log thành dạng thích hợp để lưu vào Elasticsearch.
FluentD được phát triển bởi Cloud Native Computing Foundation (CNCF), đây là tổ chức phát triển và bảo trì kubernetes.
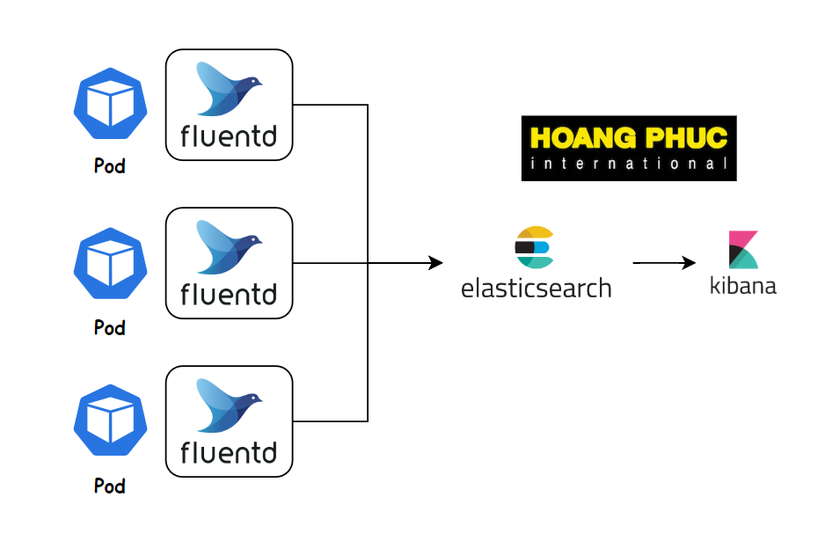
Để thu thập log bằng FluentD, ta sẽ deploy nó như một sidecar container y như cách ta dùng Filebeat ở trên. Tạo một file tên là fluentd.cm.yaml để chứa config của FluentD.
apiVersion: v1
kind: ConfigMap
metadata:name: fluentd-config
  labels:component: fluentd
data:fluent.conf:|
    <source>
      @type tail
      path /var/log/access.log
      pos_file /tmp/app.logs.pos
      tag app.logs

      <parse>
        @type none
      </parse>
    </source>

    <match app.logs>
      @type elasticsearch
      host elasticsearch
      port 9200
      logstash_format true
      logstash_prefix fluentd
      flush_interval 1s
    </match>
Ở trong file config, ta dùng <source> tag để chỉ định nơi ta thu thập log, sau đó ta dùng <match> tag để chuyển log tới Elasticsearch. Tiếp theo ta tạo file application.yaml.
apiVersion: apps/v1
kind: Deployment
metadata:name: busybox
  labels:component: busybox
spec:strategy:type: Recreate
  selector:matchLabels:component: busybox
  template:metadata:labels:component: busybox
    spec:containers:-name: busybox
          image: busybox
          args:- sh
            --c
            ->
              while true;
              do
                echo $(date) - filebeat log >> /var/log/access.log;
                sleep 10;
              donevolumeMounts:-name: log
              mountPath: /var/log
        -name: fluentd
          image: govtechsg/fluentd-elasticsearch
          volumeMounts:-name: fluentd-config
              mountPath: /fluentd/etc
            -name: log
              mountPath: /var/log
      volumes:-name: log
          emptyDir:{}-name: fluentd-config
          configMap:name: fluentd-config
Tương như khi ta khai báo filebeat sidecar container. Chạy câu lệnh apply để tạo resource.
kubectl apply -f . --recursive
Fluentd Plugin
Ta có một điều quan trọng cần lưu ý là để ta có thể chuyển được log tới Elasticsearch, chúng ta phải dùng Fluentd Elasticsearch Plugin.
Các bạn thấy ở trên ta đang dùng container govtechsg/fluentd-elasticsearch, trong container này nó có sẵn Elasticsearch Plugin nên thằng fluentd mới chuyển log tới Elasticsearch được.
Nếu bạn dùng container fluent/fluentd mặc định của fluentd thì khi bạn chạy nó sẽ báo lỗi là không tìm thấy config cho @type elasticsearch.
Để install plugin thì ta có thể viết Dockerfile như sau.
FROM fluent/fluentd:v1.12.0-debian-1.0USER rootRUN gem install fluent-plugin-elasticsearch --version 5.0.3USER fluentDanh sách toàn bộ plugin của fluentd https://www.fluentd.org/plugins/all.
Kết luận
Vậy là ta đã tìm hiểu xong cách dùng sidecar container pattern để cấu hình thu thập log của application container về một chỗ. ELK và EFK là hai log stack rất phổ biến, nếu ta biết cả hai và biết trường hợp nào nên xài cái nào thì rất tuyệt vời. Mình thì chưa đạt tới cảnh giới này :)))). Nếu có thắc mắc hoặc cần giải thích rõ thêm chỗ nào thì các bạn có thể hỏi dưới phần comment.
Mục tìm kiếm đồng đội

Hiện tại thì công ty bên mình, là Hoàng Phúc International, với hơn 30 năm kinh nghiệm trong lĩnh vực thời trang. Và sở hữu trang thương mại điện tử về thời trang lớn nhất Việt Nam. Team công nghệ của HPI đang tìm kiếm đồng đội cho các vị trí như:
- Senior Backend Engineer (Java, Go). Link JD: https://tuyendung.hoang-phuc.com/job/senior-backend-engineer-1022
- Senior Front-end Engineer (VueJS). https://tuyendung.hoang-phuc.com/job/senior-frontend-engineer-1021
- Junior Backend Engineer (Java, Go). https://tuyendung.hoang-phuc.com/job/junior-backend-engineer-1067
- Junior Front-end Engineer (VueJS). https://tuyendung.hoang-phuc.com/careers/job/1068
- App (Flutter). https://tuyendung.hoang-phuc.com/job/mobile-app-engineer-flutter-1239
- Senior Data Engineer. https://tuyendung.hoang-phuc.com/job/seniorjunior-data-engineer-1221
- Manual QC. https://tuyendung.hoang-phuc.com/job/seniorjunior-manual-qc-1039
Với mục tiêu trong vòng 5 năm tới về mảng công nghệ là:
- Sẽ có trang web nằm trong top 10 trang web nhanh nhất VN với 20 triệu lượt truy cập mỗi tháng.
- 5 triệu loyal customers và có hơn 10 triệu transactions mỗi năm.
Team đang xây dựng một hệ thống rất lớn với rất nhiều vấn đề cần giải quyết, và sẽ có rất nhiều bài toán thú vị cho các bạn. Nếu các bạn có hứng thú trong việc xây dựng một hệ thống lớn, linh hoạt, dễ dàng mở rộng, và performance cao với kiến trúc microservices thì hãy tham gia với tụi mình.
Nếu các bạn quan tâm hãy gửi CV ở trong trang tuyển dụng của Hoàng Phúc International hoặc qua email của mình nha [email protected]. Cảm ơn các bạn đã đọc.
Nguồn: viblo.asia