Lời mở đầu
Và dịch Covid đã đi vào hồi kết, chắc chắn các học kỳ tới các sinh viên không còn cảnh thi online và cố gắng gian lận trong các kỳ thi online nữa. Để không vi phạm đạo đức, lương tâm 🧐 mình phải đợi hết dịch mới dám chia sẻ nè. Vâng, vào vấn đề chính luôn: Làm sao để qua mặt được SEB (safe exam browser)!!!
SEB là gì?
SEB là 1 dự án mã nguồn mở xây dựng 1 trình duyệt chuyên dùng cho các kỳ thi.
SEB cung cấp các tính năng cơ bản sau:
- Auto fullscreen và không cho thoát fullscreen trong quá trình sử dụng
- Tự động 🔪 các process mà nó cho là không được để sống
- Không cho người dùng thi trên máy ảo
- Intercept key/mouse event để tránh người dùng sử dụng các tổ hợp phím điều khiển hệ điều hành
…
Chúng ta đã cheat như nào
Hầu hết chúng ta dùng các biện pháp cheat như gửi bài cho người khác qua tin nhắn hoặc video call, search google trong khi làm bài. Các biện pháp này có thể bị đánh chặn bởi các LMS (learning management system) có hỗ trợ listen event blur/focus window hoặc các trường bắt capture screen trong khi làm bài.  tuy nhiên cái gì cũng có cách giải quyết của nó, các bạn chỉ cần thi trong máy ảo và thoát ra máy thật mỗi khi cần làm gì đó khả nghi là được. Thế nhưng có SEB thì làm điều này hơi khó nha.
Bắt đầu thôi!!!
Clone SEB
SEB là 1 dự án mã nguồn mở, các bạn có thể tìm thấy SEB ở đây. Bài này chỉ hướng dẫn SEB cho windows thôi nha, chắc mấy cái kia tương tự á.
Bây giờ các bạn clone seb-win-refactoring từ github về bằng lệnh:
git clone https://github.com/SafeExamBrowser/seb-win-refactoring
Nhìn qua cấu trúc dự án 1 lượt và setup ban đầu
Mình khuyên các bạn dùng Visual Studio Code để search và sửa code, build bằng Visual Studio 2019.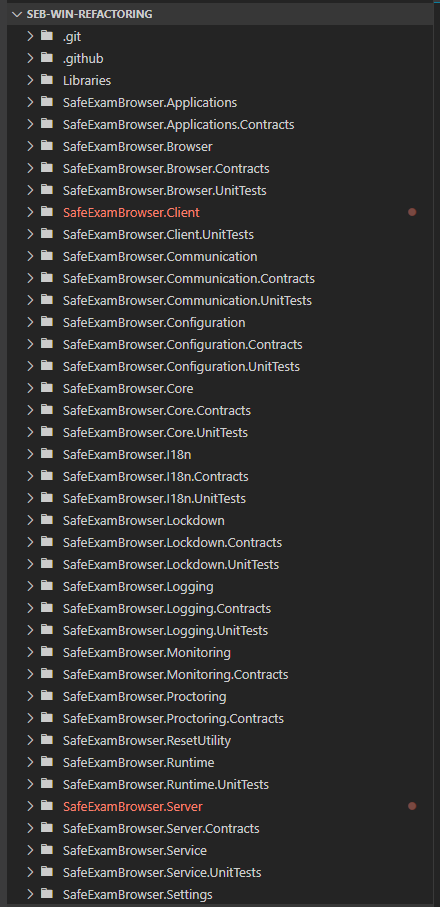
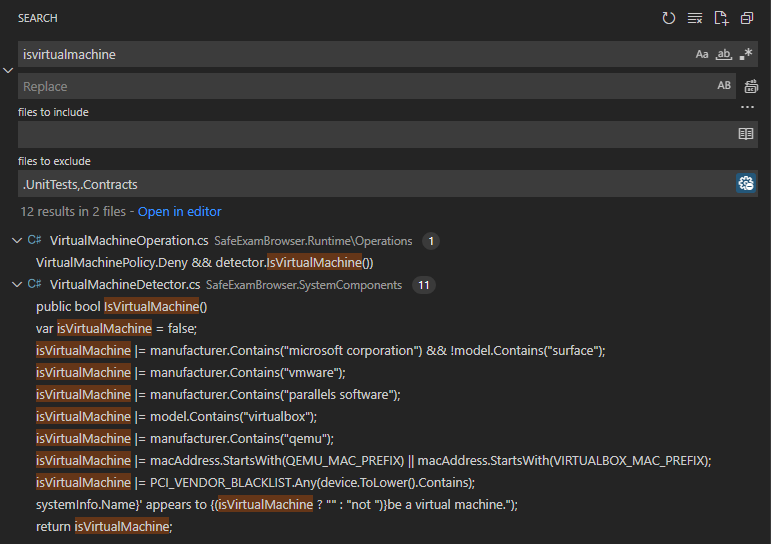
Nhiều project con kinh, nhưng chúng ta chỉ cần tập trung vào những thứ mình cần thôi. Chúng ta sẽ bỏ qua các project *.Contracts, *.UnitTests bằng cách vào tab search của Visual Studio Code, ấn icon 3 chấm ở bên phải phía dưới 2 ô input và nhập .Contracts,.UnitTests vào ô files to exclude.
Tiếp theo, chúng ta cần phải build được solution này, giờ thì bật Visual Studio lên nào. Các bạn có thể build thử lần đầu, nó sẽ thiếu đủ thứ, nó bảo thiếu gì thì cài đó thôi chứ mình cũng chả nhớ được nó cần những gì . Nó sẽ báo không sign được thì các bạn xóa tham số /sm trong mấy command chạy signtool trong file Setup.wixproj và SetupBundle.wixproj là được.
Bắt đầu mod SEB thôi
Chúng ta sẽ thịt từng tính năng một của SEB.
- Chặn máy ảo ❌
Để xử lý cái này thì các bạn phải tìm xem SEB nó check máy ảo của mình kiểu gì. Giờ thì vào Visual Studio Code/Search làm việc thôi. Với tính năng check máy ảo, mình đã thử tìm “isVM”, “isVirtualMachine” và kết quả từ “isVirtualMachine” không làm mình thất vọng:![image.png]()
HàmIsVirtualMachinetrongclass VirtualMachineDetectorchính là thủ phạm ở đây, giờ chúng ta sẽ vào trong file đó xem hàm này làm những thứ gì nào:
publicboolIsVirtualMachine(){var isVirtualMachine =false;var manufacturer = systemInfo.Manufacturer.ToLower();var model = systemInfo.Model.ToLower();var macAddress = systemInfo.MacAddress;var plugAndPlayDeviceIds = systemInfo.PlugAndPlayDeviceIds;

	isVirtualMachine |= manufacturer.Contains("microsoft corporation")&&!model.Contains("surface");
	isVirtualMachine |= manufacturer.Contains("vmware");
	isVirtualMachine |= manufacturer.Contains("parallels software");
	isVirtualMachine |= model.Contains("virtualbox");
	isVirtualMachine |= manufacturer.Contains("qemu");if(macAddress !=null&& macAddress.Count()>2){
		isVirtualMachine |= macAddress.StartsWith(QEMU_MAC_PREFIX)|| macAddress.StartsWith(VIRTUALBOX_MAC_PREFIX);}foreach(var device in plugAndPlayDeviceIds){
		isVirtualMachine |= PCI_VENDOR_BLACKLIST.Any(device.ToLower().Contains);}

	logger.Debug($"Computer '{systemInfo.Name}' appears to {(isVirtualMachine ?"":"not ")}be a virtual machine.");return isVirtualMachine;}
Khỏi nghĩ nhiều, xóa sạch rồi return false; là được .
Bên cạnh đó, khi các bạn dùng máy ảo là sẽ phải qua 1 service remote trung gian nào đó, giờ chúng ta còn phải đánh lừa nó là chúng ta không có phải đang chạy trên 1 remote session 😫. Tương tự như virtual machine, các bạn tra method IsRemoteSession trong class RemoteSessionDetector rồi cho nó return false; là được.
2. Tự động 🔪các process mà nó nghĩ là không được sống
Thực ra là chỉ cần bỏ được tính năng thứ nhất là các bạn đã sống khỏe nếu máy đủ mạnh để host 1 máy ảo rồi. Nhưng mà mình nhận ra đâu phải ai cũng có máy 32GB RAM như mình đâu 👀, không phải mình khoe khoang gì đâu nhé.
Hmmm, với cái tính năng này liệu có từ khóa nào để xử lý nhỉ, chúng ta sẽ thử tra từ khóa “process” xem có những kết quả gì:
Quá nhiều kết quả rồi, ai mà xem được đây, có khi nào “blacklist” sẽ ổn hơn không: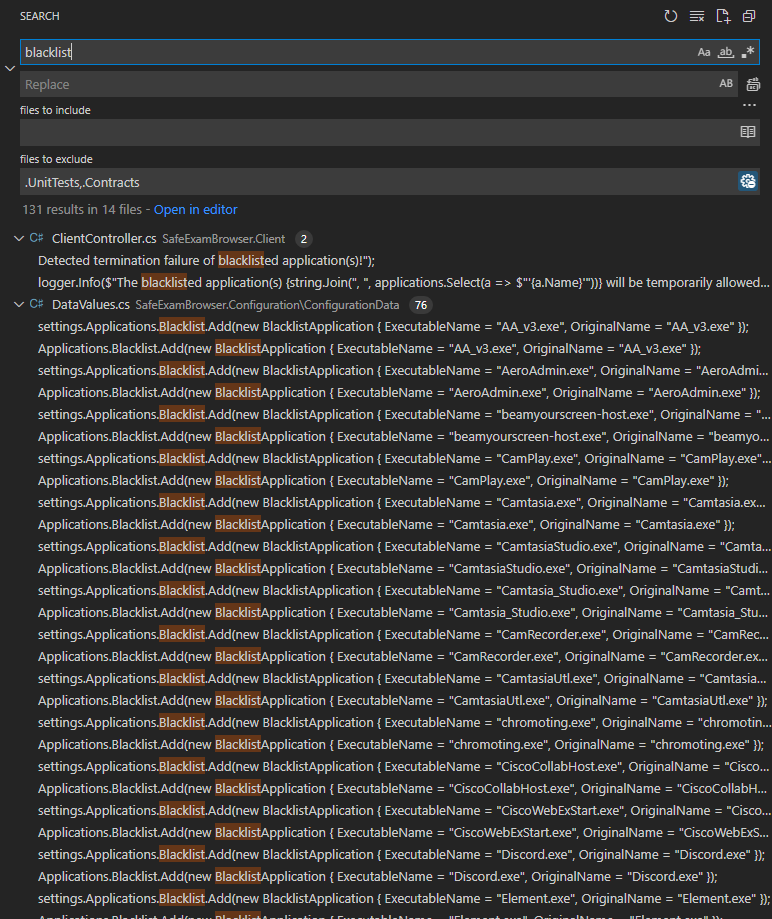
Rất tuyệt vời, vậy là có manh mối rồi, những cái process bị nó ghét tên là BlacklistApplication. Giờ thì xóa sạch cái đống mình vừa tìm được trong DataValues.cs để thu hẹp kết quả search nào. Hmmm, trong đống kết quả search còn lại, có cái này rất là sus: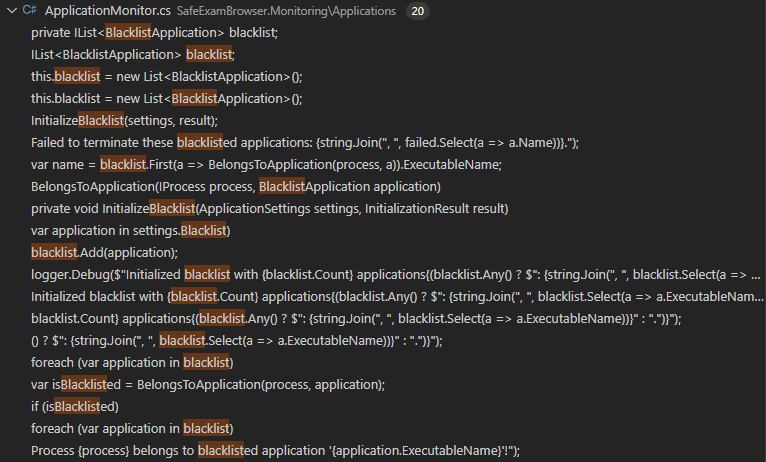
Project SafeExamBrowser.Monitoring là project dùng để theo dõi khi SEB chạy, rất có thể project này sẽ là nơi Blacklist được áp dụng, cùng mở nó ra xem nào. Ngay dưới constructor của class ApplicationMonitor ta có thể thấy 1 method tên là Initialize, trace usage thì nó được gọi khi ứng dụng chạy và bên trong Initialize có gọi InitializeBlacklist trông rất có tiềm năng đấy, giờ thì cùng xem InitializeBlacklist có gì nào:
privatevoidInitializeBlacklist(ApplicationSettings settings,InitializationResult result){foreach(var application in settings.Blacklist){
		blacklist.Add(application);}

	logger.Debug($"Initialized blacklist with {blacklist.Count} applications{(blacklist.Any()?$": {string.Join(", ", blacklist.Select(a => a.ExecutableName))}":".")}");foreach(var process in processes){foreach(var application in blacklist){var isBlacklisted =BelongsToApplication(process, application);if(isBlacklisted){if(!application.AutoTerminate){AddForTermination(application.ExecutableName, process, result);}elseif(application.AutoTerminate &&!TryTerminate(process)){AddFailed(application.ExecutableName, process, result);}break;}}}}
Khà khà, gãi đúng chỗ ngứa rồi, method này sẽ đọc tất cả những BlacklistApplication, đọc tất cả các processes trong máy và nếu nó trong blacklist thì sẽ terminate nó. Nhưng mà ủa sao lại for 2 cái lồng nhau? Dùng hashmap được mà, thôi dù sao cũng là chạy lúc load lần đầu và số lượng 2 tập giao nhau cũng không quá nhiều. Khỏi nghĩ, xóa hết!!!
Ủa có 2 method IsAllowed kìa, trông đáng nghi nhỉ, cho chúng nó return true; luôn 1 thể. Nhân tiện thì cho mấy bé TryTerminatereturn true; nhể .
3. Auto fullscreen và không cho thoát 🥴
Cái này thì thực ra là nó thịt mất explorer và nó không có hỗ trợ exit fullscreen thôi . Giờ các bạn phải làm sao cho cái explorer không bị nó thịt mất thì alt+tab ra nó mới đỡ ngỡ ngàng khi thấy taskbar với desktop mất tiêu.
Bắt đầu nhé, giờ mình thử tìm từ khóa “explorer” bằng Visual Studio Code xem kết quả thế nào: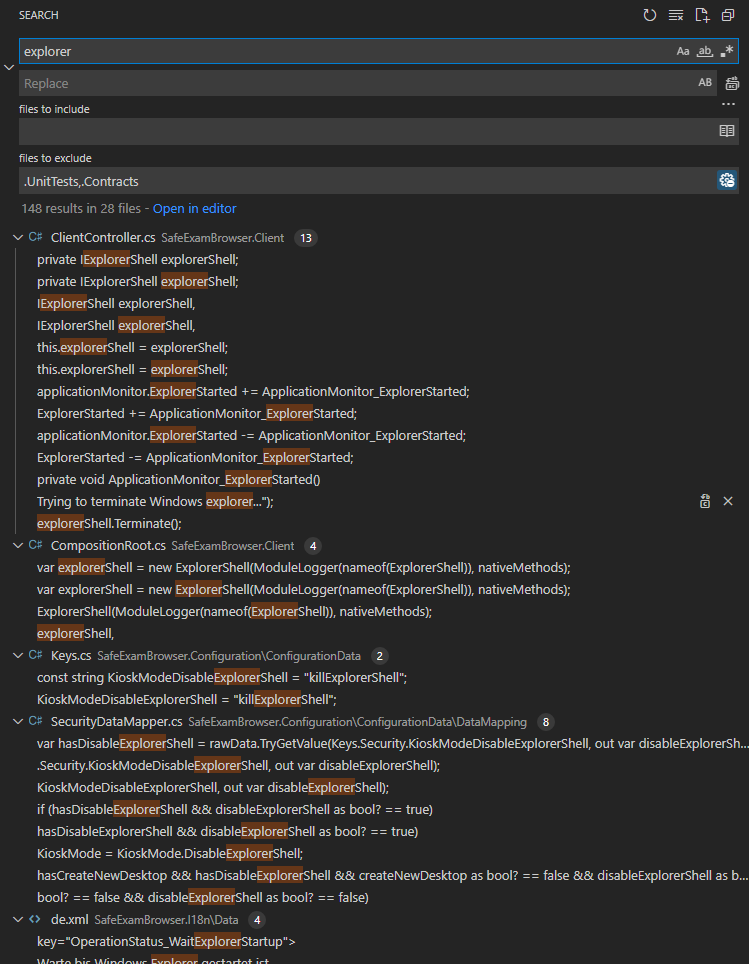
Ồ cũng nhiều đó nhưng không phải thứ mình cần ngay đầu sao, sao lại có explorerShell.Terminate() kìa, vào ngó thử nào:
privatevoidApplicationMonitor_ExplorerStarted(){
	logger.Info("Trying to terminate Windows explorer...");
	explorerShell.Terminate();
	logger.Info("Re-initializing working area...");
	displayMonitor.InitializePrimaryDisplay(Settings.Taskbar.EnableTaskbar ? taskbar.GetAbsoluteHeight():0);
	logger.Info("Re-initializing shell...");
	actionCenter.InitializeBounds();
	taskbar.InitializeBounds();
	logger.Info("Desktop successfully restored.");}
Tiếp tục, xóa hết!!!!!! Ai rảnh mà đọc .
4. Intercept key và mouse events 👮
Cái này chắc là cái cơ bản nhất rồi . Phải intercept key/mouse events không thì người dùng mà ấn tổ hợp phím kỳ kỳ để hồi sinh process thì chết dở. Với cái này thì ta cứ thử những từ khóa như “keyboard”, “mouse” thử xem:![]()
Rồi nhiều dị thì ai xem . Thôi để thử lại với “keyboardinterceptor”: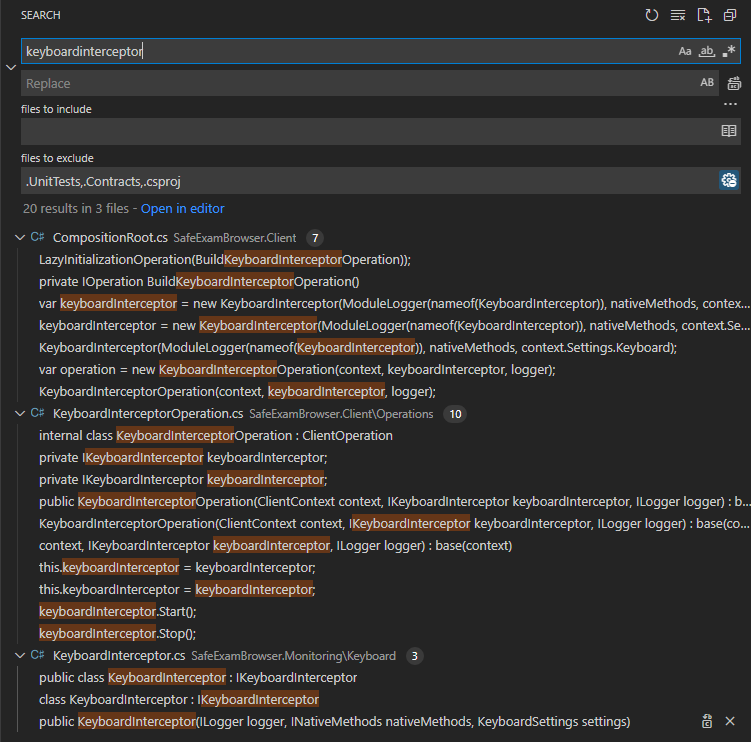
Rất tuyệt vời thưa bà con, kết quả ngay cái cuối kìa. Trong KeyboardInterceptor.cs, chúng ta có method KeyboardHookCallback:
privateboolKeyboardHookCallback(int keyCode,KeyModifier modifier,KeyState state){var block =false;var key = KeyInterop.KeyFromVirtualKey(keyCode);

	block |= key == Key.Apps;
	block |= key == Key.Escape && modifier == KeyModifier.None &&!settings.AllowEsc;
	block |= key == Key.F1 &&!settings.AllowF1;
	block |= key == Key.F2 &&!settings.AllowF2;
	block |= key == Key.F3 &&!settings.AllowF3;
	block |= key == Key.F4 &&!settings.AllowF4;
	block |= key == Key.F5 &&!settings.AllowF5;
	block |= key == Key.F6 &&!settings.AllowF6;
	block |= key == Key.F7 &&!settings.AllowF7;
	block |= key == Key.F8 &&!settings.AllowF8;
	block |= key == Key.F9 &&!settings.AllowF9;
	block |= key == Key.F10 &&!settings.AllowF10;
	block |= key == Key.F11 &&!settings.AllowF11;
	block |= key == Key.F12 &&!settings.AllowF12;
	block |= key == Key.LWin &&!settings.AllowSystemKey;
	block |= key == Key.PrintScreen &&!settings.AllowPrintScreen;
	block |= key == Key.RWin &&!settings.AllowSystemKey;
	block |= modifier.HasFlag(KeyModifier.Alt)&& key == Key.Escape &&!settings.AllowAltEsc;
	block |= modifier.HasFlag(KeyModifier.Alt)&& key == Key.F4 &&!settings.AllowAltF4;
	block |= modifier.HasFlag(KeyModifier.Alt)&& key == Key.Space;
	block |= modifier.HasFlag(KeyModifier.Alt)&& key == Key.Tab;
	block |= modifier.HasFlag(KeyModifier.Ctrl)&& key == Key.Escape &&!settings.AllowCtrlEsc;if(block){Log(key, keyCode, modifier, state);}return block;}
Có vẻ method này sẽ check xem có nên block cái combo này của chúng ta, lại một lần nữa, xóa sạch rồi return false; nào quý dị. Tương tự với MouseInterceptor.cs nha.
Liệu như này là ổn? Không, quay lại phương pháp anti cheat cổ xưa nhất, biết đâu người ta dùng JavaScript thì sao? Vậy thì thời tới rồi, intercept luôn mấy cái event trong JavaScript vậy .
Sau khi lên hỏi Gugu “how to inject script cefsharp” thì chúng ta có cách làm sau:
- Tạo 1 cái RequestHandler để có thể intercept sự kiện request 1 cái document.
- Intercept sự kiện request document, chèn code JavaScript vào.
Giờ thì làm thôi!
Đầu tiên chúng ta sẽ tạo fileSafeExamBrowser.Browser/Filters/JavascriptInjectionFilter.csvà thêm nó vào trongItemGrouptrongSafeExamBrowser.Browser/SafeExamBrowser.Browser.csproj:<Compile Include="FiltersJavascriptInjectionFilter.cs" />như vậy thì file mới được dịch. Trong fileJavascriptInjectionFilter.csthì cứ điền như này thôi:
usingSystem;usingSystem.IO;usingSystem.Text;usingSystem.Collections.Generic;usingCefSharp;namespaceSafeExamBrowser.Browser.Filters{publicclassJavascriptInjectionFilter:IResponseFilter{privatereadonlystring injection;privatereadonlystring location;privateint offset =0;privateList<byte> overflow =newList<byte>();publicJavascriptInjectionFilter(string injection){this.injection = injection;this.location ="<head>";}publicFilterStatusFilter(Stream dataIn,outlong dataInRead,Stream dataOut,outlong dataOutWritten){
			dataInRead = dataIn ==null?0: dataIn.Length;
			dataOutWritten =0;if(overflow.Count >0){var buffersize = Math.Min(overflow.Count,(int)dataOut.Length);
				dataOut.Write(overflow.ToArray(),0, buffersize);
				dataOutWritten += buffersize;if(buffersize < overflow.Count){
					overflow.RemoveRange(0, buffersize -1);}else{
					overflow.Clear();}}for(var i =0; i < dataInRead;++i){var readbyte =(byte)dataIn.ReadByte();var readchar = Convert.ToChar(readbyte);var buffersize = dataOut.Length - dataOutWritten;if(buffersize >0){
					dataOut.WriteByte(readbyte);
					dataOutWritten++;}else{
					overflow.Add(readbyte);}if(char.ToLower(readchar)== location[offset]){
					offset++;if(offset >= location.Length){
						offset =0;
						buffersize = Math.Min(injection.Length, dataOut.Length - dataOutWritten);if(buffersize >0){var data = Encoding.UTF8.GetBytes(injection);
							dataOut.Write(data,0,(int)buffersize);
							dataOutWritten += buffersize;}if(buffersize < injection.Length){var remaining = injection.Substring((int)buffersize,(int)(injection.Length - buffersize));
							overflow.AddRange(Encoding.UTF8.GetBytes(remaining));}}}else{
					offset =0;}}if(overflow.Count >0|| offset >0){return FilterStatus.NeedMoreData;}return FilterStatus.Done;}publicboolInitFilter(){returntrue;}publicvoidDispose(){}}}
Code này là mình nhặt đâu ấy , các bạn cũng cứ copy theo thôi là được rồi, khỏi giải thích gì ha.
Tiếp theo các bạn thêm cái filter kia vào file SafeExamBrowser.Browser/Handlers/ResourceHandler.cs là được:
- Thêm dòng này vào đầu, cho nó giống như những thứ còn lại thôi, còn nếu các bạn thích dùng full namespace thì tùy :
usingJavascriptInjectionFilter=SafeExamBrowser.Browser.Filters.JavascriptInjectionFilter;- Viết script để intercept events nào, mình có sẵn đây luôn:
(function(){var realAddEventListener = window.addEventListener;functionisNotChar(event){return event.key.length ===0;}functionremoveSpecialKey(event){
        event.altKey =false;
        event.ctrlKey =false;
        event.shiftKey =false;}functionkeyboardInterceptor(listener){returnfunction(event){if(isNotChar(event))return;removeSpecialKey(event);listener(event);};}functionnewAddEventListener(type, listener, useCapture, wantsUntrusted){var interceptedListener;switch(type){case"blur":case"focus":return;case"keydown":case"keypress":case"keyup":
                interceptedListener =keyboardInterceptor(listener);break;default:
                interceptedListener = listener;break;}realAddEventListener(
            type,
            interceptedListener,
            useCapture,
            wantsUntrusted
        );}
window.addEventListener = newAddEventListener;})();- Các bạn khai báo
const string InjectableScript = @"<script>{script ở trên kìa}</script>"; - Viết method để chạy filter:
protectedoverrideIResponseFilterGetResourceResponseFilter(IWebBrowser webBrowser,IBrowser browser,IFrame frame,IRequest request,IResponse response){if(frame.IsMain && request.ResourceType == ResourceType.MainFrame){returnnewJavascriptInjectionFilter(InjectableScript);}returnnull;}Vậy là chúng ta đã intercept xong JavaScript rồi đấy!
5. Không cho phép dùng nhiều màn hình
😥một điều rất buồn là mình đang dùng tới 3 màn hình mà chả nhẽ lúc thi lại tháo 2 cái ra? Nghe rất là mệt mỏi, mình thà ngồi vọc vạch thêm tí nữa còn hơn.
Lần này thì chả có manh mối nào, cứ thử “monitor” và “display” trước ha: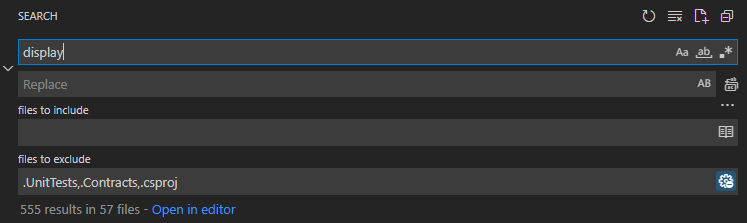 trông mệt mỏi thật sự, thôi thì thêm bộ lọc vào để lấy mỗi file source thôi nào:
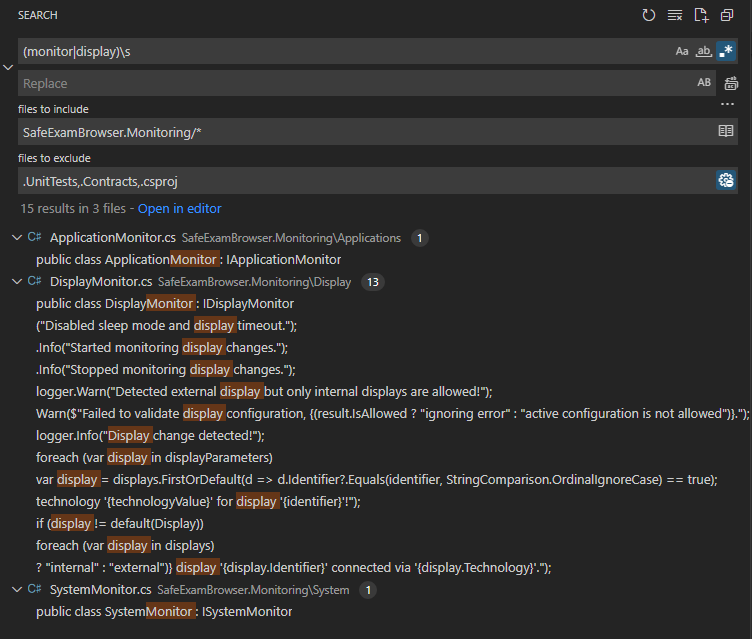
Khà khà, trông khả quan hơn hẳn mà. File DisplayMonitor.cs có vẻ chính là thủ phạm rồi, nó có method ValidateConfiguration nè:
publicValidationResultValidateConfiguration(DisplaySettings settings){var result =newValidationResult();if(TryLoadDisplays(outvar displays)){var active = displays.Where(d => d.IsActive);var count = active.Count();

        result.ExternalDisplays = active.Count(d =>!d.IsInternal);
        result.InternalDisplays = active.Count(d => d.IsInternal);
        result.IsAllowed = count <= settings.AllowedDisplays;if(result.IsAllowed){
            logger.Info($"Detected {count} active displays, {settings.AllowedDisplays} are allowed.");}else{
            logger.Warn($"Detected {count} active displays but only {settings.AllowedDisplays} are allowed!");}if(settings.InternalDisplayOnly && active.Any(d =>!d.IsInternal)){
            result.IsAllowed =false;
            logger.Warn("Detected external display but only internal displays are allowed!");}}else{
        result.IsAllowed = settings.IgnoreError;
        logger.Warn($"Failed to validate display configuration, {(result.IsAllowed ?"ignoring error":"active configuration is not allowed")}.");}return result;}
lại xóa hết và return thứ chúng ta muốn thôi:
publicValidationResultValidateConfiguration(DisplaySettings settings){var result =newValidationResult();

    result.ExternalDisplays =0;
    result.InternalDisplays =1;
    result.IsAllowed =true;return result;}
6. 🔑vô hiệu hóa mật khẩu thoát
Trong lúc mình test thì mình có phải chạy đi chạy lại rất nhiều lần và nó cứ hỏi mật khẩu thoát 😠rất chi là khó chịu nên mình thêm vào đây luôn. Cái này thì nó trong dialog nó gọi là “quit password”, thế thì mình thử luôn: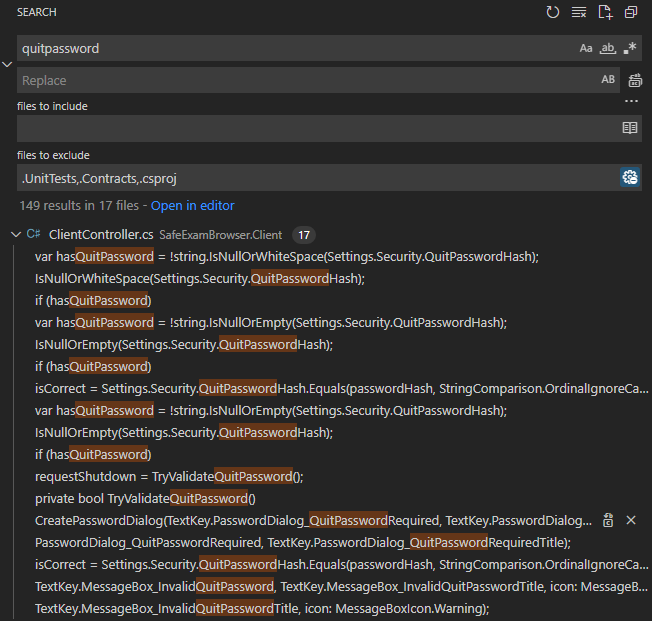
Có vẻ may mắn lại mỉm cười rồi, kết quả ngay đầu luôn . Trong class ClientController có method TryValidateQuitPassword:
privateboolTryValidateQuitPassword(){var dialog = uiFactory.CreatePasswordDialog(TextKey.PasswordDialog_QuitPasswordRequired, TextKey.PasswordDialog_QuitPasswordRequiredTitle);var result = dialog.Show();if(result.Success){var passwordHash = hashAlgorithm.GenerateHashFor(result.Password);var isCorrect = Settings.Security.QuitPasswordHash.Equals(passwordHash, StringComparison.OrdinalIgnoreCase);if(isCorrect){
            logger.Info("The user entered the correct quit password, the application will now terminate.");}else{
            logger.Info("The user entered the wrong quit password.");
            messageBox.Show(TextKey.MessageBox_InvalidQuitPassword, TextKey.MessageBox_InvalidQuitPasswordTitle,icon: MessageBoxIcon.Warning);}return isCorrect;}returnfalse;}
Nào bà con, xóa hết và return true; thôi!!!
Build nào
Mở Visual Studio lên và build thôi, các bạn nhớ clean solution và đặt target là Release x(tùy hệ điều hành của bạn)========== Build: 37 succeeded, 0 failed, 0 up-to-date, 11 skipped ==========
🤧 nó mà cứ 0 failed như này thì vui nhé, không thì khóc đi là vừa. Sau khi build xong chúng ta sẽ có 1 file Setup.msi nằm trong Setup/bin/x??/Release tầm hơn 100MB là ổn, ít hơn thì có khả năng là mất cái gì đó rồi.
Giờ thì bê cháu nó ra cài thôi:
Trông ngon đấy, nhưng ôi không:
Ròi xong, giờ sao nhỉ? Quay trở lại với code nào, thử tìm kiếm “browserexamkey” xem ra kết quả như nào:
- Đầu tiên chúng ta thấy
ResourceHandlergửi kèm các hash được tính toán bằng “BrowserExamKey”:
privatevoidAppendCustomHeaders(IWebBrowser webBrowser,IRequest request){
    Uri.TryCreate(webBrowser.Address, UriKind.Absolute,outvar pageUrl);
    Uri.TryCreate(request.Url, UriKind.Absolute,outvar requestUrl);if(pageUrl?.Host?.Equals(requestUrl?.Host)==true){var headers =newNameValueCollection(request.Headers);if(settings.SendConfigurationKey){
            headers["X-SafeExamBrowser-ConfigKeyHash"]= keyGenerator.CalculateConfigurationKeyHash(request.Url);}if(settings.SendBrowserExamKey){
            headers["X-SafeExamBrowser-RequestHash"]= keyGenerator.CalculateBrowserExamKeyHash(request.Url);}

request.Headers = headers;}}- Lần theo implementation, chúng ta biết “BrowserExamKey” được tạo ra bởi method
ComputeBrowserExamKeytrong classKeyGenerator:
publicstringCalculateBrowserExamKeyHash(string url){var urlWithoutFragment = url.Split('#')[0];var hash = algorithm.ComputeHash(Encoding.UTF8.GetBytes(urlWithoutFragment +(browserExamKey ??ComputeBrowserExamKey())));var key = BitConverter.ToString(hash).ToLower().Replace("-",string.Empty);return key;}- Và chúng ta biết rằng “BrowserExamKey” được tính toán qua 1 số thứ được cài sẵn:
privatestringComputeBrowserExamKey(){var salt = settings.Browser.BrowserExamKeySalt;if(salt ==default(byte[])){
        salt =newbyte[0];
        logger.Warn("The current configuration does not contain a salt value for the browser exam key!");}using(var algorithm =newHMACSHA256(salt)){var hash = algorithm.ComputeHash(Encoding.UTF8.GetBytes(appConfig.CodeSignatureHash + appConfig.ProgramBuildVersion + settings.Browser.ConfigurationKey));var key = BitConverter.ToString(hash).ToLower().Replace("-",string.Empty);

browserExamKey = key;return browserExamKey;}}- Trace ngược trở về nguồn gốc của object
KeyGeneratormàResourceHandlersử dụng, ta gặp nó ở trong methodBuildBrowserOperation()thuộc classCompositionRoot. ObjectKeyGeneratornày sử dụng settings từcontext.Settings. - Object
contextđược tạo ra trong methodBuildObjectGraph(Action shutdown)và sau đó được truyền vào constructor củaConfigurationOperation. - Trong class
ConfigurationOperation, ta thấy objectContextđược gán vài giá trị từ objectruntime. - Trace ngược lại và ta biết object
runtimekia là 1 đường để liên hệ tới service SEB đang chạy ngầm.Hm… giờ chúng ta phải giữ nguyên
Runtimevì nó sinh key trong khi vẫn giữ nguyên những thứ chúng ta đã mod. Và mình chợt nhận ra SEB chia ứng dụng ra làm nhiều DLL nhỏ, chúng ta chỉ cần chép những thứ đã làm là xong. Giờ cài thử SEB từ trang chính chủ rồi chép DLL vào thử nào. Ta sẽ phải chépSafeExamBrowser.Browser.dll,SafeExamBrowser.Client.dll,SafeExamBrowser.Configuration.dll,SafeExamBrowser.Monitoring.dllvàSafeExamBrowser.SystemComponents.dll. Thế là xong rồi đấy, đã vào được rồi (mình không chia sẻ ảnh chụp đâu vì lộ trường thì rip mất 😥).Bài rất dài chứ không phải hơi dài đâu, câu cú cũng lủng củng 🥴mong là được mọi người ủng hộ.
Nguồn: viblo.asia