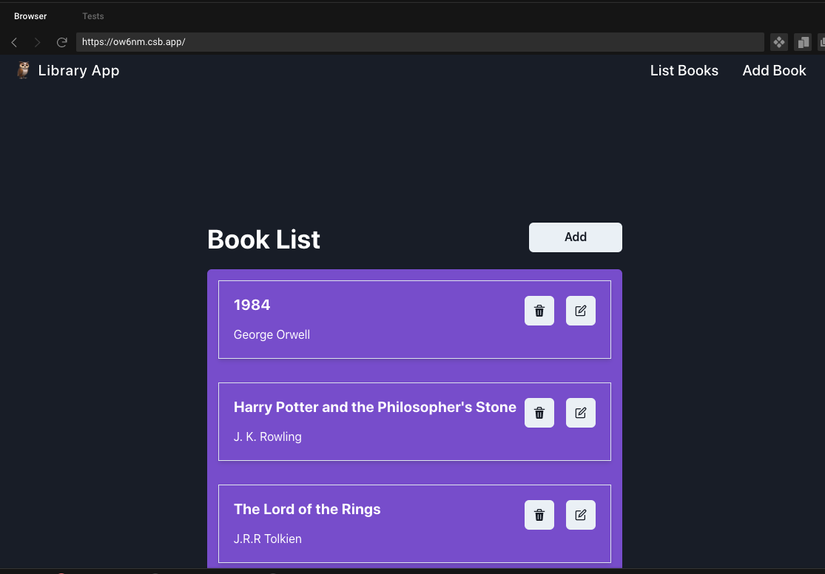
Trong bài viết này, chúng ta sẽ cùng nhau tìm hiểu cách sử dụng React, Typescript và Redux Toolkit. Mục tiêu là xây dựng một ứng dụng CRUD cơ bản, nơi chúng ta lưu trữ các tác giả và tên của cuốn sách, tôi sẽ chứng minh sự dễ dàng của việc sử dụng Typescript với các công nghệ khác. Tôi sẽ không đi sâu vào chi tiết của Redux, mà là chỉ ra cách RTK (Redux Toolkit). Chúng tôi cũng sẽ sử dụng react-router-dom để điều hướng giữa các trang và giao diện Chakra UI. Tôi hy vọng vào cuối bài viết này, Tôi hy vọng vào cuối bài viết này, bạn sẽ áp dụng được RTK và Typescript để bắt đầu dự án tiếp theo của mình với những công nghệ này.
Giả sử bạn có kiến thức cơ bản về React và React Router.
Hãy cài đặt tất cả các dependencies này:
yarn add @chakra-ui/icons @chakra-ui/react @emotion/react @emotion/styled @reduxjs/toolkit framer-motion react-redux react-router-dom uuid @types/react-redux @types/react-router-dom @types/uuid
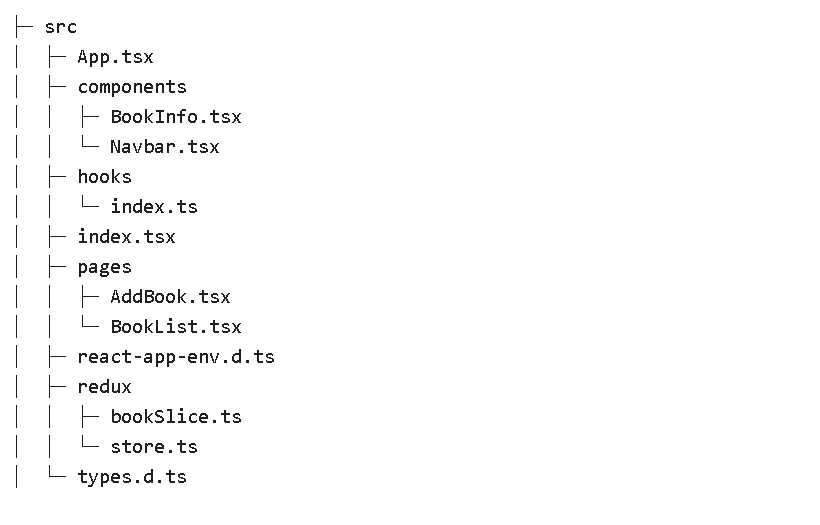
Cấu trúc folder
Trước tiên, hãy bắt đầu với index.ts
Chúng tôi sẽ thiết lập Provider cho UI Redux và Chakra của mình.
js
index.ts
iport React from 'react';
import ReactDOM from 'react-dom';
import App from './App';
import reportWebVitals from './reportWebVitals';
import { ChakraProvider, extendTheme } from '@chakra-ui/react';
import { Provider } from 'react-redux';
import { store } from './redux/store';

const theme = extendTheme({
  // Set background to blackish color.
  styles: {
    global: {
      'html, body': {
        backgroundColor: 'rgb(26,32,44)',
      },
    },
  },
});

ReactDOM.render(
  <React.StrictMode>
    <Provider store={store}>
      <ChakraProvider theme={theme}>
        <App />
      </ChakraProvider>
    </Provider>
  </React.StrictMode>,
  document.getElementById('root'),
);

// If you want to start measuring performance in your app, pass a function
// to log results (for example: reportWebVitals(console.log))
// or send to an analytics endpoint. Learn more: https://bit.ly/CRA-vitals
reportWebVitals();
Định nghĩa store và reducers
store.ts
import { configureStore } from '@reduxjs/toolkit';
import { bookSlice } from './bookSlice';

export const store = configureStore({
  reducer: {
    book: bookSlice.reducer,
  },
});

export type RootState = ReturnType<typeof store.getState>; // A global type to access reducers types
export type AppDispatch = typeof store.dispatch; // Type to access dispatch
reducer.ts
import { createSlice, PayloadAction } from '@reduxjs/toolkit';
import { RootState } from './store';
import { v4 as uuidv4 } from 'uuid';
import { BookState } from '../types';

//Defining our initialState's type
type initialStateType = {
  bookList: BookState[];
};

const bookList: BookState[] = [
  {
    id: uuidv4(),
    title: '1984',
    author: 'George Orwell',
  },
  {
    id: uuidv4(),
    title: "Harry Potter and the Philosopher's Stone",
    author: 'J. K. Rowling',
  },
  {
    id: uuidv4(),
    title: 'The Lord of the Rings',
    author: 'J.R.R Tolkien',
  },
];

const initialState: initialStateType = {
  bookList,
};

export const bookSlice = createSlice({
  name: 'book',
  initialState,
  reducers: {
    addNewBook: (state, action: PayloadAction<BookState>) => {
      state.bookList.push(action.payload);
    },
    updateBook: (state, action: PayloadAction<BookState>) => {
      const {
        payload: { title, id, author },
      } = action;

      state.bookList = state.bookList.map((book) =>
        book.id === id ? { ...book, author, title } : book,
      );
    },
    deleteBook: (state, action: PayloadAction<{ id: string }>) => {
      state.bookList = state.bookList.filter((book) => book.id !== action.payload.id);
    },
  },
});

// To able to use reducers we need to export them.
export const { addNewBook, updateBook, deleteBook } = bookSlice.actions;

//Selector to access bookList state.
export const selectBookList = (state: RootState) => state.book.bookList;

export default bookSlice.reducer;
bookSlice nhận tên như một key để phân biệt với các slice khác. InitialState là state khởi tạo ban đầu. reducers sẽ định nghĩa các actions, nó giống như 1 reducer bình thường nhận vào InitialState và actions, nhưng chúng ta đang sử dụng Typescript nên chúng ta cần xác định kiểu cho PayloadAction, xác định type trong file type.d.ts
types.d.ts
export type BookState = {
 id: string;
 title: string | undefined;
 author: string | undefined;
};
Và chúng ta cũng sẽ tạo 1 tệp cho Hooks
hooks/index.ts
import { TypedUseSelectorHook, useDispatch, useSelector } from 'react-redux';
import { RootState, AppDispatch } from '../redux/store';

//useDispatch hook with types.
export const useAppDispatch = () => useDispatch<AppDispatch>();
//useSelector hook with types
export const useAppSelector: TypedUseSelectorHook<RootState> = useSelector;
Vậy là chúng ta đã hoàn thành phần Redux và hooks. Bây giờ, tất cả những gì chúng ta phải làm là tạo hai thành phần, một cho Navbar và một cho BookInfo, để hiển thị dữ liệu của danh sách các cuốn sách
html
Navbar.tsx
import { Button, Flex, Box, Text } from '@chakra-ui/react';
import { Link } from 'react-router-dom';

const Navbar = () => {
  return (
    <Flex
      flexDirection="row"
      justifyContent="space-between"
      alignItems="center"
      width="100%"
      as="nav"
      p={4}
      mx="auto"
      maxWidth="1150px"
    >
      <Box>
        <Link to="/">
          <Button
            fontWeight={['medium', 'medium', 'medium']}
            fontSize={['xs', 'sm', 'lg', 'xl']}
            variant="ghost"
            _hover={{ bg: 'rgba(0,0,0,.2)' }}
            padding="1"
            color="white"
            letterSpacing="0.65px"
          >
            <Text fontSize={['xl', '2xl', '2xl', '2xl']} mr={2}>
              🦉
            </Text>
            Library App
          </Button>
        </Link>
      </Box>

      <Box>
        <Link to="/">
          <Button
            fontWeight={['medium', 'medium', 'medium']}
            fontSize={['xs', 'sm', 'lg', 'xl']}
            variant="ghost"
            _hover={{ bg: 'rgba(0,0,0,.2)' }}
            p={[1, 4]}
            color="white"
          >
            List Books
          </Button>
        </Link>
        <Link to="/add-new-book">
          <Button
            fontWeight={['medium', 'medium', 'medium']}
            fontSize={['xs', 'sm', 'lg', 'xl']}
            variant="ghost"
            _hover={{ bg: 'rgba(0,0,0,.2)' }}
            p={[1, 4]}
            color="white"
          >
            Add Book
          </Button>
        </Link>
      </Box>
    </Flex>
  );
};

export default Navbar;
Navbar giản chứa các liên kết để điều hướng giữa các trang.
BookInfo.tsx
import { DeleteIcon, EditIcon } from '@chakra-ui/icons';
import { Box, Heading, IconButton, Text } from '@chakra-ui/react';

import { useAppDispatch } from '../hooks';
import { deleteBook } from '../redux/bookSlice';
import { useHistory } from 'react-router-dom';

const BookInfo = ({
  title,
  author,
  id,
  ...rest
}: {
  title: string | undefined,
  author: string | undefined,
  id: string,
}) => {
  const dispatch = useAppDispatch(); // To able to call reducer, functions we use our hook called useAppDispatch
  const history = useHistory();

  //Redirecting user to /update-book route with id parameter.
  const redirect = (id: string) => {
    history.push(`/update-book/${id}`);
  };

  return (
    <Box p={5} justifyContent="space-between" d="flex" shadow="md" borderWidth="1px" {...rest}>
      <Box d="flex" flexDirection="column">
        <Heading fontSize="xl">{title}</Heading>
        <Text mt={4}>{author}</Text>
      </Box>
      <Box>
        <IconButton
          color="#1a202c"
          aria-label=""
          icon={<DeleteIcon />}
          marginRight="1rem"
          onClick={() => dispatch(deleteBook({ id }))}
        />
        <IconButton
          color="#1a202c"
          aria-label=""
          icon={<EditIcon />}
          onClick={() => redirect(id)}
        />
      </Box>
    </Box>
  );
};

export default BookInfo;
Bây giờ chúng ta cần tạo 1 nơi chứa những component. Do đó, chúng ta sẽ tách trang BookList thành 2 phần là hiển thị danh sách book, thêm mới và cập nhật book
BookList.tsx
import { Box, Button, Flex, Heading, Stack } from '@chakra-ui/react';
import { Link } from 'react-router-dom';
import { useAppSelector } from '../hooks';
import BookInfo from '../components/BookInfo';

const BookList = () => {
  // If we had any other state like book, we could have select it same way we select book. For example, author would be  useAppSelector((state) => state.author.authorNames)
  const bookList = useAppSelector((state) => state.book.bookList);

  return (
    <Flex height="100vh" justifyContent="center" alignItems="center" flexDirection="column">
      <Box width="50%">
        <Box d="flex" flexDirection="row" justifyContent="space-between" marginBottom="20px">
          <Heading color="white">Book List</Heading>
          <Link to="/add-new-book">
            <Button paddingX="3rem">Add</Button>
          </Link>
        </Box>
        <Box rounded="md" bg="purple.500" color="white" px="15px" py="15px">
          <Stack spacing={8}>
            {bookList.map((book) => (
              <BookInfo key={book.id} title={book.title} author={book.author} id={book.id} />
            ))}
          </Stack>
        </Box>
      </Box>
    </Flex>
  );
};
export default BookList;
Chúng ta sẽ sử dụng BookInfo đã định nghĩa trước đó
AddBook.tsx
import { Box, Button, Flex, FormControl, FormLabel, Heading, Input } from '@chakra-ui/react';

import { useState } from 'react';
import { useAppDispatch, useAppSelector } from '../hooks';
import { addNewBook, updateBook } from '../redux/bookSlice';
import { v4 as uuidv4 } from 'uuid';
import { useParams, useHistory } from 'react-router-dom';

const AddBook = () => {
 const { id } = useParams<{ id: string }>(); //If user comes from /update-book, we will catch id of that book here.
 const history = useHistory();
 const dispatch = useAppDispatch();
 const book = useAppSelector((state) => state.book.bookList.find((book) => book.id === id)); // Selecting particular book's information to prefill inputs for updating.

 const [title, setTitle] = useState<string | undefined>(book?.title || ''); // We are initializing useStates if book variable has title or author.
 const [author, setAuthor] = useState<string | undefined>(book?.author || '');

 const handleOnSubmit = () => {
   if (id) {
     editBook();
     return;
   }
   dispatch(addNewBook({ author, title, id: uuidv4() }));
   clearInputs();
 };

 const editBook = () => {
   dispatch(updateBook({ author, title, id }));
   clearInputs();
   history.push('/');
 };

 const clearInputs = () => {
   setTitle('');
   setAuthor('');
 };

 return (
   <Flex height="100vh" justifyContent="center" alignItems="center" flexDirection="column">
     <Box width="50%">
       <Box d="flex" flexDirection="row" justifyContent="space-between" marginBottom="20px">
         <Heading color="white">Add Book</Heading>
       </Box>
       <FormControl isRequired>
         <FormLabel color="white">Title</FormLabel>
         <Input
           value={title}
           color="white"
           placeholder="The Lord of the Rings"
           onChange={(e) => setTitle(e.currentTarget.value)}
         />
         <FormLabel color="white" marginTop={4}>
           Author
         </FormLabel>
         <Input
           value={author}
           color="white"
           placeholder="J.R.R Tolkien"
           onChange={(e) => setAuthor(e.currentTarget.value)}
         />
       </FormControl>
       <Button marginTop={4} colorScheme="teal" type="submit" onClick={handleOnSubmit}>
         Submit
       </Button>
     </Box>
   </Flex>
 );
};

export default AddBook;
Cái này phức tạp hơn BookList một chút. Vì chúng ta thực hiện các thao tác thêm và cập nhật trên cùng một trang nên thoạt đầu trông có vẻ phức tạp và cồng kềnh, nhưng nó khá đơn giản và dễ hiểu. Tất cả những gì chúng tôi làm là nếu có bất kỳ dữ liệu nào như tác giả, tên sách, nghĩa là chúng ta đang chỉnh sửa sách và điền thông tin đầu vào cho phù hợp. Nếu không có dữ liệu, chúng ta sẽ nhập tên sách và tác giả và thêm chúng vào bookList với dispatch action
Đã đến lúc hợp nhất tất cả chúng thành một
App.tsx
import { BrowserRouter as Router, Switch, Route } from 'react-router-dom';
import Navbar from './components/Navbar';
import AddBook from './pages/AddBook';
import BookList from './pages/BookList';

function App() {
  return (
    <Router>
      <Navbar />
      <Switch>
        <Route path="/" exact component={BookList} />
        <Route path="/add-new-book" component={AddBook} />
        <Route path="/update-book/:id" component={AddBook} />
      </Switch>
    </Router>
  );
}

export default App;
Cuối cùng là hình ảnh demo project của chúng ta.

Bây giờ chúng ta đã có một project nhỏ sử dụng React, Typescript và Redux Toolkit. Tôi hy vọng tôi đã khuyến khích bạn sử dụng RTK với Typescript trong project tiếp theo của các bạn.
Thanks for reading!
Demo: https://codesandbox.io/s/react-reduxtoolkit-typescript-ow6nm?from-embed
Nguồn: https://ogzhanolguncu.com
Nguồn: viblo.asia

