Trong bài viết này mình sẽ chia sẻ cách sử dụng soft delete trong Laravel.
Cách hoạt động của soft delete là laravel sẽ thêm cột delete_at trên bảng và mặc định giá trị của cột delete_at sẽ là null.
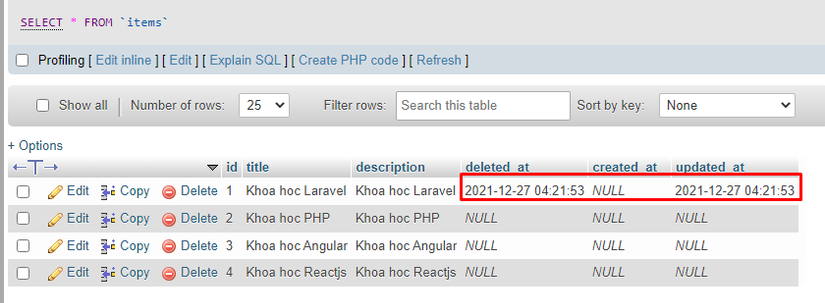
Khi chúng ta xóa một bản ghi trong database thì giá trị của cột delete_at ở bản ghi bị xóa sẽ được cập nhật bằng thời gian hiện tại và khi query lấy dữ liệu thì Model Laravel luôn thêm điều kiện delete_at = null vào câu query.
Trước khi đi vào ví dụ, mình sẽ tạo bảng items bằng command bên dưới để lưu một vài dữ liệu test nhé:
php artisan make:migration create_items_table
Sau khi chạy migration thì mình sẽ có 1 file kiểu 2021_12_22_011024_create_items_table.php trong thư mục app/database/migrations.
Trong file migration này mình sẽ thêm code như bên dưới để tạo các trường trong bảng items.
<?phpuseIlluminateDatabaseMigrationsMigration;useIlluminateDatabaseSchemaBlueprint;useIlluminateSupportFacadesSchema;classCreateItemsTableextendsMigration{/**
     * Run the migrations.
     *
     * @return void
     */publicfunctionup(){Schema::create('items',function(Blueprint$table){$table->increments('id');$table->string('title');$table->text('description');$table->softDeletes();// đoạn này để thêm trường deleted_at, mặc định giá trị là null$table->timestamps();});}/**
     * Reverse the migrations.
     *
     * @return void
     */publicfunctiondown(){Schema::dropIfExists('items');}}
Tiếp theo mình chạy command bên dưới để thêm các trường dữ liệu vào bảng items:
php artisan migrate --path=/database/migrations/2021_12_22_011024_create_items_table.php
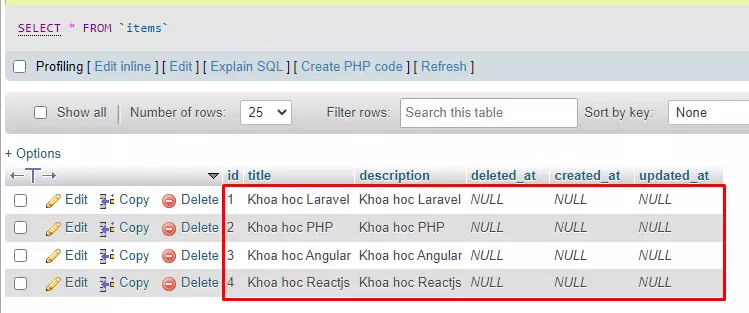
Bậy giờ bạn có thể thấy cột deleted_at trong bảng items và mình đã tạo dữ liệu test như bên dưới.

Mình tạo model,controller như bên dưới.
Items Model:
<?phpnamespaceAppModels;useIlluminateDatabaseEloquentFactoriesHasFactory;useIlluminateDatabaseEloquentModel;useIlluminateDatabaseEloquentSoftDeletes;classItemextendsModel{useHasFactory;useSoftDeletes;//dòng này để tự động thêm điều kiện delete_at = null vào câu query nhé}Items Controller:
<?phpnamespaceAppHttpControllers;useAppModelsItem;useIlluminateHttpRequest;classItemControllerextendsController{/**
     * Display a listing of the resource.
     *
     * @return IlluminateHttpResponse
     */publicfunctionindex(){}}
Bây giờ mình có thể sử dụng model trong Controller để lấy dữ liệu như trước đây các bạn đã sử dụng.
Ví dụ lấy tất cả dữ liệu từ bảng items:
Bạn hãy thêm code bên dưới vào trong hàm index bên trên để kiểm tra nhé.
publicfunctionindex(){$data=Item::get()->toArray();dd($data);}Output:
array:4 [▼
  0 => array:6 [▼
    "id" => 1
    "title" => "Khoa hoc Laravel"
    "description" => "Khoa hoc Laravel"
    "deleted_at" => null
    "created_at" => null
    "updated_at" => null
  ]
  1 => array:6 [▼
    "id" => 2
    "title" => "Khoa hoc PHP"
    "description" => "Khoa hoc PHP"
    "deleted_at" => null
    "created_at" => null
    "updated_at" => null
  ]
  2 => array:6 [▼
    "id" => 3
    "title" => "Khoa hoc Angular"
    "description" => "Khoa hoc Angular"
    "deleted_at" => null
    "created_at" => null
    "updated_at" => null
  ]
  3 => array:6 [▼
    "id" => 4
    "title" => "Khoa hoc Reactjs"
    "description" => "Khoa hoc Reactjs"
    "deleted_at" => null
    "created_at" => null
    "updated_at" => null
  ]
]
Ví dụ xóa dữ liệu từ bảng items:
publicfunctionindex(){$data=Item::find(1)->delete();}Output:
Sau khi xóa bản ghi thì cột delete_at sẽ được cập nhật với giá trị là thời gian hiện tại như ảnh bên dưới.

Ví dụ lấy tất cả dữ liệu từ bảng items sau khi xóa 1 bản ghi:
Hàm này sẽ chỉ hiển thị dữ liệu có cột delete_at != null.
publicfunctionindex(){$data=Item::get()->toArray();dd($data);}Output:
array:3 [▼
  0 => array:6 [▼
    "id" => 2
    "title" => "Khoa hoc PHP"
    "description" => "Khoa hoc PHP"
    "deleted_at" => null
    "created_at" => null
    "updated_at" => null
  ]
  1 => array:6 [▼
    "id" => 3
    "title" => "Khoa hoc Angular"
    "description" => "Khoa hoc Angular"
    "deleted_at" => null
    "created_at" => null
    "updated_at" => null
  ]
  2 => array:6 [▼
    "id" => 4
    "title" => "Khoa hoc Reactjs"
    "description" => "Khoa hoc Reactjs"
    "deleted_at" => null
    "created_at" => null
    "updated_at" => null
  ]
]
Ví dụ sử dụng hàm withTrashed():
Hàm này sẽ lấy tất cả dữ liệu từ bảng items bao gồm cả những bản ghi đã bị xóa.
publicfunctionindex(){$model=newItem();$data=$model::withTrashed()->get()->toArray();dd($data);}Output:
array:4 [▼
  0 => array:6 [▼
    "id" => 1
    "title" => "Khoa hoc Laravel"
    "description" => "Khoa hoc Laravel"
    "deleted_at" => "2021-12-27T04:21:53.000000Z"
    "created_at" => null
    "updated_at" => "2021-12-27T04:21:53.000000Z"
  ]
  1 => array:6 [▼
    "id" => 2
    "title" => "Khoa hoc PHP"
    "description" => "Khoa hoc PHP"
    "deleted_at" => null
    "created_at" => null
    "updated_at" => null
  ]
  2 => array:6 [▼
    "id" => 3
    "title" => "Khoa hoc Angular"
    "description" => "Khoa hoc Angular"
    "deleted_at" => null
    "created_at" => null
    "updated_at" => null
  ]
  3 => array:6 [▼
    "id" => 4
    "title" => "Khoa hoc Reactjs"
    "description" => "Khoa hoc Reactjs"
    "deleted_at" => null
    "created_at" => null
    "updated_at" => null
  ]
]
Ví dụ sử dụng hàm onlyTrashed():
Hàm này sẽ chỉ lấy các dữ liệu đã bị xóa từ bảng items.
publicfunctionindex(){$model=newItem();$data=$model::onlyTrashed()->get()->toArray();dd($data);}Output:
array:1 [▼
  0 => array:6 [▼
    "id" => 1
    "title" => "Khoa hoc Laravel"
    "description" => "Khoa hoc Laravel"
    "deleted_at" => "2021-12-27T04:21:53.000000Z"
    "created_at" => null
    "updated_at" => "2021-12-27T04:21:53.000000Z"
  ]
]
Hy vọng bài viết sẽ giúp ích cho các bạn!
Nguồn: viblo.asia
