Giới thiệu
Cần tây là một hàng đợi tác vụ không đồng bộ mã nguồn mở hoặc hàng đợi công việc dựa trên việc truyền thông điệp phân tán. Mặc dù nó hỗ trợ lập lịch trình, nhưng trọng tâm của nó là hoạt động trong thời gian thực.
Mô hình hoạt động
Khi nào cần sử dụng celery
- Chạy background jobs
- Chạy các job lập lịch
- Tính toán phân tán
- Xử lý song song
Chức năng
- Monitor: giám sát các job/task được đưa vào queue
- Scheduling: chạy các task lập lịch (giống cronjob)
- Workflows: tạo một luồng xử lý task
- Time & Rate Limits: kiểm soát số lượng task được thực thi trong một khoảng thời gian, thời gian một task được chạy,…
- Resource Leak Protection: kiểm soát tài nguyên trong quá trình xử lý task
- User Component: cho phép người dùng tự customize các worker.
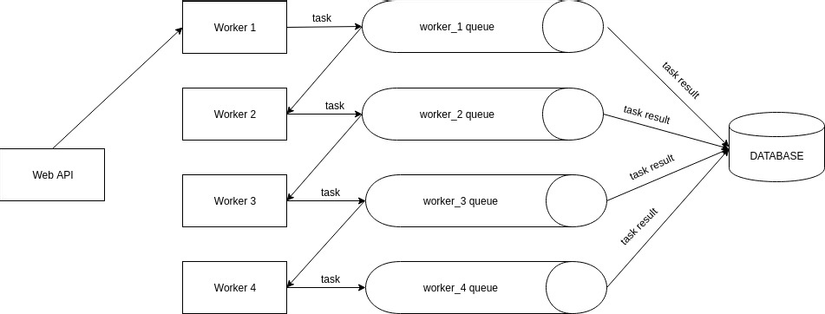
Cơ chế của Celery
- Celery hoạt động dựa trên khái niệm task queue. Đây là cơ chế queue dùng để điều phối các job/work giữa các máy khác nhau. Các worker sẽ nhận task, chạy task và trả về kết quả.
- Input của queue:
- Task
- Các process trên từng worker sẽ theo dõi queue để thực thi các task mới được đẩy vào queue
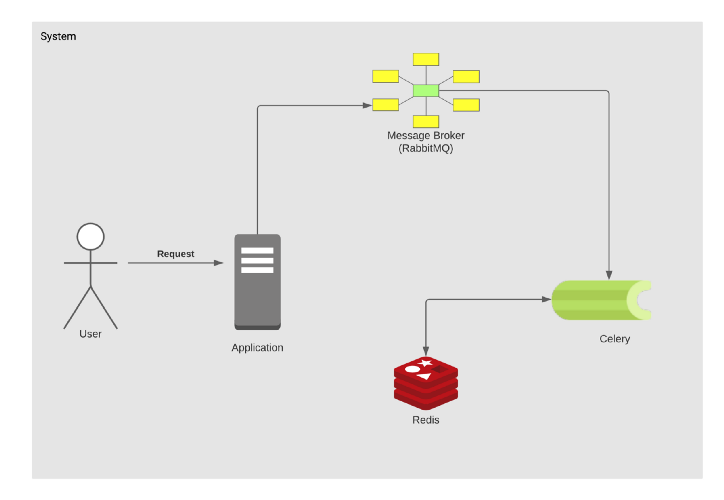
- Celery thường dùng một message broker để điều phối task giữa các clients và worker. Để tạo một task mới client sẽ thêm một message vào queue, broker sau đó sẽ chuyển message này tới worker. Celery hỗ trợ 3 loại broker:
- RabbitMQ
- Redis
- SQS
- Một hệ thống sử dụng celery có thể có nhiều workers và brokers, nhờ vậy việc scale theo chiều ngang sẽ rất dễ dàng.
Cài đặt
Django, Package
pip install django
django-admin startproject app
django-admin startapp tutorial
Tạo file
app
├─ tutorial
│  ├─ __init__
│  ├─ admin.py
│  ├─ apps.py
│  ├─ models.py
│  ├─ tasks.py
│  ├─ tests.py
│  ├─ urls.py
│  └─ views.py
├─ app
│  ├─ __init__
│  ├─ asgi.py
│  ├─ celery.py
│  ├─ setting.py
│  ├─ urls.py
│  └─ wsgi.py
├─ static
├─ templates
├─ docker-compose.yml
├─ Dockerfile
├─ manage.py
└─ requirements.txt
Tạo 1 file requirements.txt trong app
Django==3.2.6
psycopg2==2.9.1
psycopg2-binary==2.9.1
celery==5.1.2
django-celery-results==2.2.0
redis==3.5.3
Và gõ lệnh sau
pip install -r requirements.txt
Docker
Chỉnh sửa Dockerfile
FROM python:3

ENV PYTHONUNBUFFERED=1

WORKDIR /code
COPY requirements.txt /code/

RUN apt-get update
    && apt-get -y install libpq-dev gcc
RUN pip install -r requirements.txt
COPY . /code/

EXPOSE 8000
CMD ["python", "manage.py", "runserver", "0.0.0.0:8000"]
Chỉnh sửa docker-compose.yml. Chúng ta sử dụng thêm Redis làm người môi giới(broker message)
version:"3.9"

services:
  db:
    image: postgres
    container_name: postgres
    volumes:-./data/db:/var/lib/postgresql/data
    environment:- POSTGRES_DB=postgres
      - POSTGRES_USER=postgres
      - POSTGRES_PASSWORD=postgres
    ports:-"5432:5432"
    healthcheck:
      test:["CMD-SHELL","pg_isready -U postgres"]
      interval: 10s
      timeout: 5s
      retries:5
    restart: always

  redis:
    image: redis:alpine
    container_name: redis
    healthcheck:
      test:["CMD","redis-cli","ping"]
      interval: 2s
      timeout: 3s
      retries:10

  celery:
    build:.
    container_name: celery
    command: celery -A app worker -l info
    volumes:-.:/code
    depends_on:- web
      - redis
      - db

  web:
    build:.
    container_name: web
    volumes:-.:/code
    ports:-"8000:8000"
    environment:- DEBUG=1- DJANGO_ALLOWED_HOST=localhost 127.0.0.1- CELERY_BROKER=redis://redis:6379/0- CELERY_BACKEND=redis://redis:6379/0
    depends_on:
      db:
        condition: service_healthy
      redis:
        condition: service_healthy
    command: bash -c "python manage.py makemigrations && python manage.py migrate && python manage.py runserver 0.0.0.0:8000"
    restart: on-failure
Code
Setting
Chỉnh sửa file setting.py
INSTALLED_APPS =['django.contrib.admin','django.contrib.auth','django.contrib.contenttypes','django.contrib.sessions','django.contrib.messages','django.contrib.staticfiles','django_celery_results','tutorial',]

DATABASES ={'default':{'ENGINE':'django.db.backends.postgresql','NAME':'postgres','USER':'postgres','PASSWORD':'postgres','HOST':'db','PORT':5432,}}

CELERY_BROKER_URL = os.environ.get("CELERY_BROKER","redis://redis:6379/0")
CELERY_RESULT_BACKEND ='django-db'
CELERY_ACCEPT_CONTENT =['application/json']
CELERY_TASK_SERIALIZER ='json'
CELERY_RESULT_SERIALIZER ='json'
Celery
Chỉnh sửa file init trong thư mục app
#app/__init__.pyfrom __future__ import absolute_import, unicode_literals

# This will make sure the app is always imported when# Django starts so that shared_task will use this app.from.celery import app as celery_app

__all__ =['celery_app']
chỉnh sửa file celery.py
from __future__ import absolute_import, unicode_literals

import os
from celery import Celery
from celery.schedules import crontab

# set the default Django settings module for the 'celery' program.
os.environ.setdefault('DJANGO_SETTINGS_MODULE','app.settings')

app = Celery('app')# Using a string here means the worker doesn't have to serialize# the configuration object to child processes.# - namespace='CELERY' means all celery-related configuration keys#   should have a `CELERY_` prefix.
app.config_from_object('django.conf:settings', namespace='CELERY')# Load task modules from all registered Django app configs.
app.autodiscover_tasks()@app.task(bind=True)defdebug_task(self):print('Request: {0!r}'.format(self.request))
Tasks
Tạo và chỉnh sửa file task trong thư mục tutorial
from __future__ import absolute_import, unicode_literals

from celery import shared_task

@shared_task(name="add")defadd(a,b):return a+b
Tutorial
Chỉnh sửa file urls.py trong app
from django.contrib import admin
from django.urls import path,include

urlpatterns =[
    path('admin/', admin.site.urls),
    path('', include("tutorial.urls")),]
Tạo và thêm file urls.py trong tutorial
from django.urls import path,include
from.import views

app_name ='tutorial'

urlpatterns =[
    path('',  views.total, name="total"),]
Chỉnh sửa file views.py trong tutorial
from django.http.response import HttpResponse
from django.shortcuts import render
from.tasks import*deftotal(request):
    res = add.delay(4,5)return HttpResponse(res)
Trình duyệt sẽ hiển thị UUID của task

Kết quả được hiển thị ở celery trong docker.

Build
docker-compose build
docker-compose up
Bài viết đến đây là kết thúc. Chúc các bạn thành công
Nguồn: viblo.asia