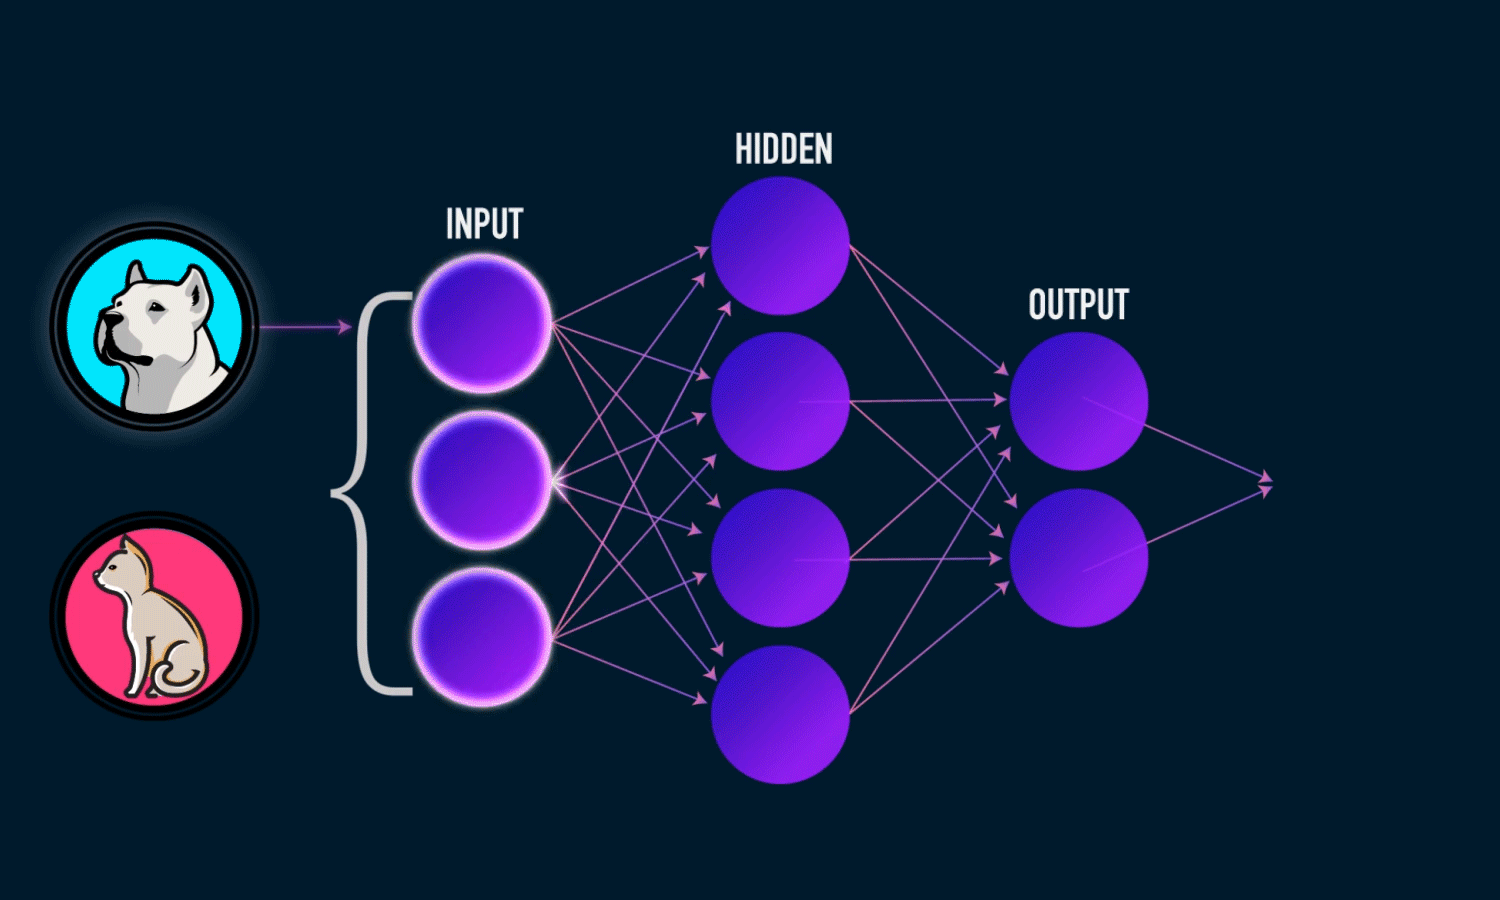
Hình ảnh mình mượn tại đây nhé Cat&Doc
Why?
Dạo này đang tìm hiểu về Spark Distributed ML model để sử dụng nền tảng tính toán phân tán của Apache Spark thực thi các tác vụ Machine Learning cho hệ thống Big-Data. Spark có 2 ngôn ngữ đc sử dụng là scala và python (pypark) thì bài này đề cập đến Pyspark có thể mình sẽ viết một bài về scala (not today  ). Toàn bộ code có thể tìm thấy tại repo Github
Đặt vấn đề là mình có tệp dữ liệu siêu siêu lớn về chó và mèo cần lọc ra chúng ra hai nơi riêng biệt, để làm được điều đó mình lại dùng model thần thánh object detection CNN đã được đề cập trong bài trước [Serving ML Models in Production with FastAPI and Celery] trai(https://viblo.asia/p/serving-ml-models-in-production-with-fastapi-and-celery-924lJROmlPM) train lại với [Cat&Dog Dataset] (https://www.kaggle.com/c/dogs-vs-cats/data) để phân loại hình ảnh chó và mèo tuy nhiên thay vì kiểm tra từng hình và phân loại thì để tăng độ khó mình muốn sử lý theo dạng batch và dùng spark để phân tán đến nhiều worker node để kiểm tra khả năng sử lý dữ liệu lớn trong spark và làm một benchmark vui vui của python, udf, và pandas udf.
Sau một hồi lòng và lòng vòng thả thính, sạc (search) lên sạc xuống với chị google thì mình tìm thấy một số khái niệm sau có thể hữu ích .
1. UDF & PySpark UDF ?
-
UDF: Các hàm do người dùng xác định, nếu bạn đã sử dụng SQL, thì UDF không có gì mới đối với bạn vì hầu hết các database truyền thống đều hỗ trợ các hàm do người dùng xác định.
-
Python UDF’s: tương tự như UDF trên cơ sở dữ liệu. Trong PySpark, bạn tạo một hàm theo cú pháp Python và bọc nó bằng PySpark SQL udf() hoặc đăng ký nó dưới dạng udf và sử dụng nó trên DataFrame và SQL tương ứng. Hiểu đơn giản là viết một function bằng python và dùng nó tác động lên dataframe. vd có một dataframe với cột X là float và mong muốn cộng thêm 1 vào mỗi phần tử của cột X dùng udf trong pyspark.
from pyspark.sql.functions import udf

 @udf('double')defplus_one(x):return x +1#(ss là spark Session)
 df = ss.range(0,3).withColumn('id',(col('id')).cast('integer')).withColumn('v', rand())
 df.show()@udf('double')defplus_one(v):return v +1

 df.withColumn('v', plus_one(df.v)).show()
+---+--------------------+ +---+--------------------+ | id| x| | id| x| +---+--------------------+ +---+--------------------+ | 0| 0.1| -> | 0| 1.1| | 1| 0.2| | 1| 1.2| | 2| 0.3| | 2| 1.3|
2. Pandas UDFs ?
Được gọi là vectorized UDF — Về cơ bản, Một Pandas UDF là một UDF sử dụng Apache Arrow để transfer dữ liệu và sử dụng Pandas để xử lý dữ liệu đó. Để hình dung được Apache Arrow là gì các bạn có thể xem hình dưới đây (nguồn internet). Apache arrow chỉ định một định dạng bộ nhớ cột độc lập với ngôn ngữ được tiêu chuẩn hóa cho dữ liệu phẳng và phân cấp, được tổ chức cho các hoạt động phân tích hiệu quả trên phần cứng hiện đại
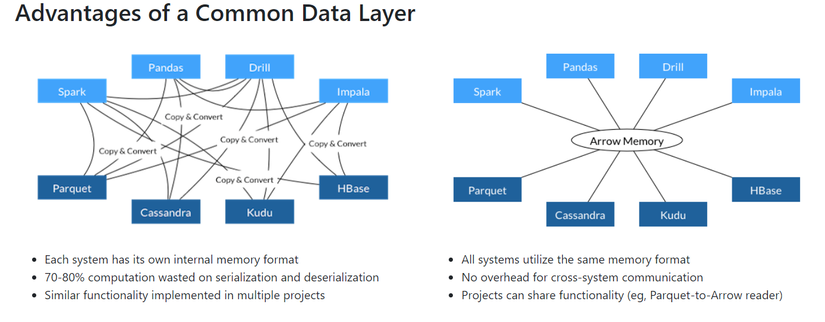
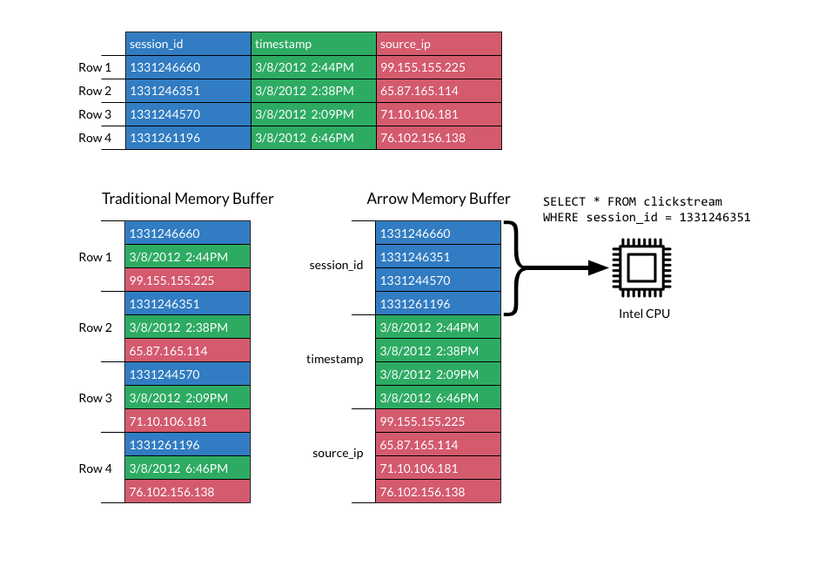
Apache Arrow tận dụng bộ đệm cột để giảm IO và tăng tốc hiệu suất xử lý phân tích (nguồn internet).
=> Pandas UDF cho phép các hoạt động được vector hóa có thể tăng hiệu suất lên đến 100 lần so với các Python UDF theo hàng tại một thời điểm. Trong Pyspark, có 3 loại Pandas UDF đó là: Scalar, Grouped Map và Grouped Aggregate. Mình sẻ đề cập đến Scalar. Là một UDF chuyển đổi các Pandas Series thành một Pandas Series, trong đó độ dài của Pandas Series trả về phải bằng với độ dài của các Pandas Series đầu.
3. Choice ?
Vậy khi nào thì dùng udf và khi nào dùng pandas udf:
- Udf thực hiện tất cả hoạt động của nó trên một Node trong khi Pandas udf phân phối dữ liệu cho nhiều Node để xử lý.
- Trừ khi dữ liệu của bạn đủ lớn để không thể xử lý nó chỉ bằng một node spark thì bạn nên dùng pandas udf.
- Nếu dữ liệu quá nhỏ thì hiệu năng của udf có thể sẽ tốt hơn Pandas udf.
Distributed ML model with Pandas UDFs
Quay lại với bài toán ban đầu là tách dữ liệu có hình ảnh chó và mèo từ tập dữ liệu. Trước tiên tiến hành clone repo Github
git clone https://github.com/dnguyenngoc/lab-spark.git &&cd lab-spark && docker-compose up
Cấu trúc của dự án như sau:
├── spark
├── jupyterlab
├── share_storages
    ├── lab
    ├── data
        ├── images
        ├── models
├── docker-compose.yaml
...
Sau khi thực hiện lệnh docker-compose up, các dịch vụ sẽ khởi động. Có thể mất một khoảng thời gian trước khi mọi thứ bắt đầu và chạy. Lưu ý bạn có thể tuỳ chỉnh cấu hình spark cho phù hợp với máy tính của bạn từ docker-compose.yaml
| Service | URL | Password |
|---|---|---|
| Lab | http://localhost:8888 | 1q2w3e4r |
| Spark Master | http://localhost:8080 | None |
Truy cập vào http://localhost:8888 và dùng pass 1q2w3e4r để đăng nhập nhé. Notebook chứa toàn bộ code cho bài viết này đặt tại Distributed ML model with Pandas UDFs.ipynb. Giải thích code một chút xíu. Đầu tiên là Tạo session connect đến spark cluster với việc gọi các node spark worker có cấu hình 2 core CPU và 2GB RAM.
ss  = SparkSession.builder.master('spark://spark-master:7077')
                  .appName("test")
                  .config("spark.executor.memory","2g")
                  .config("spark.driver.memory","2g")
                  .config("spark.executor.cores","2")
                  .config("spark.driver.cores","2")
                  .getOrCreate()
sc = ss.sparkContext
sc
Show dữ liệu mình đang có lên nào:
paths = glob.glob('/usr/local/share_storages/data/image/dog-cat/*.jpeg')
rows =2
plt.figure(figsize=(14,7))for num, x inenumerate(paths):
    image = PIL.Image.open(x)
    plt.subplot(rows,3, num+1)
    plt.title(x.split('/')[-1])
    plt.axis('off')
    plt.imshow(image)
plt.show()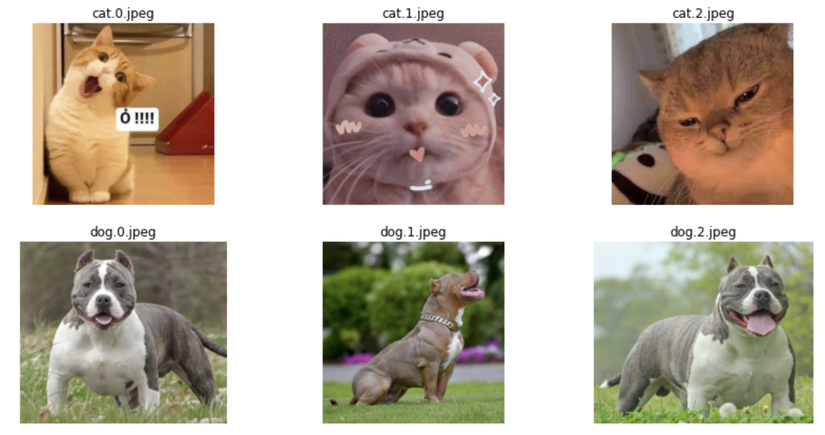
Tạo một bộ dữ liệu dữ liệu 3000 hình ảnh từ một vài hình ảnh ban đầu vì mình chỉ có 3 hình mèo và 3 hình chó thôi nên phải fake fake để có một tệp dữ liệu lớn … :v
X1 =[100,500,1000,1500,2000,2500,3000]

random_path =[random.choice(paths)for i inrange(3000)]
df = pd.DataFrame(random_path, columns=['path'])
df['label']=df['path'].apply(lambda x: x.split("/")[-1].split(".")[0])
pdf =[df.iloc[: x]for x in X1[:-2]]# pdf = [df.iloc[: x] for x in X1]
sdf =[ss.createDataFrame(df.iloc[: x])for x in X1]print(pdf[0].iloc[:3])
sdf[0].show(3)
Tạo hàm preprocessing image:
IMAGE_SIZE =192# (image input 192x192)
BATCH_SIZE =2# Preprocess an imagedefpreprocess_image(image):
image = tf.image.decode_jpeg(image, channels=3)
image = tf.image.resize(image,[IMAGE_SIZE, IMAGE_SIZE])
image /=255.0# normalize to [0,1] rangereturn image
# Read the image from path and preprocessdefload_and_preprocess_image(path):
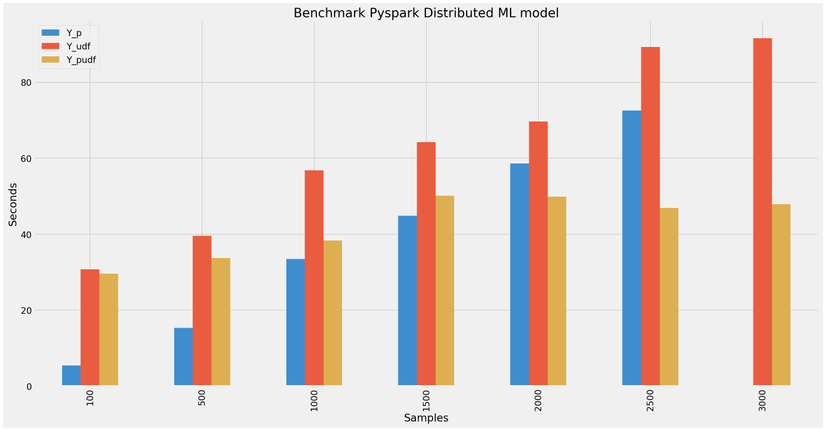
image = tf.io.read_file(path)return preprocess_image(image)Để tiến hình phân tích về tốc độ sử lý của python, pyspark udf và pandas udf thì tạo một tệp mẫu gồm lần lượt [100, 500, 1000, 1500, 2000, 2500, 3000] sample từ dataframe đã tạo. Sau đó Tính toán thời gian thực hiện của python với 4 core CPU và 4GB RAM và pyspark udf và pandas udf với 2 node spark 2 core CPU, 2GB RAM mỗi node. Thực hiện lần lượt đầu tiên là python thuần load model và dự đoán (mình set batch_size predict là 2 nha).
X_p =[]
X_d =[]defprocess_batch_python(all_paths):
    start_time = time.perf_counter()
    data_lenght =len(all_paths)
    model = keras.models.load_model("/usr/local/share_storages/data/model/dog_cat.h5")
    preprocessed_imgage = np.array([load_and_preprocess_image(item)for item in all_paths])
    predictions = model.predict(preprocessed_imgage, batch_size=BATCH_SIZE)
    predicted_labels =[{"class":"Cat","score": x[0]}if x[0]>=0.5else{"class":"Dog","score": x[0]}for x in predictions]
    end_time = time.perf_counter()return predicted_labels, end_time - start_time

for x in X1:
    pred, count_time = process_batch_python(df.iloc[:x]['path'])
    X_p.append(count_time)
    X_d.append(pred)print("Run with {} sample: {}s".format(x, count_time))
Run with 100 sample: 5.428100499997527s
Run with 500 sample: 15.379066599998623s
Run with 1000 sample: 33.48210130000007s
Run with 1500 sample: 44.866816599998856s
Run with 2000 sample: 58.65093120000165s
Run with 2500 sample: 72.51571390000026s
Run with 3000 sample: ngỏm.
Tương tự với Pyspark udfs:
X_udf_d =[]
X_udf_d =[]defprocess_batch_udf(sdf):

    start_time = time.perf_counter()

    model = keras.models.load_model("/usr/local/share_storages/data/model/dog_cat.h5")
    bc_model_weights = sc.broadcast(model.get_weights())defcover_model():
        model.set_weights(bc_model_weights.value)return model

    model_fn = cover_model()@udf(StringType())defpredict(img):
        processed_images = np.array([load_and_preprocess_image(img)])
        predictions = model_fn.predict(processed_images, batch_size=BATCH_SIZE)
        predicted_labels =["Cat,{}".format(x[0])if x[0]>=0.5else"Dog, {}".format(x[0])for x in predictions]return predicted_labels[0]

    x= sdf.withColumn('v2', predict(sdf.path))
    x.show(1)

    end_time = time.perf_counter()return sdf, end_time - start_time

for x inrange(len(X1)):
    pred, count_time = process_batch_udf(sdf[x])
    X_udf.append(count_time)
    X_udf_d.append(pred)print("Run with {} sample: {}s".format(X1[x], count_time))
Run with 100 sample: 30.738601299999573s
Run with 500 sample: 39.60790839999754s
Run with 1000 sample: 56.82039040000018s
Run with 1500 sample: 64.21761259999766s
Run with 2000 sample: 69.66648029999851s
Run with 2500 sample: 89.24947419999808s
Run with 3000 sample: 91.57887720000144s
Cuối cùng là Pandas Udf:
X_pudf =[]
X_pudf_d =[]defprocess_batch_pandas_udf(sdf):
    start_time = time.perf_counter()
    model = keras.models.load_model("/usr/local/share_storages/data/model/dog_cat.h5")
    bc_model_weights = sc.broadcast(model.get_weights())defcover_model():
        model.set_weights(bc_model_weights.value)return model

    defkeras_model_udf(model_fn):"""
          Wraps an Keras model into a Pandas UDF that makes predictions.

          You might consider the following customizations for your own use case:
            - Tune DataLoader's batch_size and num_workers for better performance.
            - Use GPU for acceleration.
            - Change prediction types.
          """
        model = model_fn()defpredict_batch(image_batch):
            data_lenght =len(image_batch)
            processed_images = np.array([load_and_preprocess_image(img)for img in image_batch])
            predictions = model.predict(processed_images, batch_size=BATCH_SIZE)
            predicted_labels =[{"class":"Cat","score": x[0]}if x[0]>=0.5else{"class":"Dog","score": x[0]}for x in predictions]return pd.DataFrame(predicted_labels)
        return_type ="class: string, score:float"return pandas_udf(return_type, PandasUDFType.SCALAR)(predict_batch)
    model_udf = keras_model_udf(cover_model)
    sdf.withColumn("prediction", model_udf(col("path"))).show(1)
    end_time = time.perf_counter()return sdf, end_time - start_time

for x inrange(len(X1)):
    pred, count_time = process_batch_pandas_udf(sdf[x])
    X_pudf.append(count_time)
    X_pudf_d.append(pred)print("Run with {} sample: {}s".format(X1[x], count_time))
Run with 100 sample: 29.639200400000846s
Run with 500 sample: 33.74288650000017s
Run with 1000 sample: 38.36985210000057s
Run with 1500 sample: 50.09157480000067s
Run with 2000 sample: 49.84821749999901s
Run with 2500 sample: 46.89816769999743s
Run with 3000 sample: 47.90912639999806s
Kết quả đúng như đã thảo luận ở trên khi dữ liệu càng lớn pandas udf càng phát huy tác dụng.
What next?
Pandas UDFs là một ví dụ tuyệt vời về nỗ lực của cộng đồng Spark. Sắp tới mình sẻ tìm hiểu thêm scala để có một so sánh hiệu suất của Pandas UDFs với scala.
Nguồn: viblo.asia