Test component react phải thật thú vị, đơn giản và dễ dàng để chúng ta xây dựng và bảo trì.
Tuy nhiên, hệ sinh thái thư viện phục vụ cho việc test không đủ để thúc đẩy các nhà phát triển viết các thành phần test nhất quán cho các component react. Test các component React và DOM nói chung thường yêu cầu một số loại wrapper cấp cao hơn các chương trình chạy test, phổ biến là Jest hoặc Mocha.
Vấn đề ở đây là gì ?
Viết test cho các component với tool hiện nay rất nhàm chán, và ngay cả khi bạn viết chúng, nó cũng gặp rất nhiều rắc rối. Việc diễn đạt logic test theo kiểu giống Jquery rất khó hiểu. Nó không giống với component React được xây dựng.
Đoạn code Enzyme bên dưới đấy có thể đọc được, nhưng hơi quá cồng kềnh vì nó sử dụng quá nhiều từ để diễn đạt một thứ mà cuối cùng chỉ là markup đơn giản.
xpect(screen.find(".view").hasClass("technologies")).to.equal(true);
expect(screen.find("h3").text()).toEqual("Technologies:");
expect(screen.find("ul").children()).to.have.lengthOf(4);
expect(screen.contains([
  <li>JavaScript</li>,
  <li>ReactJs</li>,
  <li>NodeJs</li>,
  <li>Webpack</li>
])).to.equal(true);
expect(screen.find("button").text()).toEqual("Back");
expect(screen.find("button").hasClass("small")).to.equal(true);
Đoạn test trên chỉ đơn giản là test cho đoạn DOM sau:
<div className="view technologies">
  <h3>Technologies:</h3>
  <ul>
    <li>JavaScript</li>
    <li>ReactJs</li>
    <li>NodeJs</li>
    <li>Webpack</li>
  </ul>
  <button className="small">Back</button>
</div>
Bạn cần làm gì nếu bạn muốn test các component nặng hơn ? Mặc dù các cú pháp trên vẫn có thể sử dụng được, nhưng nó sẽ không giúp người đọc nắm bắt được cấu trúc và logic. Đọc và viết các đoạn code test như thế này chắc chắn sẽ khiến bạn đau đầu. Đó là vì các component React tuân theo các nguyên tắc nhất định để tạo ra mã html cuối cùng. Mặt khác, các đoạn test thể hiện nguyên tắc giống nhau lại không hề đơn giản. Chỉ sử dụng Javascript thì sẽ không giúp ích cho bạn về lâu về dài.
Có 2 vấn đề chính về test ở trong React:
- Cách tiếp cận việc viết test dành riêng cho các component
- Làm thế nào để tránh tất cả các phiền phức không cần thiết
Hãy mở rộng hơn nữa những điều ở trên trước khi chuyển sang các ví dụ thực tế
Tiếp cận việc test các component React
Một component React đơn giản có thể như thế này:
function Welcome(props) {
  return <h1>Hello, {props.name}</h1>;
}
Đây là một function chấp nhận một props object và trả về DOM thông qua JSX.
Vì một component có thể được biển diễn dưới dạng function, nên tất cả đều là về kiểm tra functions.Chúng ta cần đến các đối số và cách mà chúng ảnh hưởng đến kết quả trả về của function. Áp dụng logic đó cho các component React, trọng tâm của việc test sẽ là thiết lập các props và test cho DOM được render ở UI. Vì các hành động của người dùng như di chuột, nhấp, nhập … cũng có thể dẫn đến sự thay đổi về giao diện, bạn cũng cần phải tìm cách kích hoạt các hành động đó.
Ẩn các vấn đề phức tạp không cần thiết khi test
Viết test yêu cầu một mức độ dễ độc nhất định bằng cách giảm bớt từ ngữ và tuân theo một form nhất định để thực hiện mô tả các tình huống.
Các đoạn test React component trải qua 3 giai đoạn:
- Sắp xếp bố trí: các props component đã được chuẩn bị
- Hành động: thành phần cần hiển thị DOM của nó tới giao diện người dùng và đăng kí bất kì hành động nào của người dùng để được kích hoạt.
- Xác nhận: các kì vọng được đặt ra, xác định các impact nhất định đối với các component.
Sau đây là ví dụ:
it("should click a large button", () => {
  // 1️⃣ Arrange
  // Prepare component props
  props.size = "large";

  // 2️⃣ Act
  // Render the Button's DOM and click on it
  const component = mount(<Button {...props}>Send</Button>);
  simulate(component, { type: "click" });

  // 3️⃣ Assert
  // Verify a .clicked class is added
  expect(component, "to have class", "clicked");
});
Đối với thử nghiệm đơn giản, các giai đoạn có thể được hợp nhất:
it("should render with a custom text", () => {
  // Mixing up all three phases into a single expect() call
  expect(
    // 1️⃣ Preparation
    <Button>Send</Button>,
    // 2️⃣ Render
    "when mounted",
    // 3️⃣ Validation
    "to have text",
    "Send"
  );
});
Viết component test bây giờ
Hai ví dụ trên trông có vẻ hợp lí nhưng chúng quá tầm thường. Hầu hết các test tool không cung cấp mức độ trừu tượng như vậy, nên chúng ta phải tự xử lí. Có lẽ đoạn code dưới đây sẽ giúp bạn:
it("should display the technologies view", () => {
  const container = document.createElement("div");
  document.body.appendChild(container);

  act(() => {
    ReactDOM.render(<ProfileCard {...props} />, container);
  });

  const button = container.querySelector("button");

  act(() => {
    button.dispatchEvent(new window.MouseEvent("click", { bubbles: true }));
  });

  const details = container.querySelector(".details");

  expect(details.classList.contains("technologies")).toBe(true);
});
So sánh nó với cùng một ví dụ test, chỉ với một lớp trừu tượng được thêm vào:
it("should display the technologies view", () => {
  const component = mount(<ProfileCard {...props} />);

  simulate(component, {
    type: "click",
    target: "button",
  });

  expect(
    component,
    "queried for test id",
    "details",
    "to have class",
    "technologies"
  );
});
Trông có vẻ tốt hơn, ít mã hơn và dòng chảy logic rõ ràng. Đây không phải là một đoạn test trừu tượng, mà là điều bất ngờ bạn đạt được.
Phần sau là phần đi sâu vào việc test các component React. Chúng ta sẽ tập trung vào cách sử dụng, các ví dụ.
Viết test với UnexpectedJS
UnexpectedJS là một bộ công cụ có thể tích hợp tương thích với tất cả các framework. Nó có thể được mở rộng với một số plugin. Điều tốt nhất ở thư viện này có lẽ là cú pháp tiện lợi mà nó cung cấp để mô tả các trường hợp test React component.
Ví dụ: Profile Card component
Bài học của chúng ta sẽ là test profile card component.
// ProfileCard.js
export default function ProfileCard({
  data: {
    name,
    posts,
    isOnline = false,
    bio = "",
    location = "",
    technologies = [],
    creationDate,
    onViewChange,
  },
}) {
  const [isBioVisible, setIsBioVisible] = useState(true);

  const handleBioVisibility = () => {
    setIsBioVisible(!isBioVisible);
    if (typeof onViewChange === "function") {
      onViewChange(!isBioVisible);
    }
  };

  return (
    <div className="ProfileCard">
      <div className="avatar">
        <h2>{name}</h2>
        <i className="photo" />
        <span>{posts} posts</span>
        <i className={`status ${isOnline ? "online" : "offline"}`} />
      </div>
      <div className={`details ${isBioVisible ? "bio" : "technologies"}`}>
        {isBioVisible ? (
          <>
            <h3>Bio</h3>
            <p>{bio !== "" ? bio : "No bio provided yet"}</p>
            <div>
              <button onClick={handleBioVisibility}>View Skills</button>
              <p className="joined">Joined: {creationDate}</p>
            </div>
          </>
        ) : (
          <>
            <h3>Technologies</h3>
            {technologies.length > 0 && (
              <ul>
                {technologies.map((item, index) => (
                  <li key={index}>{item}</li>
                ))}
              </ul>
            )}
            <div>
              <button onClick={handleBioVisibility}>View Bio</button>
              {!!location && <p className="location">Location: {location}</p>}
            </div>
          </>
        )}
      </div>
    </div>
  );
}
Cài đặt project
## 1. Clone the project:
git clone [email protected]:moubi/profile-card.git

## 2. Navigate to the project folder:
cd profile-card

## 3. Install the dependencies:
yarn

## 4. Start and view the component in the browser:
yarn start

## 5. Run the tests:
yarn test
Cấu trúc component
và các đoạn UnexpectedJS test sau khi bắt đầu project:
/src
  └── /components
      ├── /ProfileCard
      |   ├── ProfileCard.js
      |   ├── ProfileCard.scss
      |   └── ProfileCard.test.js
      └── /test-utils
           └── unexpected-react.js
Component tests
Chúng ta hãy xem xét một số đoạn mã test component. Chúng nằm trong src/components/ProfileCard/ProfileCard.test.js. Lưu ý cách tổ chức mỗi đoạn test theo 3 giai đoạn đã được đề cập từ trước.
1. Cài đặt các props component bắt buộc cho mỗi đoạn test
beforeEach(() => {
  props = {
    data: {
      name: "Justin Case",
      posts: 45,
      creationDate: "01.01.2021",
    },
  };
});
Trước khi test, một đối tượng props với <ProfileCard />được tạo ra, trong đó props.data chứa thông tin tối thiểu để hiển thị
2. Render với status online
Bây giờ chúng ta check nếu profile render với status ‘online’
Và test case cho nó sẽ là:
it("should display online icon", () => {
  // Set the isOnline prop
  props.data.isOnline = true;

  // The minimum to test for is the presence of the .online class
  expect(
    <ProfileCard {...props} />,
    "when mounted",
    "queried for test id",
    "status",
    "to have class",
    "online"
  );
});
3. Render với tiểu sử
<ProfileCard /> chập nhận bất kì chuỗi tuỳ ý với tiểu sử (bio)
Hãy viết test case cho nó:
it("should display bio text", () => {
  // Set the bio prop
  props.data.bio = "This is a bio text";

  // Testing if the bio string is rendered in the DOM
  expect(
    <ProfileCard {...props} />,
    "when mounted",
    "queried for test id",
    "bio-text",
    "to have text",
    "This is a bio text"
  );
});
4. Render “Technologies” với một list rỗng
Click vào “View Skill” link sẽ chuyển qua list skill của user đó. Nó không có data được truyền vào, list skill sẽ rỗng.
Đây là test case:
it("should display the technologies view", () => {
  // Mount <ProfileCard /> and obtain a ref
  const component = mount(<ProfileCard {...props} />);

  // Simulate a click on the button element ("View Skills" link)
  simulate(component, {
    type: "click",
    target: "button",
  });

  // Check if the details element contains a .technologies className
  expect(
    component,
    "queried for test id",
    "details",
    "to have class",
    "technologies"
  );
});
5. Render với list technologies.
Nếu danh sách skill được truyền vào, nó sẽ hiển thị lên UI nếu click vào “View Skills” link.
Đây là đoạn test:
it("should display list of technologies", () => {
  // Set the list of technologies
  props.data.technologies = ["JavaScript", "React", "NodeJs"];

  // Mount ProfileCard and obtain a ref
  const component = mount(<ProfileCard {...props} />);

  // Simulate a click on the button element ("View Skills" link)
  simulate(component, {
    type: "click",
    target: "button",
  });

  // Check if the list of technologies is present and matches the prop values
  expect(
    component,
    "queried for test id",
    "technologies-list",
    "to satisfy",
    {
      children: [
        { children: "JavaScript" },
        { children: "React" },
        { children: "NodeJs" },
      ]
    }
  );
});
6. Render vị trí của user
Thông tin được render nếu nó được cung cấp một props
Test case sẽ là:
it("should display location", () => {
  // Set the location
  props.data.location = "Copenhagen, Denmark";

  // Mount <ProfileCard /> and obtain a ref
  const component = mount(<ProfileCard {...props} />);

  // Simulate a click on the button element ("View Skills" link)
  // Location render only as part of the Technologies view
  simulate(component, {
    type: "click",
    target: "button",
  });

  // Check if the location string matches the prop value
  expect(
    component,
    "queried for test id",
    "location",
    "to have text",
    "Location: Copenhagen, Denmark"
  );
});
7. Gọi callback khi chuyển view
Test này không so sánh các DOM nhưng kiểm tra chức năng chuyển đến <ProfileCard /> có được thực thi với đối số chính xác khi chuyển đổi giữa xem Bio và Technologies hay không.
it("should call onViewChange prop", () => {
  // Create a function stub (dummy)
  props.data.onViewChange = sinon.stub();

  // Mount ProfileCard and obtain a ref
  const component = mount(<ProfileCard {...props} />);

  // Simulate a click on the button element ("View Skills" link)
  simulate(component, {
    type: "click",
    target: "button",
  });

  // Check if the stub function prop is called with false value for isBioVisible
  // isBioVisible is part of the component's local state
  expect(
    props.data.onViewChange,
    "to have a call exhaustively satisfying",
    [false]
  );
});
8. Render với DefaultProps.
Test này sẽ kiểm tra toàn bộ DOM do component tạo ra khi các trường name, posts, và createDate mặc định
Đây là đoạn test:
it("should render default", () => {
  // "to exhaustively satisfy" ensures all classes/attributes are also matching
  expect(
    <ProfileCard {...props} />,
    "when mounted",
    "to exhaustively satisfy",
    <div className="ProfileCard">
      <div className="avatar">
        <h2>Justin Case</h2>
        <i className="photo" />
        <span>45{" posts"}</span>
        <i className="status offline" />
      </div>
      <div className="details bio">
        <h3>Bio</h3>
        <p>No bio provided yet</p>
        <div>
          <button>View Skills</button>
          <p className="joined">{"Joined: "}01.01.2021</p>
        </div>
      </div>
    </div>
  );
});
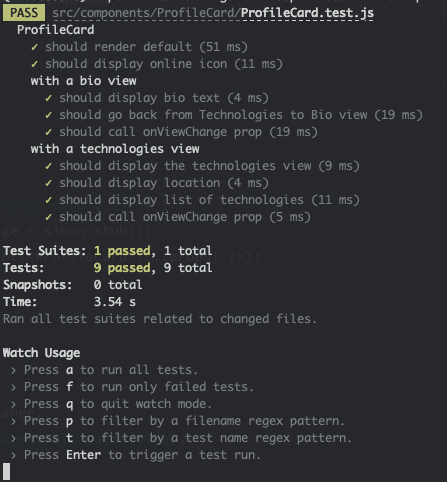
Chạy test
Việc cuối cùng mà bạn phải làm là thực thi các đoạn test trên:
yarn test
Cám ơn các bạn đã theo dõi bài viết.
Bài viết được dịch tại: https://css-tricks.com/react-component-tests-for-humans/
Nguồn: viblo.asia