Lời nói đầu!
- Là một developer mk không thể phủ nhận rằng trong một hệ thống mà thiếu logging thì việc debug, sửa lỗi nó khó khăn ntn.
- Logging giúp chúng ta dễ dàng theo dõi quá trình hệ thống xử lý tác vụ, khắc phục sự cố hoặc gỡ lỗi.
- Một trong những cách log đơn giản mà hiệu quả mk hay sử dụng đó là dùng Serilog.
- Bài viết này mk sẽ giới thiệu cách sử dụng logging using Serilog trong API ASP.NET Core 3.1 nhé.
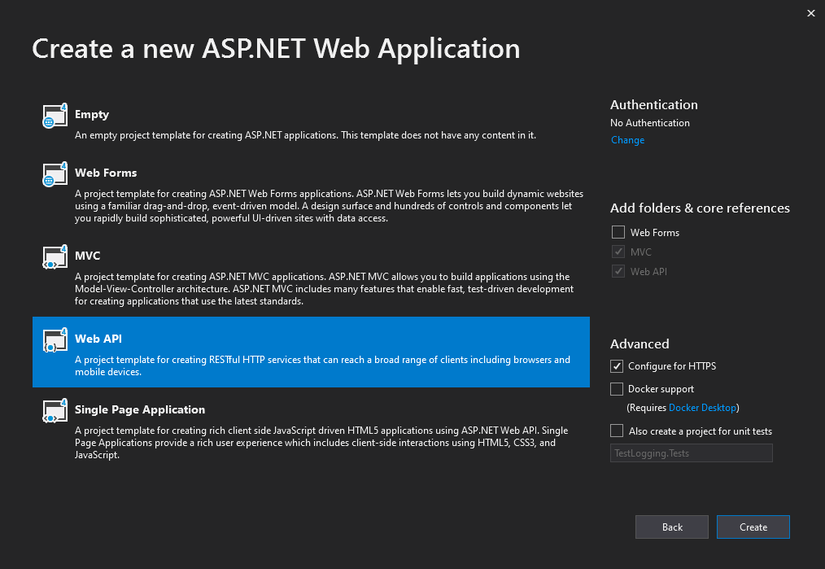
1. Tạo project
- Đặt tên dự án là TestLogging và chọn ASP.NET Core 3.1 API template

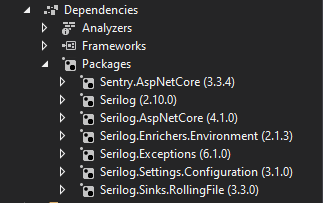
2. Add Serilog packages
- Các bạn thêm nhưng packages dưới đây vào project nhé
<ItemGroup>
    <PackageReference Include="Sentry.AspNetCore" Version="3.3.4" />
    <PackageReference Include="Serilog" Version="2.10.0" />
    <PackageReference Include="Serilog.AspNetCore" Version="4.1.0" />
    <PackageReference Include="Serilog.Enrichers.Environment" Version="2.1.3" />
    <PackageReference Include="Serilog.Exceptions" Version="6.1.0" />
    <PackageReference Include="Serilog.Settings.Configuration" Version="3.1.0" />
    <PackageReference Include="Serilog.Sinks.RollingFile" Version="3.3.0" />
  </ItemGroup>
3. Configure Serilog in Program.cs
- Thêm đoạn code bên dưới vào class Program.cs
- Đảm bảo rằng bạn thêm
UseConfiguration()vàUserSerilog()
using Microsoft.AspNetCore.Hosting;
using Microsoft.Extensions.Configuration;
using Microsoft.Extensions.Hosting;
using Serilog;
using Serilog.Exceptions;
using System;
using System.IO;

namespace API.Serilog
{
    public class Program
    {
        public static IConfiguration Configuration { get; private set; }

        public static void Main(string[] args)
        {
            // Build Configuration
            Configuration = new ConfigurationBuilder()
                .SetBasePath(Directory.GetCurrentDirectory())
                .AddJsonFile("appsettings.json", false, true)
                .AddJsonFile($"appsettings.{Environment.GetEnvironmentVariable("ASPNETCORE_ENVIRONMENT")}.json", true,
                    true)
                .AddCommandLine(args)
                .AddEnvironmentVariables()
                .Build();

            // Configure serilog
            Log.Logger = new LoggerConfiguration()
                .ReadFrom.Configuration(Configuration)
                .Enrich.FromLogContext()
                .Enrich.WithExceptionDetails()
                .Enrich.WithMachineName()
                .CreateLogger();

            try
            {
                Log.Information("Starting up...");
                CreateHostBuilder(args).Build().Run();
                Log.Information("Shutting down...");
            }
            catch (Exception ex)
            {
                Log.Fatal(ex, "Api host terminated unexpectedly");
            }
            finally
            {
                Log.CloseAndFlush();
            }
        }

        public static IHostBuilder CreateHostBuilder(string[] args) =>
            Host.CreateDefaultBuilder(args)
                .ConfigureWebHostDefaults(webBuilder =>
                {
                    webBuilder.UseStartup<Startup>()
                              .UseConfiguration(Configuration)
                              .UseSerilog();
                });
    }
}
4. Add Serilog settings to appsettings.json
- Thêm đoạn json bên dưới vào file appsettings.json
{
  "Logging": {
    "LogLevel": {
      "Default": "Information",
      "Microsoft": "Warning",
      "Microsoft.Hosting.Lifetime": "Information"
    }
  },
  "Serilog": {
    "Using": [
      "Serilog.Sinks.Console",
      "Serilog.Sinks.RollingFile"
    ],
    "MinimumLevel": {
      "Default": "Debug",
      "Override": {
        "Microsoft": "Error",
        "System": "Error",
        "Microsoft.EntityFrameworkCore.Database.Command": "Error"
      }
    },
    "WriteTo": [
      {
        "Name": "RollingFile",
        "Args": {
          "pathFormat": "C:\Logs\API.Serilog\log-api-serilog-{Date}.txt",
          "retainedFileCountLimit": 14,
          "shared": true,
          "buffered": false,
          "flushToDiskInterval": "00:00:10",
          "outputTemplate": "[{Timestamp:yyyy-MM-dd HH:mm:ss.fff}] [{Level}] {MachineName} ({ThreadId}) <{SourceContext}> {Message}{NewLine}{Exception}"
        }
      },
      {
        "Name": "Console",
        "Args": {
          "theme": "Serilog.Sinks.SystemConsole.Themes.AnsiConsoleTheme::Code, Serilog.Sinks.Console",
          "outputTemplate": "[{Timestamp:yyyy-MM-dd HH:mm:ss.fff}] [{Level}] {MachineName} ({ThreadId}) <{SourceContext}> {Message}{NewLine}{Exception}"
        }
      }
    ]
  }
}
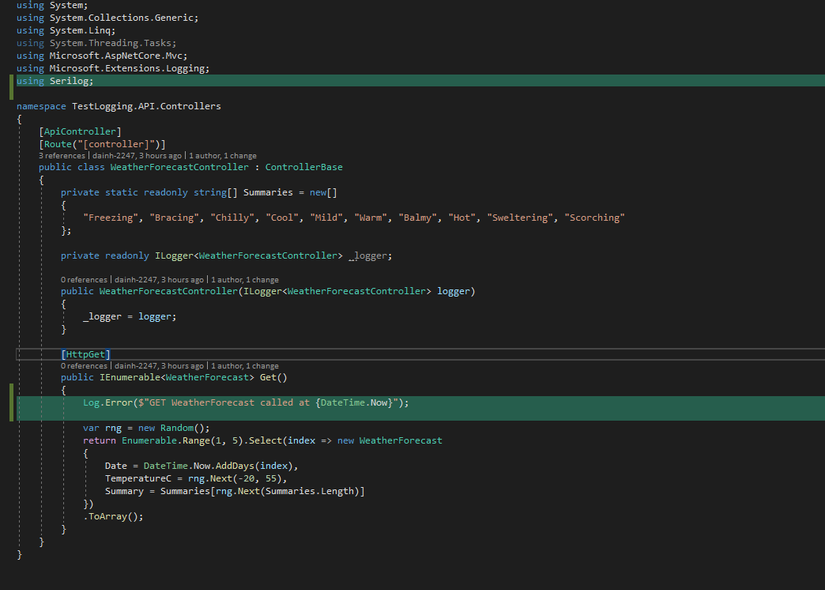
5. Add Logging to where you need
-
Tới bước này thì chúng ta đã có một công cụ ghi log khá hoàn chỉnh
-
Chúng ta có thể log theo các cấp độ sau
-
Log.Verbose()
-
Log.Debug() các thông tin debug sẽ được log
-
Log.Information() các thông tin về luồng làm việc của chương trình sẽ được log.
-
Log.Warning() các thông tin cảnh báo của chương trình sẽ được log.
-
Log.Error() các lỗi khi chạy chương trình sẽ được log nếu chúng ta sử dụng cấp độ này.
-
Log.Fatal() cấp độ này sẽ log các lỗi nghiêm trọng xảy ra trong chương trình, có thể làm cho chương trình không sử dụng được nữa.
-
Ví dụ ở đây mk thêm đoạn
Log.InformationtrongWeatherForecastController
Log.Information($"GET WeatherForecast called at {DateTime.Now}");
6. Test run application
- Ở trong file
appsettings.jsonthì chúng ra đang config pathFormat của log là
pathFormat": "C:\Logs\API.Serilog\log-api-serilog-{Date}.txt" - Chúng ta mở file theo đường dẫn và xem kết quả
- Kết quả

[2021-05-22 21:37:57.280] [Information] B122247-PC () <> Starting up...
[2021-05-22 21:37:59.497] [Information] B122247-PC () <> GET WeatherForecast called at 22/05/2021 9:37:59 PM
Nguồn: viblo.asia