Step 1: Ensure system is updated and has basic build tools
sudo apt-get update
sudo apt-get --assume-yes upgrade
sudo apt-get --assume-yes install tmux build-essential gcc g++ make binutils
sudo apt-get --assume-yes install software-properties-common
Step 2: Install your nvidia graphics driver.
Search for software & update and click tab additional drivers in menu and open it. Wait for minute and select nvidia driver and hit apply and restart.

Step 3: Download cuda-9.0 .deb package and install it
Choose version cuda suitable with OS
cd Downloads
sudo dpkg -i cuda-repo-ubuntu1704-9-1-local_9.1.85-1_amd64.deb (This is the deb file you've downloaded)
sudo apt-get update
sudo apt-get install cuda
Open terminal, type:
cd ~
nano ~/.bashrc
And add 2 lines below file above:
export PATH=/usr/local/cuda-9.1/bin${PATH:+:${PATH}}
export LD_LIBRARY_PATH=/usr/local/cuda-9.1/lib64${LD_LIBRARY_PATH:+:${LD_LIBRARY_PATH}}
In terminal, type: source ~/.bashrc
Step 4: Download cudnn v7.1 and run following command:
Download cuDNN v7.1.1 for CUDA 9.1
cd Downloads
wget https://developer.nvidia.com/compute/machine-learning/cudnn/secure/v7.1.1/prod/9.1_20180214/cudnn-9.1-linux-x64-v7.1
tar -xzvf cudnn-9.1-linux-x64-v7.1.tgz
sudo cp cuda/include/cudnn.h /usr/local/cuda/include
sudo cp cuda/lib64/libcudnn* /usr/local/cuda/lib64
sudo chmod a+r /usr/local/cuda/include/cudnn.h /usr/local/cuda/lib64/libcudnn*
Step 5: Prepare TensorFlow dependencies
sudo apt-get install libcupti-dev
Step 6: Download Python and then tensorflow gpu
Install Anaconda: Because anaconda support lots of library for Python programming
wget https://repo.continuum.io/archive/Anaconda2-5.1.0-Linux-x86_64.sh
bash Anaconda2-5.1.0-Linux-x86_64.sh
pip3 install tensorflow-gpu  # for Python 3.n
Open terminal, type:
cd ~
nano ~/.bashrc
And add a line below file above:
# Add by anaconda2 5.1.0 installer
export PATH="/home/swapnil/anaconda2/bin:$PATH"
In terminal, type: source ~/.bashrc
- Check anaconda2 have you installed yet?
-
Type:
python -
If you successful installation, you will see result:
-

-
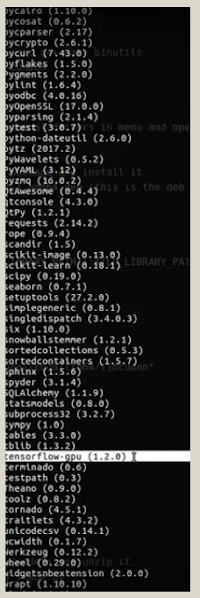
Check tensorflow-gpu have you installed yet?
- You type:
pip list - If you successful installation, you will see result:

- You type:
Step 7: Check gpu has been step properly or not.
cd Downloads
Download this git repo https://github.com/tensorflow/models and unzip it.
Use one of statements:
python models-master/tutorials/image/imagenet/classify_image.py
Or
python models-master/tutorials/image/cifar10/cifar10_train.py

Step 8: Demo
Open terminal:
python
import tensorflow as tf
hello = tf.constant('Hello Tensorflow')
sess = tf.Session()
print(sess.run(hello))
Nguồn: viblo.asia