Giới Thiệu
Tiếp tục với series Java Practice, hôm nay chúng ta tiếp tục tìm hiểu về API Gateway trong triển khai mô hình Microservices. Bắt đầu thôi.
Consul là gì
Consul là một service discovery được phát triển bởi Hashicorp, nói chính xác hơn service discovery là 1 phần chức năng được phát triển trong Consul, ngoài ra Consul còn tích hợp nhiều tính năng rất hay có thể kể đến như Consul Config có thể sử dụng như một config central, Proxy…
Consul giúp việc kết nói các ứng dụng được phát triển theo từng phần lại với nhau.

Consul có 4 thành phần chính
- Service Discovery: các service client đăng ký vào, Consul hiện cho phép đăng ký dưới 2 phường thức DNS và HTTP.
- Health Checking: Consult HC các Node, instances để đảm bảo các service client còn sống
- KV Store: Bạn có thể quản lý config của mình tại đây
- Secure Service Communication: Thiếp lập bảo mật cho các kết nối tới nhau
- Multi Datacenter: Nơi cấu hình các datacenters.
Cài đặt Consul
Để bài viết không bị quá dài và lan man, nên chúng ta chỉ cấu hình Consul trên Docker nhé.
Tải xuống docker image
docker pull consul
Khởi chạy Consul
$ docker run -d --name=dev-consul -e CONSUL_BIND_INTERFACE=eth0 consul
xem thêm tại: https://hub.docker.com/_/consul
Api Gateway trong Consul
Trong ví dụ hôm nay mình sẽ triển khai Api Gateway bằng Spring Cloud Gateway và các service client mình sẽ viết trên Quarkus
Service client
Trong bài viết này mình sẽ tiến hành dựng 2 service bằng Quarkus nhé.
các bạn có thể khởi tạo source Quarkus tại đây
Để kết nối tới Consul trong Quarkus, bạn tiếp hành add 2 dependency này vô file POM của 2 Service Client nhé
    <dependency>
            <groupId>com.orbitz.consul</groupId>
            <artifactId>consul-client</artifactId>
            <version>1.5.3</version>
        </dependency>
        <dependency>
            <groupId>io.quarkus</groupId>
            <artifactId>quarkus-consul-config</artifactId>
        </dependency>
Tiếp theo tại service 1 mình tạo ra ProductController để hiện ra thông tin sản phẩm
@Path("/product")
public class ProductController {

    @GET
    @Produces(MediaType.TEXT_PLAIN)
    public String getProduct() {
        return "Sản Phẩm 1";
    }
}
Tại service 2 mình tạo ra StockController để hiện ra thông tin tồn kho
@Path("/stock")
public class StockController {

    @GET
    @Produces(MediaType.TEXT_PLAIN)
    public Integer getStock() {
        return 1;
    }
}
Tại 2 service mình tiến hành kết nối tới Consul để đăng ký.
Mình tạo file ServiceLifecycle.java ở cả 2 serivice để đăng ký tới Consul
@ApplicationScoped
public class ServiceLifecycle {

  private static final Logger LOGGER = Logger.getLogger(ServiceLifecycle.class);

  private String instanceId;

  Consul consulClient = Consul.builder()
              .withHostAndPort(HostAndPort.fromParts("localhost", 8500))
              .build();

  @ConfigProperty(name = "quarkus.application.name")
  String appName;
  @ConfigProperty(name = "quarkus.application.version")
  String appVersion;

  @ConfigProperty(name = "quarkus.profile")
  String profile;

  @ConfigProperty(name = "quarkus.http.port")
  String httpPort;

  ConfigUtils.ConfigBO config = ConfigUtils.get();

  void onStart(@Observes StartupEvent ev) {

    if (consulClient == null) {
      LOGGER.error("Inject Consul failed......");
      return;
    }
    LOGGER.info("The ServiceLifecycle is starting...");
    try {
      ScheduledExecutorService executorService = Executors
              .newSingleThreadScheduledExecutor();
      executorService.schedule(() -> {
        HealthClient healthClient = consulClient.healthClient();
        List<ServiceHealth> instances = healthClient
                .getHealthyServiceInstances(appName + profile).getResponse();

        var instancesSize = instances.size();
        instanceId = appName + profile + "-" + instancesSize;
        ImmutableRegistration registration = ImmutableRegistration.builder()
                .id(instanceId)
                .name(appName + profile)
                .address("localhost")
                .port(8080)
                .putMeta("version", appVersion)
                .tags(Collections.singletonList("hpi"))
                .serviceWeights(ImmutableServiceWeights.builder().passing(1).warning(5).build())
                .build();
        consulClient.agentClient().register(registration);
        LOGGER.info("Instance registered: id=" + registration.getId() + ");
      }, 5000, TimeUnit.MILLISECONDS);
    } catch (Exception e) {
      LOGGER.error("ServiceLifecycle " + e.getMessage());

    }
  }

  void onStop(@Observes ShutdownEvent ev) {

    if (consulClient == null) {
      LOGGER.info("consulClient is null, can not de-registered...");
      return;
    }
    if(instanceId != null){
      consulClient.agentClient().deregister(instanceId);
      LOGGER.info("Instance de-registered: id=" + instanceId);
    }
  }
}
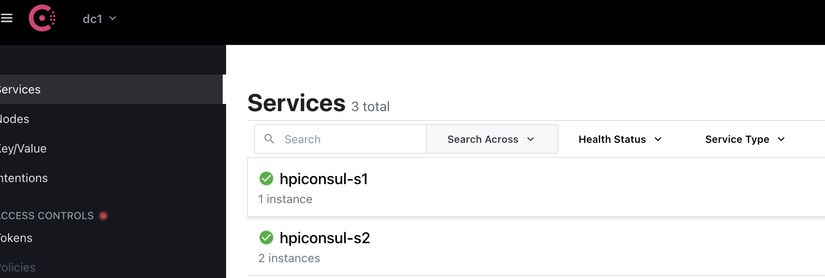
Khi chương trình java của bạn được khởi động, Quarkus sẽ tự động chạy onStart và khởi tạo đăng ký tới Consul sau 5 giây, và chạy hàm onStop để hủy đăng ký tới Consult khi chương trình tắt.
sau khi chạy 2 service client, bạn sẽ nhận được kết quả như hình dưới
Spring Cloud Gateway
Tiếp theo bạn tiến hành add các dependency để kết nối Consul trong Spring Cloud Gateway ( nếu bạn chưa có project Spring Cloud Gateway, bạn có thể xem qua tại đây.
<dependency>
      <groupId>org.springframework.cloud</groupId>
      <artifactId>spring-cloud-starter-consul-discovery</artifactId>
      <version>3.1.0</version>
    </dependency>
    <dependency>
      <groupId>org.springframework.cloud</groupId>
      <artifactId>spring-cloud-starter-consul-config</artifactId>
      <version>3.1.0</version>
    </dependency>
Sau đó bạn tiếp hành cấu hình Api GateWay trong application.yml
management:
  endpoints:
    web:
      exposure:
        include: info,health,prometheus,metrics

---
spring:
  config:
    activate.on-profile: dev
  application:
    name: gwapi
  cloud:
    gateway:
      httpclient:
        pool:
          type: fixed
          max-connections: 3000
          acquire-timeout: 8000
          max-life-time: 300s
          max-idle-time: 10s
        connect-timeout: 30000
        response-timeout: 60s
      default-filters:
        - DedupeResponseHeader=Access-Control-Allow-Credentials Access-Control-Allow-Origin
      globalcors:
        cors-configurations:
          '[/**]':
            allowedOrigins: "*"
            allowedMethods: "*"
            allowedHeaders: "*"
      discovery:
        locator:
          enabled: true
      routes:
        - id: hpiconsul-s1
          uri: lb://hpiconsul-s1
          predicates:
            - Path=/service-1/**
          filters:
            - RewritePath=/service-1/(?<path>.*), /${path}
        - id: hpiconsul-s2
          uri: lb://hpiconsul-s2
          predicates:
            - Path=/service-2/**
          filters:
            - RewritePath=/service-2/(?<path>.*), /${path}

    loadbalancer:
      ribbon:
        enabled: false
    consul:
      host: localhost
      port: 8500
      discovery:
        instanceZone: gw-service-api
        register: false
        registerHealthCheck: false
        tags: gw-service-api-tags
        healthCheckPath: /
        healthCheckInterval: 15s
      config:
        enabled: false
      retry:
        enabled: true
        initialInterval: 2
server:
  port: 2060
Trong đó:
- globalcors và default-filters là cấu hình giúp bạn bật/tắt CORS
- httpclient để bạn cấu hình tham số như pool khi gọi tcp ( các tham số phía trên đã được HPI điều chỉnh phù hợp và sử dụng.
- routes giúp bạn khai báo các routes
Lúc này bạn truy cập trình duyệt của mình localhost:2060/service-1/product Consul sẽ gọi url localhost:8080/product và trả kết quả về cho bạn, kết quả cũng tương tự khi bạn gọi service-2.
Ngoài ra bạn cũng có thể làm nhiều hơn ví dụ như lấy các instances của 1 service, health-check, redirect url… bằng code =))
đoạn code phía dưới có thể giúp bạn tìm hiểu rõ và sâu hơn nữa về Consul khi thử
@RestController
@Component
public class DiscoveryClientController {

  @Autowired
  private DiscoveryClient discoveryClient;
  ConsulServiceInstance service;

  @Autowired
  RestTemplate restTemplate;

  @GetMapping("/gw-discovery")
  public List<ServiceInstance> ServiceInstance() {
    List<ServiceInstance> list = discoveryClient.getInstances("hpiconsul-s1");
    return list;
  }

  public Optional<URI> serviceUrl() {
    return discoveryClient.getInstances("hpiconsul-s2")
        .stream()
        .findFirst()
        .map(si -> si.getUri());
  }

  @GetMapping("/gw-api/redirect/{url}")
  public String discoveryPing(@PathVariable("url") String url) throws RestClientException,
      ServiceUnavailableException {
    URI service = serviceUrl()
        .map(s -> s.resolve("/" + url))
        .orElseThrow(ServiceUnavailableException::new);
    System.out.println(service.getHost());
    return restTemplate.getForEntity(service, String.class)
        .getBody();
  }

  @GetMapping("/gw-swagger-ui")
  public String swagger() throws RestClientException,
      ServiceUnavailableException {
    URI service = serviceUrl()
        .map(s -> s.resolve("/q/swagger-ui/"))
        .orElseThrow(ServiceUnavailableException::new);
    return restTemplate.getForEntity(service, String.class)
        .getBody();
  }
}
Kết Luận
Hy vọng qua bài viết ngắn có phần sơ sài này có thể giúp ích các bạn trong việc tìm hiểu và triển khai API Gateway + Consul nhé.
Chúc các bạn thành công.
Xí Xí, đừng quên HPI vẫn còn đang tuyển dụng rất nhiều vị trí hot với mức lương hấp dẫn nhé.
Đồng đội Senior Backend Engineer (Java/Go).
Đồng đội Junior Backend Engineer(Java/Go).
Đồng đội Senior Frontend Engineer(Vuejs/React).
Nguồn: viblo.asia