1.Auth0 là gì
Auth0 là một platform cung cấp các dịch vụ authentication và authorization như các chức năng như đăng nhập, đăng ký, quên mật khẩu, đăng nhập bằng SMS, multi factor authentication,… cho ứng dụng của bạn. Ngoài ra, Auth0 sẽ lưu trữ và cũng cấp các dịch vụ để quản lý các thông tin dùng để đăng nhập của người dùng như email, username, số điện thoại, password,… Do vậy dịch vụ này rất hữu ích khi hệ thống của bạn gồm nhiều dịch vụ và bạn muốn người dùng chỉ sử dụng một tài khoản để đăng nhập cho tất cả các dịch vụ này mà không cần phải lặp đi lặp lại việc implement lại chức năng đăng nhập cho các dịch vụ đó. Ở bài viết này, mình sẽ thực hành tích hợp Auth0 vào ứng dụng Rails thông qua API.
2.Auth0 Setup
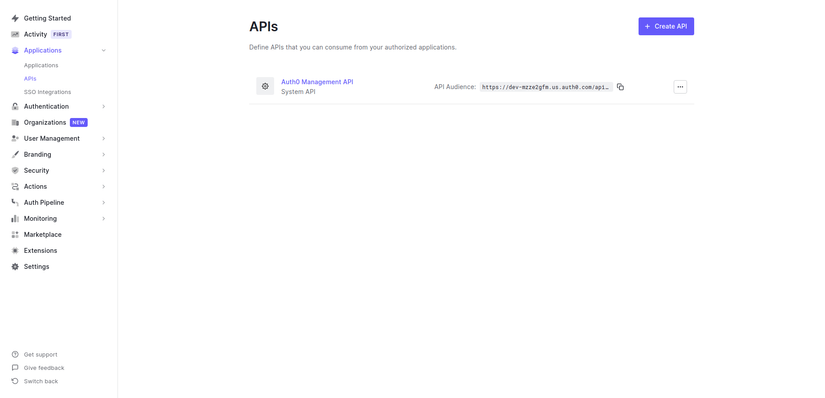
Truy cập https://auth0.com/ để đăng ký tài khoản, sau đó tạo một API ở đây

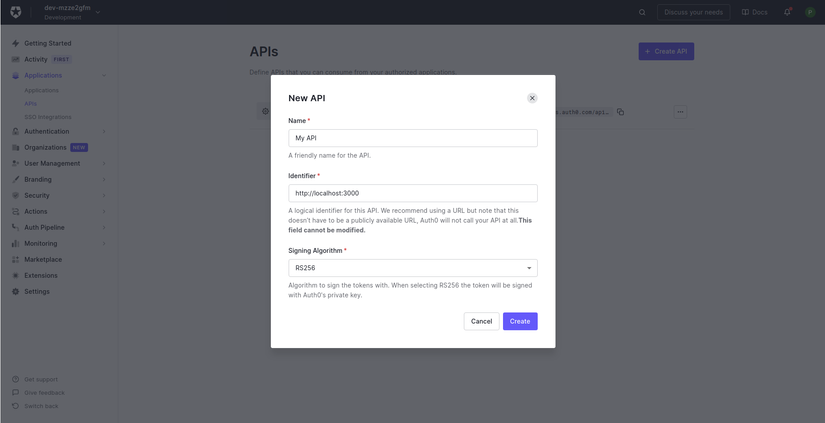
Nhấn nút “Create API” để tạo

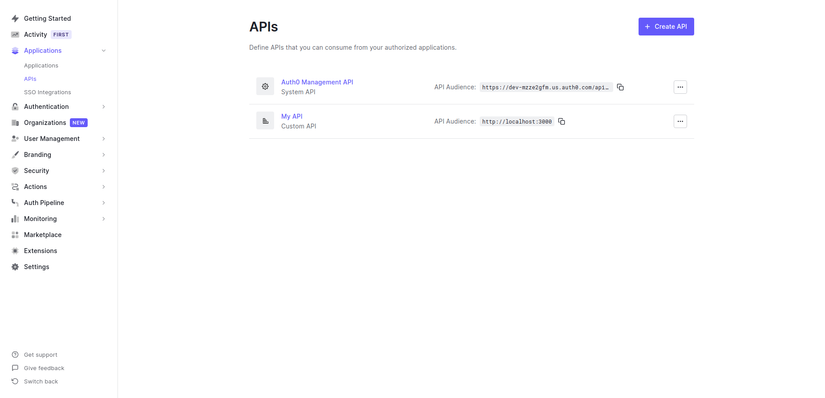
Điền các thông tin như trên
3.Rails Setup
Tạo một Rails API project với database là mysql
rails new auth0_demo --api --database=mysql
Thêm gem JWT, access token từ phía Auth0 gửi lên là một Json Web Token nên ở đây ta sẽ dùng thư viện JWT để decode token từ phía client gửi lên.
# add to your Gemfile
gem 'jwt'

# execute on the command line
bundle install
3.1 Tạo Class JsonWebToken
Bây giờ chúng ta sẽ tạo một class JsonWebToken ở server (Rails) chứa code để xác thực và giải mã access token từ Authorization header của request. Việc giải mã sẽ sử dụng cơ chế giải mã bằng key do Auth0 cung cấp ở https://AUTH0_DOMAIN/.well-known/jwks.json
# lib/json_web_token.rb# frozen_string_literal: truerequire"net/http"require"uri"classJsonWebTokendefself.verify token
    JWT.decode(token,nil,true, algorithms:"RS256", iss:"https://AUTH0_DOMAIN/", verify_iss:false,
      aud:Rails.application.secrets.auth0_api_audience, verify_aud:true)do|header|
      jwks_hash[header["kid"]]endenddefself.jwks_hash
    jwks_raw =Net::HTTP.get URI("https://AUTH0_DOMAIN/.well-known/jwks.json")
    jwks_keys =Array(JSON.parse(jwks_raw)["keys"])Hash[
      jwks_keys.map do|k|[
          k["kid"],OpenSSL::X509::Certificate.new(Base64.decode64(k["x5c"].first)).public_key
        ]end]endend
Lưu ý: thay thế AUTH0_DOMAIN bằng domain Auth0 của bạn, có thể xem domain này tại https://manage.auth0.com/#/applications, chọn Default App > tab Settings > Domain
3.2 Định nghĩa một module sercured
Tạo một module Secured chứa các hàm để lấy access token từ header Authorization của request và giải mã nó
# app/controllers/concerns/secured.rb# frozen_string_literal: truemoduleSecuredextendActiveSupport::Concern

  included do
    before_action :authenticate_request!endprivatedefauthenticate_request!
    auth_token
  rescueJWT::VerificationError,JWT::DecodeError
    render json:{ errors:["Not Authenticated"]}, status::unauthorizedenddefhttp_tokenif request.headers["Authorization"].present?
      request.headers["Authorization"].split(" ").last
    endenddefauth_tokenJsonWebToken.verify(http_token)endend
Code trên được tham khảo từ document của Auth0 tại đây
Thêm auto load path đến thư mục lib ở file config/application.rb
# config/application.rb

config.autoload_paths <<"#{Rails.root}/lib"
3.3 Public và private route
Thông thường trong một dự án sẽ có 2 loại API là API cần Authentication (private) và API không cần Authentication (public). Ở đây mình sẽ tạo 2 controller là PrivateController và PublicController chứa các API public và private
Tạo controller public bằng lệnh
bin/rails generate controller Public hello
Code thực thi cho public controller
classPublicController<ApplicationControllerdefhello
    render json:{ message:"Hello from a public endpoint! You don't need to be authenticated to see this."}endend
Tạo controller private bằng lệnh
bin/rails generate controller Private hello
Code thực thi cho private controller
classPrivateController<ApplicationControllerincludeSecureddefhello
    render json:{ message:"Hello from a private endpoint! You need to be authenticated to see this."}endend
4.Test API public và private bằng console
Để có thể test được API thì đầu tiên chúng ta cần phải lấy được access token để có thể xác thực, ở bài này mình sẽ sử dụng API của Auth0 (đã tạo ở bước đầu tiên) để sinh ra access token, nhưng best practice là access token này phải được get từ phía client như VueJS, ReactJS, … Bạn có thể tham khảo cách lấy access token thông qua login sử dụng VueJS và Auth0 ở đây

4.1 Lấy access token bằng cURL
Truy cập vào trang danh sách API, nhấn vào API đã tạo ở phần đầu tiên (của mình là “My API”) sau đó vào tab “Test” và là theo hướng dẫn:
curl --request POST
  --url https://AUTH0_DOMAIN/oauth/token
  --header 'content-type: application/json'
  --data '{"client_id":"<client Id>","client_secret":"<client secret>","audience":"http://localhost:3000","grant_type":"client_credentials"}'
Dữ liệu trả về sẽ có dạng
{
  "access_token": "eyJhbGciOiJSUzI1NiIsInR5cCI6IkpXVCIsImtpZCI6IjFUNm4wQk1Kdm03MW9aVDBrRExMWiJ",
  "token_type": "Bearer"
}
4.2 Api public
curl --request GET
  --url http://localhost:3000/public/hello
Kết quả
{"message":"Hello from a public endpoint! You don't need to be authenticated to see this."}
4.3 Api private
curl --request GET
  --url http://localhost:3000/private/hello
Một error sẽ xuất hiện vì không có access token
{"errors":["Not Authenticated"]}
Truyền access token thông qua header authorization
curl --request GET
  --url http://localhost:3000/private/hello/
  --header 'authorization: Bearer eyJhbGciOiJSUzI1NiIsInR5cCI6IkpXVCIsImtpZCI6IjFUNm4wQk1Kdm03MW9aVDBrRExMWiJ9.eyJpc3MiOiJodHRwczovL2Rldi1tenplMmdmbS51cy5hdXRoMC5jb20vIiwic3ViIjoiaEFHblNBbGgySU5IOGI1bENQYTNSZTNpb3h6TzBSTEhAY2xpZW50cyIsImF1ZCI6Imh0dHA6Ly9sb2NhbGhvc3Q6MzAwMCIsImlhdCI6MTYyNjYxNjg1MywiZXhwIjoxNjI2NzAzMjUzLCJhenAiOiJoQUduU0FsaDJJTkg4YjVsQ1BhM1JlM2lveHpPMFJMSCIsImd0eSI6ImNsaWVudC1jcmVkZW50aWFscyJ9.tZtyqUT8h5b_Jjjc4QILaRzpK2ES2M1hkkRY8wKCtY0KKnFPdMOgoMYe_73DqLU2OSPTU17xzc0asyW91MRSkw4UBMD41oMfmO7pD3Im0RqyJTSE42LX_wNAYsKMf39hrLUa9mPILaW5a0GPndbTFM2dBLWhWztKL8o-Py2HmBnFGrUez64zOiPsV71QDg-lG03fDF1nDO2cj_y5wUYaD6Qj_qLcEptvT3PVprRb0gTSHdZ_fdmmGJJr7e1_8QettbgisGjqYkCVTBJcXojhmpF3945-fXW5rbVc91ell71LHxMs4W1fC9cfRJmOcyKaFYWTRMu-nu2NmeBrskmTXA'
Kết quả
{"message":"Hello from a private endpoint! You need to be authenticated to see this."}
Nguồn
Nguồn: viblo.asia
