Amazon CloudFront lets you securely deliver data, videos, applications, and APIs to your global customers with low latency and high transfer speeds. In today’s digital-first world with a worldwide customer base, it’s important to deliver digital assets to end users with the lowest possible load time. Mobile devices now account for approximately 70% of internet traffic [1]. Therefore optimizing content delivery for this category of device is critical for overall customer experience.
When a customer accesses the internet through a mobile device, at any given time the device can have different grades of connectivity. It may be connected via Wi-Fi and a home broadband connection, thereby allowing high speed and unmetered downloads. At another time, it can be connected via a cellular connection, perhaps with a restrictive or expensive data plan. Cellular connectivity itself varies with the different generations of mobile telecommunication technology—from 2G to 5G.
The different connection types have different characteristics, particularly bandwidth. Therefore they can dramatically affect the time taken to load content. This makes it desirable to optimize the content delivered on the basis of the connection type. Traditional content optimization techniques vary content on the basis of inferred device characteristics, for example using User-Agent strings, or device screen resolution and other fingerprints. However, these techniques aren’t helpful in this context, because these properties remain constant regardless of the device’s actual network connectivity at any given time.
In this post we show how you can leverage CloudFront and CloudFront Functions to deliver content optimized for the device’s instantaneous connectivity type.
Prerequisites
This post assumes some general knowledge of programming, and that you’re familiar with
Amazon Simple Storage Service (Amazon S3), CloudFront, and CloudFront Functions. To help you get started, read the Amazon CloudFront documentation. Cooperation between client applications and the infrastructure is necessary to achieve the desired results. Therefore in this post we also provide code for a simple client app. In order to test the example, an AWS account must be available.
Introduction
The CloudFront infrastructure serving HTTP and HTTPS requests has no a priori way of knowing the local network connectivity of any given client that requests a particular object. To serve different assets on this basis, we require a method for the client to signal this information to the infrastructure. There are numerous ways that we could do this, such as using different domain names, or appending particular suffixes to the names of requested objects when we wish to receive optimized assets.
However, it’s preferable to decouple the control of which assets are returned under which network conditions from the application logic. Then, if we wish to make changes, perhaps on the basis of user feedback, it’s a simple matter to update a CloudFront distribution’s configuration, rather than pushing out app updates to all of our users. For this reason, in the case where optimized assets are desired, we suggest adding a simple request header to the HTTP requests made by the client application. The actual choice of header is arbitrary, as long as the clients and infrastructure agree on a common standard. However, the Save-Data header is a logical choice. If you decide upon a different request header, then note the detailed documentation regarding HTTP request headers and CloudFront behavior (custom and Amazon S3 origins).
Architecture
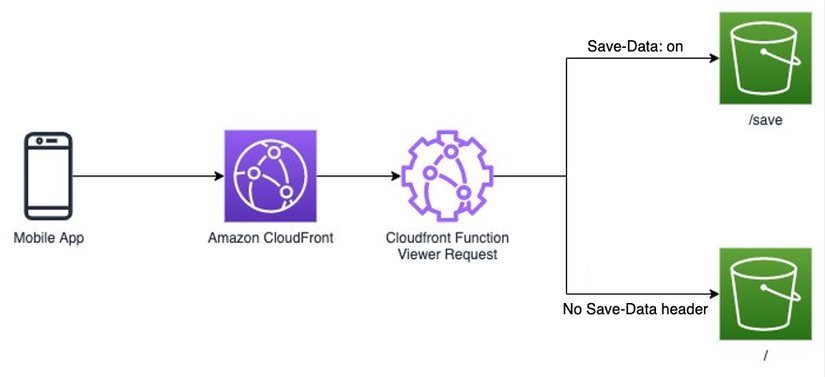
As shown in the following architecture, the mobile app will decide whether to send the header Save-Data: on when the mobile phone OS suggests it (detailed explanation in the following section). Upon receiving the request, CloudFront matches the request URL with corresponding path patterns. In the example, CloudFront will match any request and trigger the CloudFront Function on the Viewer Request event class. Then, the CloudFront Function will modify and forward the request to obtain the correct variant of the content based on the presence or absence of the header.

Client side procedures
A simple iOS app to demonstrate the client side procedures, written in Objective C, may be found on the aws-samples github, here. Furthermore, we discuss client side procedures for Android applications and native web applications in the following section.
The sample app uses the Apple Network framework, and specifically the nw_path_monitor_t observer, to monitor the network path that’s available to the device. As a phone or tablet moves from Wi-Fi coverage to cellular data coverage or back again, the app receives call-backs to a handler, indicating that the network path has been updated. In our handler code, we interrogate the path capabilities using the calls nw_path_is_expensive() and nw_path_is_constrained(). The former tells us whether or not the path uses an interface that is considered expensive, such as cellular or a personal hotspot. The latter checks whether or not the path uses a network interface that is in Low Data mode (see below). Note that iOS doesn’t provide more granular information about the exact type of cellular network to which the device is attached.
Exactly how we use this data regarding the path capabilities is an application-level choice. For example, if our application streams video, then we may decide to use the expensive flag to select standard resolution video instead of 4K or 8K. This is because we can rapidly exhaust a customer’s cellular data plan if we stream high resolution video across a cellular network. In this case, it may also be logical to combine this information with other device capability information, such as screen size and resolution. Furthermore, CloudFront can infer the broad category of device the client is running on, and add headers such as CloudFront-Is-Mobile-Viewer: true to requests for you, as described here.
On the other hand, we may wish to preserve an element of user choice in the type of asset delivered—after all, our user may be perfectly willing to use their cellular data plan allowance to download their favorite show in the best possible quality. We could use an application-specific, or even user profile-specific setting within the app, or alternatively—and as shown in the sample code—we can use the constrained flag. This will be true if the user has turned on Low Data mode for the relevant data plan in the iOS Settings app (Settings > Mobile Data > Mobile Data Options > Low Data Mode toggle). This setting provides an easily-understood, device-wide hint that the user wishes to limit the usage of their cellular data plan, which makes it a logical choice here.
When we’ve detected that reduced-size assets are desired, as described above, we add a request header Save-Data: on to each HTTP request that we send. If regular-sized assets are desired, we omit this header altogether. The sample app uses the Apple URL Loading System, embodied by NSURLSession and NSURLSessionTask objects, to load web-hosted assets. All we need to do is configure an NSURLSession object with the additional request header field as required, as shown in this code snippet:
NSURLSessionConfiguration *config = [NSURLSessionConfiguration defaultSessionConfiguration];
NSDictionary *myHeaders = nil;

// Here we just use the pathConstrained flag to influence our
// added HTTP request headers; we could do something more complex
// using both flags

if (pathConstrained) {
    // Add Save-Data: On header
    myHeaders = [NSDictionary dictionaryWithObject:@"on" forKey:@"Save-Data"];
    [config setHTTPAdditionalHeaders:myHeaders];
}
session = [NSURLSession sessionWithConfiguration:config];
If pathConstrained is true, then when we now use the session object to create download tasks, underlying HTTP requests that are sent to the HTTP origin will contain the request header field Save-Data: on.
Other client platforms
For Android native applications, the ConnectivityManager class provides similar functionality that allows apps to interrogate a device’s local connectivity. The equivalent of the iOS Low Data mode on Android is Data Saver mode. Apps can use the ConnectivityManager API to test whether Data Saver is enabled, and monitor for changes in its status, as described in the Android developer guide here.
For web-based applications—in other words, applications that are designed to run on a client device in a web browser—the Network Information Web API provides similar functionality. In particular, see the ECT, or effective connection type, header. However, note that at the time of writing this API is experimental technology that isn’t universally supported by all browsers.
Infrastructure configuration
First, we must create an S3 bucket that will host the images.
-
Open the Amazon S3 console.
-
Select Create Bucket.
-
Provide a name, for instance “example-testxyz” (remember this must be unique).
-
Select Create.
-
Once created, open the bucket “example-testxyz“.
-
Select Create folder and chose “save” as the folder name, then Create folder.
Now that you have an S3 bucket and the folder, upload two images—one in the root directory of the bucket, and the second one in the folder “save”. The pictures must have the same name “example.jpg”. But make sure they are different so you can easily understand which one is being delivered (the optimized version or the regular one). -
Select Upload, drag-and-drop the first example.jpg image and select Upload. Select Close.
-
Open “save” folder, drag-and-drop the second example.jpg image and select Upload. Select Close.

Now we have an S3 bucket with two different pictures with the same name, example.jpg, with one in the root directory of the S3 bucket, while the other is in /save. Next, set up CloudFront:
- Open the CloudFront console.
- Under Distribution, select Create Distribution
- For Origin Domain, select the S3 bucket you previously created.
- Under Origin access, select Origin access control settings (recommended).
- Select Create control setting.
- In the modal dialog that appears, you can accept the default settings, and select Create. This will create a control setting with the same name as the origin S3 bucket. Note the comment “You must update the S3 bucket policy”. We’ll do this in a later step.
- Select Create distribution, at the bottom of the page
- On the following page, you’ll see a banner that states “The S3 bucket policy needs to be updated”. This change to the policy allows the CloudFront service to access objects in the bucket securely. Select Copy policy to copy the policy statement to the clipboard.
- Navigate back to the S3 console and select the bucket you created above.
- On the Permission tab, under Bucket policy, select Edit.
- Paste from the clipboard into the Policy edit text area, which should be empty for this newly-created bucket. You’ll see a JSON policy document allowing the CloudFront service to read objects from the bucket for a specific distribution.
- Select Save changes.
Now you can navigate back to the CloudFront console. When the newly configured CloudFront distribution has finished deploying—which can take a few minutes—the Status field for the distribution will read Enabled. Note the Distribution domain name, which will be something like dXXXXXXXXXXXX.cloudfront.net.
Now, upload our CloudFront Function. The following code prefixes /save to the URL if the header Save-Data is present and has the value on.
function handler(event) {
    var request = event.request;
    var headers = request.headers;

    if (headers['save-data'] && headers['save-data']['value'] === 'on') {
        var url = request['uri'];
        var newurl = '/save' + url;
        // we log the url
        console.log(newurl);
        request.uri = newurl;
    }
    return request;
}
- Open the CloudFront console.
- Select Functions and select Create function.
- Add the name “blogpostfunction” and choose Create function.
- Copy and paste the code above.
- Select Save changes.
- Once saved, select the Publish tab and choose Publish function
- Select Add association.
- A new pop up window will appear. Choose your newly created CloudFront distribution, select Viewer Request in the Event Type and select Default (*) for Cache behavior.
- Select Add association.
Now the CloudFront distribution is up and running. Whenever it receives a request with a Save-Data: on header, it will redirect the request to /save. In the next section, we’ll see two ways to test it.
For simplicity of this example, we have configured this function to run for any object that is requested from the CloudFront distribution. In practice, you can use the Behaviors tab of the CloudFront distribution to limit its application only to certain URI path patterns—such as /media/mpeg/.mp4, or /images/.jpg—where optimized media is known to exist in the corresponding bucket prefixes /save/media/mpeg/ and /save/images/. This is useful for situations where some media has been optimized, but media found in other URI paths, perhaps such as legacy assets or UI elements, does not have an optimized variant.
Testing the solution
If you wish to build the iOS app locally and test it using an iOS device or simulator, use Apple’s Xcode IDE. Start by cloning the repository https://github.com/aws-samples/ios-objective-c-simple-image-loader (Source Control > Clone …). Select a location to save the local copy. Now you can select a device or simulator from the IDE top bar, then choose Product > Run to build, install and run the app.
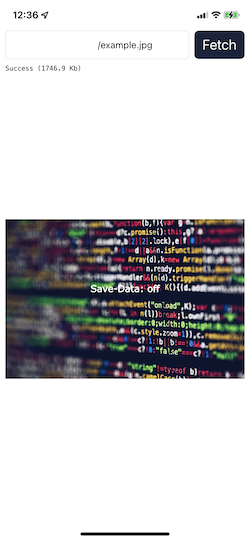
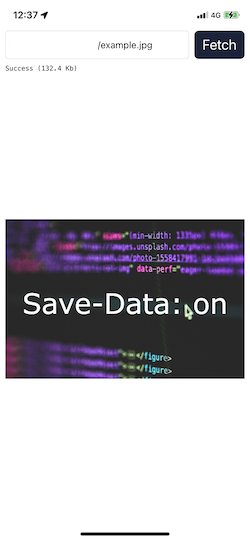
Upon starting up, the app looks like figure 3(a). Paste your CloudFront distribution domain name and /example.jpg into the text field and select Fetch. Depending on your connectivity, as described above, the app either will or won’t include the Save-Data: on header, and the CloudFront distribution will return the appropriate image—see figures 3(b) and (c). The app also shows the size of the downloaded object.


To force your device to use a constrained network path, go into the iOS Settings app. First disable Wi-Fi (Settings > Wi-Fi > Wi-Fi toggle off), and second, enable Low Data Mode for your cellular connection (Settings > Mobile Data > Mobile Data Options > Low Data Mode toggle on).
If you want to test the infrastructure behavior independently of any app, then you can use curl as follows:
curl https://dXXXXXXXXXXXXX.cloudfront.net/example.jpg --output /tmp/example.jpg
To add the Save-Data: on header:
curl https://dXXXXXXXXXXXXX.cloudfront.net/example.jpg --header "Save-Data: on" --output /tmp/example.jpg
When you’ve tested the solution, to avoid incurring ongoing costs, first disable and then delete the distribution in the CloudFront console.
Conclusion
In this post, we’ve shown how client apps on mobile devices can signal their current local network connectivity to backend infrastructure. By centralizing decisions about how network connectivity should affect the content served to applications, and decoupling those decisions from application logic, we simplify the process of optimizing content for varying conditions. End users benefit from a more responsive user experience that still conforms to their preferences, while mobile network operators benefit from the reduced load on legacy networks.
Nguồn: viblo.asia
