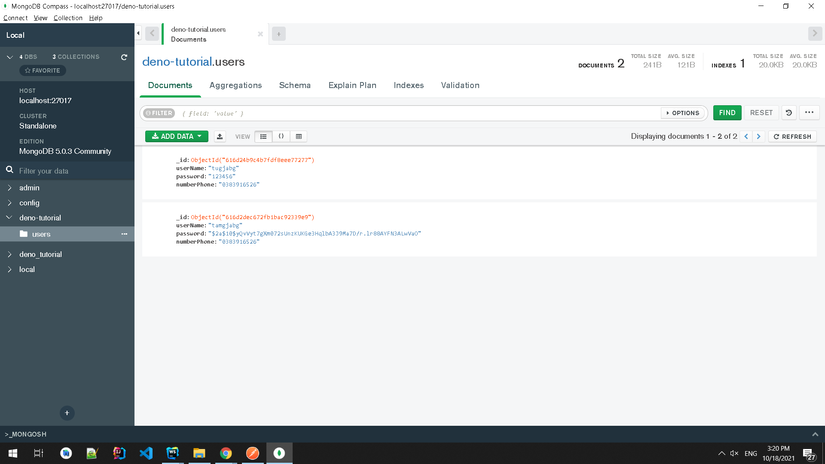
- Ở bài trước, chúng ta đã làm api đơn giản về đăng ký tài khoản. Bài này mình sẽ hướng dẫn các bạn mã hóa mật khẩu và xác thực người dùng trong deno
- Để mã hóa mật khẩu chúng ta sẽ dùng thư viện https://deno.land/x/bcrypt
- Xác thực người dùng bằng jwt, chúng ta dùng https://deno.land/x/[email protected]
Chúng ta sẽ tạo ra một packge có tác dụng encode, verify mật khẩu phía mongoDB
sercure/sercurePassword.ts
ở đây, chúng ta cần 2 function cho việc này : encodePass(String) và verifyPass(String, String)
import * as bcrypt from "https://deno.land/x/bcrypt/mod.ts";

export const encodePass = (password : string) => {
    return bcrypt.hashSync(password);
}

export const verifyPass = (password : string, hash : string) => {
    return bcrypt.compareSync(password, hash);
}
Quay trở lại controller thực hiện nhiệm vụ đăng ký, chúng ta cần thêm một số bước cho giống với thực tế một chút
đầu tiên, chúng ta cần bổ xung phương thức getByUserName để check xem đã có user đó ở trong db chưa, tất nhiên method này sẽ được tạo từ repository/userRepository.ts:
export const getByUserName = async (userName: string) => {
    return await userCollection.findOne({userName: userName});
}
Để format chuẩn hơn với data trả về, chúng ta cần custom 1 chút dạng response (các bạn tạo thêm một package utilities nhé
utilities/responseCustom.ts
import {Context, Status} from "https://deno.land/x/[email protected]/mod.ts";

export const ResponseCustom = (context : Context, status : Status, data : any) => {
    context.response.status = status;
    context.response.body = data;
}
controllers/userController.ts
import {Context, Status, STATUS_TEXT} from "https://deno.land/x/[email protected]/mod.ts";
import {createUser, getByUserName} from "../repository/userRepository.ts";
import {ResponseCustom} from "../utilities/responseCustom.ts";
import {encodePass} from "../secure/sercurePassword.ts";

export const signUpHandler = async (context: Context) => {
    const body = await context.request.body();
    const value = await body.value;
    const user = await getByUserName(value.userName);
    if(user){
        // nếu tồn tại user name trong db, sẽ trả về conflict, không thể tạo
        return ResponseCustom(context, Status.Conflict, {
            message: STATUS_TEXT.get(Status.Conflict),
            status: Status.Conflict
        })
    }else {
        value.password = encodePass(value.password);
        const insertId = await createUser(value);
        if (insertId) {
            return ResponseCustom(context, Status.OK, {
                message: STATUS_TEXT.get(Status.OK),
                status: Status.OK,
                // data: {
                //     token: await genToken({phone: value.numberPhone, userName : value.userName})
                // }
            });
        } else {
            return ResponseCustom(context, Status.InternalServerError, {
                message: STATUS_TEXT.get(Status.InternalServerError),
                status: Status.InternalServerError
            });
        }
    }
}
Thử lại bằng postman, chúng ta được kết quả sau khi encode mật khẩu như sau :

Tiếp đến sau khi đăng ký tài khoản, chúng ta cần phải trả về token cho người dùng để phía font-end sử dụng để đăng nhập
sercure/token.ts
import {Header, create, Payload} from "https://deno.land/x/[email protected]/mod.ts";
import {verify} from "https://deno.land/x/[email protected]/mod.ts";

export const keyHS256 = await crypto.subtle.importKey(
    "raw",
    new TextEncoder().encode("secret"),
    { name: "HMAC", hash: "SHA-256" },
    false,
    ["sign", "verify"],
);

const header: Header = {
    alg: "HS256",
    typ: "JWT",
};

export const genToken = async (payload: Payload) =>{
    const jwt = await create(header, payload, keyHS256);
    return jwt;
}

export const validateToken = async (token: string) => {
    return await verify(token, keyHS256);
}
ở đây, chúng ta sẽ tạo token bằng SHA-256 đây là một thuật toán thôi, không có gì quá đặc biệt đối với người “sử dụng” như mình
cần 2 phương thức ở đây là genToken để tạo ra token cho người dùng, và validateToken để xác thực người dùng, đến bước này chúng ta bỏ comment ở đoạn code
                // data: {
                //     token: genToken({phone: value.numberPhone, userName : value.userName})
                // }
đi nhé.
Sau khi thử lại bằng postman, chúng ta nhận được 1 token như sau :
{
    "message": "OK",
    "status": 200,
    "data": {
        "token": "eyJhbGciOiJIUzI1NiIsInR5cCI6IkpXVCJ9.eyJwaG9uZSI6IjAxMjM0NTY3ODkiLCJ1c2VyTmFtZSI6InZpYmxvIn0.5KJwjEHKNGZNh5xs6EGv9dCZ5HAlFL1r9kn-4vQuXUU"
    }
}
Các bạn có thể kiểm tra thông tin mà token này chứa thông tin mang theo bằng cách copy đoạn token này dán vào https://jwt.io/, chọn header giông với header mà chúng ta set ở code bên trên
Khá là thiếu khi chúng ta chưa làm phương thức đăng nhập cho api của mình.
Đầu tiên, ta thêm method signInHandler vào userController :
export const signInHandler = async (context: Context) => {
    const body = await context.request.body();
    const reqValue = await body.value;
    const user = (await getByUserName(reqValue.userName)) as User;
    if (user) {
        /// chúng ta sẽ kiểm tra password bằng cách mã hóa password user nhập khi đăng nhập,
        // nếu encode == encode ở db thì là đúng
        const validatePass = verifyPass(reqValue.password, user.password);
        if (validatePass) {
            return ResponseCustom(
                context, Status.OK, {
                    status: Status.OK,
                    message: STATUS_TEXT.get(Status.OK),
                    data: {
                        token: await genToken({phone: reqValue.numberPhone, userName: reqValue.userName})
                    }
                }
            );
        } else {
            return ResponseCustom(context, Status.Unauthorized, {
                status: Status.Unauthorized,
                message: STATUS_TEXT.get(Status.Unauthorized)
            });
        }
    } else {
        return ResponseCustom(context, Status.NotFound, {
            status: Status.NotFound,
            message: STATUS_TEXT.get(Status.NotFound)
        });
    }
}
tiếp theo, tiếp tục thêm vào router thôi:
router
    .get("/", helloHandler)
    .post("/api/v1/sign-up", signUpHandler)
    .post("/api/v1/sign-in", signInHandler);
Thử ở postman, chúng ta được kết quả như sau :
{
    "status": 200,
    "message": "OK",
    "data": {
        "token": "eyJhbGciOiJIUzI1NiIsInR5cCI6IkpXVCJ9.eyJ1c2VyTmFtZSI6InZpYmxvIn0.hJRlUn7kmwiQU5t8JVwSPYiwfYE-Jm_r29SZ_jxK07s"
    }
}
- Đến đây, chúng ta đã xong các api như đăng nhập, đăng ký. Có thể xác thực người dùng,..
- Ở bài viết tiếp theo mình sẽ hướng dẫn cách dùng jwt để viết api xem thông tin cá nhân của người dùng
Nguồn: viblo.asia
