NestJS là một framework hỗ trợ người dùng xây dựng các ứng dụng node server-side một cách hiệu quả và dễ dàng mở rộng. Với ưu điểm nổi bật là tính hiệu quả, đáng tin cậy và dễ mở rộng, hỗ trợ Typescript. Đặc biệt là lớp bên dưới sử dụng ExpressJS nên nó kế thừa toàn bộ sức mạnh của framework phổ biến này.
I. Cài đặt NestJS
Trước khi có thể sử dụng NestJS để xây dựng ứng dụng, bạn cần phải cài đặt sẵn công cụ Nest CLI (Command Line Interface). Ta sử dụng NPM để cài đặt Nest CLI
$ npm i -g @nestjs/cli
Sau khi cài đặt xong Nest CLI, bạn sử dụng lệnh sau để tạo dự án với NestJS:
$ nest new project-name
Chờ 1 chút để download source, kết quả hiển thị như dưới là cài đặt project hoàn thành rồi, khá nhanh phải không. Sau đây mình cùng đi tìm hiểu chi tiết bên trong
SUN-ASTERISK[email protected]:/var/www$ nest new nestjs
⚡  We will scaffold your app in a few seconds..

CREATE nestjs/.eslintrc.js (631 bytes)
CREATE nestjs/.prettierrc (51 bytes)
CREATE nestjs/README.md (3339 bytes)
CREATE nestjs/nest-cli.json (64 bytes)
CREATE nestjs/package.json (1995 bytes)
CREATE nestjs/tsconfig.build.json (97 bytes)
CREATE nestjs/tsconfig.json (546 bytes)
CREATE nestjs/src/app.controller.spec.ts (617 bytes)
CREATE nestjs/src/app.controller.ts (274 bytes)
CREATE nestjs/src/app.module.ts (249 bytes)
CREATE nestjs/src/app.service.ts (142 bytes)
CREATE nestjs/src/main.ts (208 bytes)
CREATE nestjs/test/app.e2e-spec.ts (630 bytes)
CREATE nestjs/test/jest-e2e.json (183 bytes)

? Which package manager would you ❤️  to use? npm
✔ Installation in progress... ☕

🚀  Successfully created project nestjs
👉  Get started with the following commands:

$ cd nestjs
$ npm run start


                                                        Thanks for installing Nest 🙏
                                               Please consider donating to our open collective
                                                      to help us maintain this package.
Để khởi động pj, bạn run cmd sau.
$ cd nestjs
$ npm run start
sau đó truy cập link http://localhost:3000/ để xem kết quả.

II. Project Structure
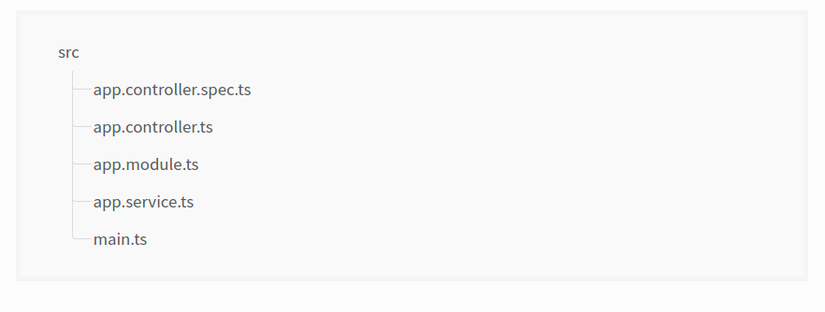
Bên trong thư mục src, bạn sẽ thấy các file được tạo sẵn như sau:
Thư mục này sẽ là nơi mà chúng ta làm việc thường xuyên nhất.

app.controller.spec.ts: Đây là controller để phục vụ cho việc testing (Unittest)
import { Test, TestingModule } from '@nestjs/testing';
import { AppController } from './app.controller';
import { AppService } from './app.service';

describe('AppController', () => {
  let appController: AppController;

  beforeEach(async () => {
    const app: TestingModule = await Test.createTestingModule({
      controllers: [AppController],
      providers: [AppService],
    }).compile();

    appController = app.get<AppController>(AppController);
  });

  describe('root', () => {
    it('should return "Hello World!"', () => {
      expect(appController.getHello()).toBe('Hello World!');
    });
  });
});
app.controller.ts Đây là controller mặc định, nó render ra view hello world!
import { Controller, Get } from '@nestjs/common';
import { AppService } from './app.service';

@Controller()
export class AppController {
  constructor(private readonly appService: AppService) {}

  @Get()
  getHello(): string {
    return this.appService.getHello();
  }
}
app.module.ts: Đây là module gốc của ứng dụng.
import { Module } from '@nestjs/common';
import { AppController } from './app.controller';
import { AppService } from './app.service';

@Module({
  imports: [],
  controllers: [AppController],
  providers: [AppService],
})
export class AppModule {}
app.service.ts: Chứa các hàm bạn xử lý logic cho ứng dụng của bạn, trong controller chỉ có tiếp nhận dữ liệu từ request (param, query, body…) và trả dữ liệu cho client. Trong quá trình xử lý, nếu cần phải xử lý business logic như DB, File… Controller sẽ gọi tới service.
import { Injectable } from '@nestjs/common';

@Injectable()
export class AppService {
  getHello(): string {
    return 'Hello World!';
  }
}
main.ts: là file mà chúng ta sẽ sẽ khởi tạo các đối tượng để chạy ứng dụng, ex: NestFactory.create() để khởi tạo instance của Nest, khởi tạo một server lắng nghe ở port 3000.
import { NestFactory } from '@nestjs/core';
import { AppModule } from './app.module';

async function bootstrap() {
  const app = await NestFactory.create(AppModule);
  await app.listen(3000);
}
bootstrap();
III. Demo tạo REST API với NestJS
Mình sẽ tạo REST API quản lý posts, có đầy đủ chức năng như CRUD như: GET, POST và DELETE.
Dưới đây là 4 api mình define:
- GET /posts: Lấy toàn bộ danh sách bài post
- GET /posts/:post_id: Chi tiết bài post by id
- POST /posts: Thêm mới 1 bài post
- DELTE /posts: Xóa một bài post
Step 1: Create module
sử dụng cmd như sau:
nest generate module posts
sau khi chạy cmd trên, sẽ generate ra modul posts, và import vào app.module
SUN-ASTERISK[email protected]:/var/www/nestjs$ nest generate module posts
CREATE src/posts/posts.module.ts (82 bytes)
UPDATE src/app.module.ts (312 bytes)
Chi tiết: CREATE src/posts/posts.module.ts
import { Module } from '@nestjs/common';

@Module({})
export class PostsModule {}
Chi tiết: UPDATE src/app.module.ts, imports: PostsModule
import { Module } from '@nestjs/common';
import { AppController } from './app.controller';
import { AppService } from './app.service';
import { PostsModule } from './posts/posts.module';

@Module({
  imports: [PostsModule],
  controllers: [AppController],
  providers: [AppService],
})
export class AppModule {}
Khá là nhanh, nếu bạn không thích tạo tự động bằng cmd, thì có thể tự tạo modul và tự import vào app.module
Step2: Create Controller
Tương tự như tạo module, ta tạo controller cũng sẽ có cmd tương tự
$ nest g controller posts
Khi này trên màn hình cmd sẽ hiển thị như sau:
SUN-ASTERISK[email protected]:/var/www/nestjs$ nest g controller posts
CREATE src/posts/posts.controller.spec.ts (485 bytes)
CREATE src/posts/posts.controller.ts (99 bytes)
UPDATE src/posts/posts.module.ts (170 bytes)
Như ta nhìn thấy, cmd sẽ tạo 2 file posts.controller, và update file posts.module
posts.controller.spec.tslà file test controllerposts.controller.tslà controller chính để xử lý
import { Controller } from '@nestjs/common';

@Controller('posts')
export class PostsController {}
src/posts/posts.module.tsimport controller vào
import { Module } from '@nestjs/common';
import { PostsController } from './posts.controller';

@Module({
  controllers: [PostsController]
})
export class PostsModule {}
Step3: Create Service
tương tự ta sẽ có cmd tương ứng
nest generate service posts
Kết quả:
SUN-ASTERISK[email protected]:/var/www/nestjs$ nest generate service posts
CREATE src/posts/posts.service.spec.ts (453 bytes)
CREATE src/posts/posts.service.ts (89 bytes)
UPDATE src/posts/posts.module.ts (247 bytes)
Cmd trên sẽ tạo ra
posts.service.spec.tsvà file test serviceposts.service.tslà file xử lý logic
import { Injectable } from '@nestjs/common';

@Injectable()
export class PostsService {}
- import service vào posts.module
Step3: Xử lý logic CRUD
Mở file posts.servive.ts chỉnh sửa như sau:
import { HttpException, Injectable } from '@nestjs/common';

@Injectable()
export class PostsService {
    posts = [
        {
            id: 1,
            title: 'Chúng tôi là ai?',
            description: 'Sun Asterisk chứa đựng ước mơ và mục tiêu kiến tạo nên thật nhiều những điều tốt đẹp cho xã hội của tập thể những chiến binh mặt trời.',
            author: 'Sun*',
            url: 'https://sun-asterisk.vn/ve-chung-toi/',
          },
          {
            id: 2,
            title: 'Chúng tôi làm gì?',
            description: 'Là một Digital Creative Studio, Sun* luôn đề cao tinh thần làm chủ sản phẩm, tư duy sáng tạo trong mỗi dự án để mang đến những trải nghiệm "Awesome" nhất cho end-user',
            author: 'Sun*',
            url: 'https://sun-asterisk.vn/creative-engineering/',
          },
    ];


    getPosts(): Promise<any> {
        return new Promise(resolve => {
             resolve(this.posts);
        });
    }

    getPost(postId): Promise<any> {
        let id = Number(postId);
        return new Promise(resolve => {
            const post = this.posts.find(post => post.id === id);
            if (!post) {
                 throw new HttpException('Post not found', 404)
            }
            resolve(post);
        });
    }

    addPost(post): Promise<any> {
        return new Promise(resolve => {
            this.posts.push(post);
            resolve(this.posts);
        });
    }

    deletePost(postId): Promise<any> {
        let id = Number(postId);
        return new Promise(resolve => {
            let index = this.posts.findIndex(post => post.id === id);
            if (index === -1) {
                throw new HttpException('Post not found', 404);
            }
            this.posts.splice(index, 1);
            resolve(this.posts);
        });
    }
}
File posts.controller.ts
import { Controller, Get, Param, Post, Body, Delete, Query } from '@nestjs/common';
import { PostsService } from './posts.service';
import { CreatePostDto } from './create-post.dto';
import { identity } from 'rxjs';
@Controller('posts')
export class PostsController {
    constructor(private postService: PostsService) {}

    @Get()
    async getPosts() {
        const posts = await this.postService.getPosts();
        return posts;
    }

    @Get(':postId')
    async getCourse(@Param('postId') postId) {
        const post = await this.postService.getPost(postId);
        return post;
    }

    @Post()
    async addPost(@Body() CreatePostDto: CreatePostDto) {
        const post = await this.postService.addPost(CreatePostDto);
        return post;
    }

    @Delete(':id')
    async deletePost(@Param('id') id: string) {
        const post = await this.postService.deletePost(id);
        return post;
    }
}
func addPost Để truy cập và lấy dữ liệu từ body trong POST request, chúng ta sẽ sử dụng decorator @Body(). Để xác định cấu trúc dữ liệu trong body, chúng ta sẽ sử dụng Data Transfer Object (DTO)
tạo file create-post.dto.ts khai báo nội dung như sau:
export class CreatePostDto {
    id: number;
    title: string;
    description: string;
    author: string;
    url: string;
}
Step4: Demo API
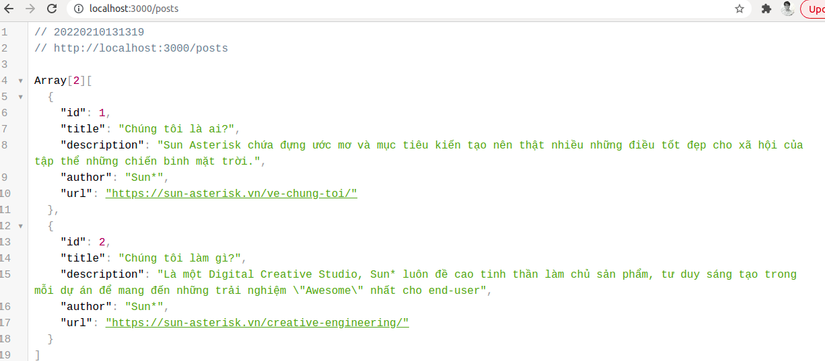
Get posts

Get Post

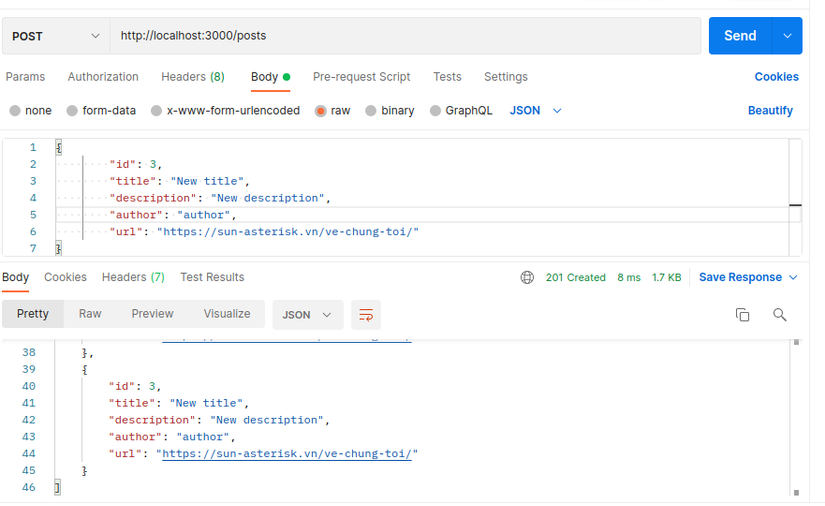
Add Post

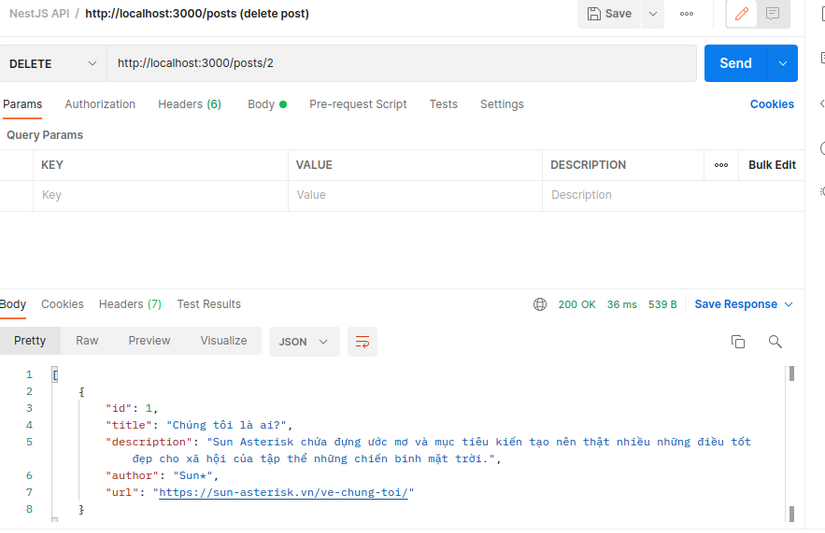
Delete Post

Như vậy là xong phần tìm hiểu và cách hoạt động cơ bản của NestJs, trong bài tiếp theo chúng ta sẽ tìm hiểu về auth. Thanks!
Nguồn: viblo.asia
