What is Redux Toolkit? Why to choose it?
Redux is a popular state management library in React. If you to create a complete store sometime, you need to go with many steps, create many files and duplicate code. In additional, Redux also can not us easy to create a good flow or standard for writing the logic .. and sometime we need to add more libraries such as middleware, selectors… to write complete state management logic.
Redux Toolkit makes it easier to write good Redux applications and speeds up development, by baking in our recommended best practices, providing good default behaviors, catching mistakes, and allowing you to write simpler code. Redux Toolkit is beneficial to all Redux users regardless of skill level or experience. It can be added at the start of a new project, or used as part of an incremental migration in an existing project.
Redux Toolkit was originally created to help address three common concerns about Redux:
- “Configuring a Redux store is too complicated”
- “I have to add a lot of packages to get Redux to do anything useful”
- “Redux requires too much boilerplate code”
Install
Now we can create the new by using command below:
npx react-demo redux-toolkit-demo --template redux
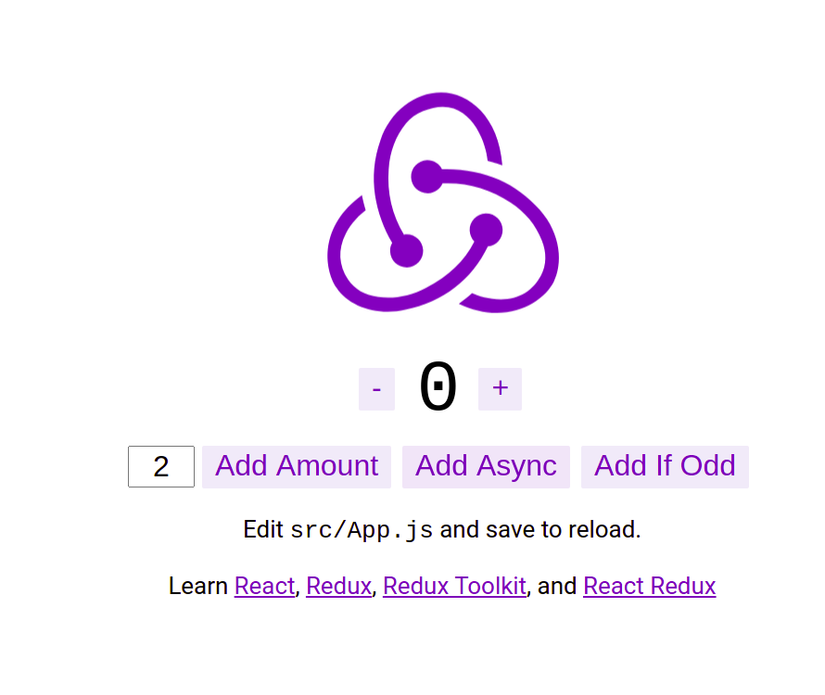
When you finish set up, you can use yarn start to start server. After server started, you can Redux Toolki also generate for you a example like picture below:
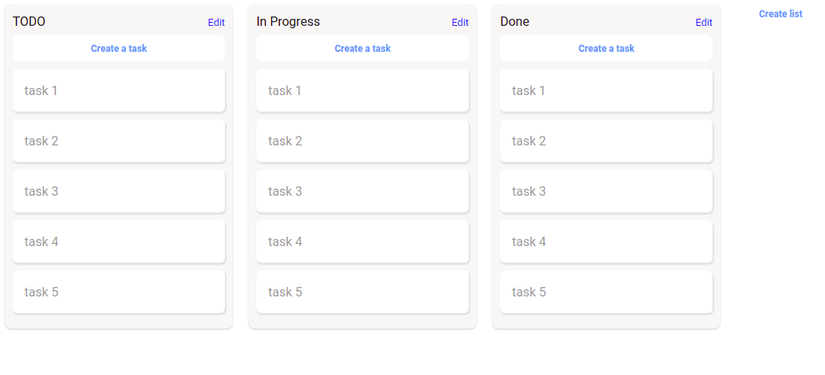
Practice with simple app
Now let’s start to create simple app like task managment. In this demo, We already have board, list and we just create task in to list.
In file src/features/task/boardSlice.js
import { createAsyncThunk, createSlice } from '@reduxjs/toolkit';

const data = {
  id: 1,
  name: "Board Demo",
  lists: [...]
}

const initialState = {
  board: {lists: [{tasks: []}]},
  status: 'idle',
};

export const fetchBoardDetail = createAsyncThunk(
  'board/fetchDetail',
  async () => {
    const response = await new Promise((resolve) =>
      setTimeout(() => resolve({ data: data }), 2000)
    );
    return response.data;
  }
);

export const addTask = createAsyncThunk(
  'board/addTask',
  async (task) => {
    const response = await new Promise((resolve) =>
      setTimeout(() => resolve({ data: {id: new Date().getTime(), name: task.name, listId: task.listId} }), 100)
    );
    return response.data;
  }
);

export const addList = createAsyncThunk(
  'board/addList',
  async (listName) => {
    const response = await new Promise((resolve) =>
      setTimeout(() => resolve({ data: {id: new Date().getTime(), name: listName, tasks: []} }), 100)
    );
    return response.data;
  }
);

export const updateList = createAsyncThunk(
  'board/updateList',
  async (list) => {
    const response = await new Promise((resolve) =>
      setTimeout(() => resolve({ data: {id: list.id, name: list.name} }), 100)
    );
    return response.data;
  }
);

export const boardSlice = createSlice({
  name: 'board',
  initialState,
  reducers: {
  },
  extraReducers: (builder) => {
    builder
      .addCase(fetchBoardDetail.pending, (state) => {
        state.status = 'loading';
      })
      .addCase(fetchBoardDetail.fulfilled, (state, action) => {
        state.status = 'idle';
        state.board = action.payload;
      })

      .addCase(addTask.pending, (state) => {
      })
      .addCase(addTask.fulfilled, (state, action) => {
        let list = state.board.lists.find(list => list.id === action.payload.listId);
        list.tasks.unshift(action.payload);
      })
     ....
  }
});

export const {} = boardSlice.actions;
export const selectBoard = (state) => state.board;
export default boardSlice.reducer;
In file above you can see we have fuction addTask that we use to add task to array in list.
We need to import reducer and add it into the store.
import { configureStore } from '@reduxjs/toolkit';
import counterReducer from '../features/counter/counterSlice';
import boardReducer from '../features/board/boardSlice';

export const store = configureStore({
  reducer: {
    counter: counterReducer,
    board: boardReducer
  },
});
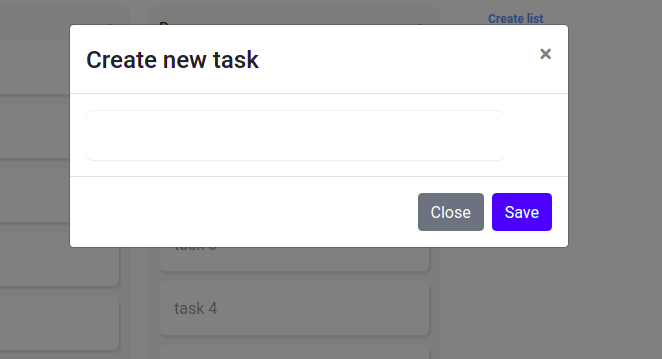
In list, we will have button to create new task:
import React, { useEffect, useState } from 'react';
import { useSelector, useDispatch } from 'react-redux';
...

export function BoardDetail() {
  const boardData = useSelector(selectBoard);
  const dispatch = useDispatch();
  const [taskName, setTaskName] = useState("");
  const [listName, setListName] = useState("");
  const [listToCreateTask, setListToCreateTask] = useState("");
  const [showCreateListForm, setShowCreateListForm] = useState(false);
  const [showCreateTaskForm, setShowCreateTaskModal] = useState(false);
  const [showTaskModal, setShowTaskModal] = useState(false);
  const [taskObject, setTaskObject] = useState({});
  const [showListModal, setShowListModal] = useState(false);
  const [listObject, setListObject] = useState({});

  useEffect(() => {
    dispatch(fetchBoardDetail());
  }, []);

  return (
    <div>
      {boardData.status == 'loading' ?
        <div className={styles.loading}>Loading ...</div>
      :
        <div>
          {boardData.board.lists.map((list) => (
            <div className={styles.listItem} key={list.id}>
              <span>{list.name}
                <a href="#" className="float-right" onClick={() => {
                    setListObject(list);
                    setShowListModal(true);
                  }}>
                  <small>Edit</small>
                </a>
              </span>

              {listToCreateTask === list.id ?
                <div>
                  <CreateTaskModal show={setShowCreateTaskModal}
                    handleClose={() => {
                      setShowCreateTaskModal(false);
                      setListToCreateTask("");
                    }}
                    createTask={(taskName) => {
                      dispatch(addTask({name: taskName, listId: list.id}));
                    }}
                  />
                </div>
              :
                <button className={styles.createTask}
                  onClick={() => {
                    setListToCreateTask(list.id);
                    setShowCreateTaskModal(true);
                    setTaskName("");
                  }}
                >
                  Create a task
                </button>
              }

              {list.tasks.map((task) => (
                <div>
                  <div className={styles.taskItem} key={task.id} onClick={() => {
                      setTaskObject(task);
                      setShowTaskModal(true);
                    }}
                  >
                    {task.name}
                  </div>
                </div>

              ))}
            </div>
          ))}

          {showCreateListForm ?
            <div>
              <CreateListModal show={showCreateListForm}
                handleClose={() => setShowCreateListForm(false)}
                createList={(listName) => {
                  dispatch(addList(listName));
                }}
              />
            </div>
          :
            <button className={styles.createList}
              onClick={() => {
                setShowCreateListForm(true);
                setListName("");
              }}
            >
              Create list
            </button>
          }

          <TaskModal show={showTaskModal}
            handleClose={() => setShowTaskModal(false)}
            task={taskObject}
          />

          <ListModal show={showListModal}
            handleClose={() => setShowListModal(false)}
            list={listObject}
          />


        </div>
      }
    </div>
  );
}
Now let’s start to create view for modal create task:
import React, { useEffect, useState } from 'react';
import { useSelector, useDispatch } from 'react-redux';
import { Modal, Button } from 'react-bootstrap';
import styles from './BoardDetail.module.css';

export function CreateTaskModal(props) {
  const [taskName, setTaskName] = useState("");
  const dispatch = useDispatch();

  return(
    <Modal show={props.show} onHide={() => {
      props.handleClose();
      setTaskName("");
    }}>
      <Modal.Header closeButton>
        <Modal.Title>Create new task</Modal.Title>
      </Modal.Header>
      <Modal.Body>
        <input className={styles.formControl}
          value={taskName}
          onChange={(e) => setTaskName(e.target.value)}
        />
      </Modal.Body>
      <Modal.Footer>
        <Button variant="secondary" onClick={() => {
          props.handleClose();
          setTaskName("");
        }}>
          Close
        </Button>
        <Button variant="primary" onClick={() => {
            props.handleClose();
            props.createTask(taskName);
          }}>
          Save
        </Button>
      </Modal.Footer>
    </Modal>
  )
}
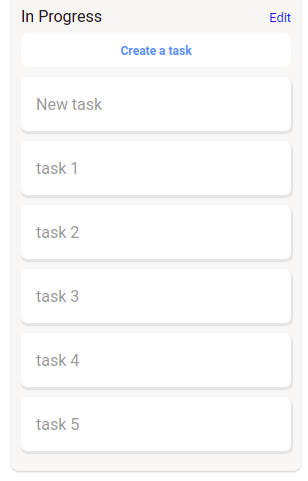
After we fill the task name “New task” and we click on save, it will be save and show it the list.
Nguồn: viblo.asia