1.Giới thiệu
Ở tiêu đề bài viết chúng ta thấy có từ khoá Hook. Theo như tài liệu từ React mô tả thì Hook là 1 bổ sung mới trong React 16.8. Nó cho phép chúng ta sử dụng State và các chức năng khác của React mà không cần viết 1 class.
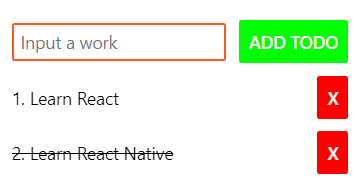
State là 1 thành phần trong Hook. Và nếu không sử dụng State thì ứng dụng sẽ ra sao, chúng ta có thể nhìn qua một ứng dụng Todo bên dưới
Khi chúng ta thao tác nhập thông tin công việc rồi nhấn “ADD TODO” hay nhấn nút “X” để xóa 1 đầu việc đều không có tác dụng. Giao diện này hoàn toàn tĩnh và không hề cập nhật khi có thao tác của người dùng.
Ở đây, để cập nhật được UI và tương tác với người dùng chúng ta sẽ dụng State để thực hiện điều đó. State sẽ giúp chúng ta xác nhận và cập nhật UI khi có các sự kiện tương ứng.
2.Các bước thiết lập
Định nghĩa và khai báo 1 State
Để sử dụng State ta cần import thư viện của nó trong mỗi file source mà ta sử dụng như sau:
import React from"react";import{ useState }from"react";Đọc State
Để đọc dữ liệu ta sử dụng cú pháp như sau:
const data =[{
        id:1,
        text:"Learn React",
        completed:false,},{
        id:2,
        text:"Learn React Native",
        completed:true,},];constTodoApp=()=>{const[todos, setTodos]=useState(data);//....}
Ở đây ta thấy sẽ có 2 biến todos và setTodos với chức năng chính như sau:
- todos: xem như là 1 biến để lưu trữ giá trị lúc khởi tạo State, ở đây ta có thêm xem như todos giữ giá trị của đối tượng data, todos = data
- setTodos: có nhiệm vụ thiết lập lại giá trị của todos và chức năng vô cùng quan trọng nữa là cập nhật lại UI ở những nơi mà có sử dụng giá trị của todos. Vì vậy UI sẽ được cập nhật lại khi có những sự kiện gọi hoặc thao tác từ người dùng.
Cập nhật State
Việc cập nhật State thì khá đơn giản, chỉ cần gọi hàm setTodos. Ví dụ, ta cần add thêm 1 đầu việc vào danh sách todo hiện có ta có thể tạo 1 hàm đơn giản như sau:
constaddTodo=(todo)=>{const newTodos = todos.concat(todo);setTodos(newTodos);};Hàm này sẽ nhận vào 1 đối tượng todo, và add vào danh sách todos hiện tại, sau đó gọi setTodos để cập nhật lại UI.
Tương tự ta có thể tạo thêm các hàm cho việc xóa hay cập nhật trạng thái 1 công việc đã làm hay chưa như bên dưới
constdeleteTodo=(id)=>{const newTodos = todos.filter((todo)=> todo.id !== id);setTodos(newTodos);};constupdateTodo=(id)=>{const newTodos = todos.map((todo)=>
      todo.id === id ?{...todo, completed:!todo.completed }: todo
    );setTodos(newTodos);};
Tổng quan các bước
File TodoApp.js
import AddTodoForm from"./AddTodoForm";import TodoList from"./TodoList";import React from"react";import{ useState }from"react";import{ Text, View, ScrollView }from"react-native";const data =[{
    id:1,
    text:"Learn React",
    completed:false,},{
    id:2,
    text:"Learn React Native",
    completed:true,},];constTodoApp=()=>{const[todos, setTodos]=useState(data);constaddTodo=(todo)=>{const newTodos = todos.concat(todo);setTodos(newTodos);};constdeleteTodo=(id)=>{const newTodos = todos.filter((todo)=> todo.id !== id);setTodos(newTodos);};constupdateTodo=(id)=>{
    console.log(id);const newTodos = todos.map((todo)=>
      todo.id === id ?{...todo, completed:!todo.completed }: todo
    );setTodos(newTodos);};return(<View><AddTodoForm addTodo={addTodo}/><TodoList todos={todos} deleteTodo={deleteTodo} updateTodo={updateTodo}/></View>);};exportdefault TodoApp;
File AddTodoForm.js
import{ useState }from"react"import{ StyleSheet, Text, View, TextInput, Button }from'react-native';import React from'react';constAddTodoForm=(props)=>{const{ addTodo }= props
    const[todo, setTodo]=useState("")consthandleInputChange=(text)=>{setTodo(text)}consthandleAddTodo=()=>{const dataItem ={
            id: Date.now(),
            text: todo,
            completed:false,}addTodo(dataItem)setTodo("")}const styles = StyleSheet.create({

        TextInputStyleClass:{// Setting up Hint Align center.
            textAlign:'left',

            padding:5,

            marginRight:10,// Setting up TextInput height as 50 pixel.
            height:30,// Set border width.
             borderWidth:2,// Set border Hex Color Code Here.
             borderColor:'#FF5722',// Set border Radius.
             borderRadius:2,//Set background color of Text Input.
             backgroundColor :"#FFFFFF"}});return(<View style={{flexDirection:'row', alignItems:'center', justifyContent:'space-between', marginBottom:10}}><TextInput style={styles.TextInputStyleClass} value={todo} onChangeText={handleInputChange} placeholder={"Input a work"}/><Button onPress={handleAddTodo} title="Add todo" color="#00ff00"/></View>)}exportdefault AddTodoForm
File TodoList.js
import TodoItem from"./TodoItem"import{ StyleSheet, Text, ScrollView, TextInput, Button }from'react-native';import React from'react';constTodoList=(props)=>{return(<ScrollView>{props.todos.map((todo, index)=>(<TodoItem key={index} index={index+1} todo={todo} deleteTodo={props.deleteTodo} updateTodo={props.updateTodo}/>))}</ScrollView>)}exportdefault TodoList
File TodoItem.js
import React from'react';import{ Text, View, Button }from'react-native';constTodoItem=(props)=>{const{index, todo, deleteTodo, updateTodo}= props
    const{id, text, completed}= todo

    consthandleClick=()=>{deleteTodo(id)}consthandleClickText=()=>{updateTodo(id)}return<View style={{flexDirection:'row', alignItems:'center', justifyContent:'space-between', marginBottom:10}}><Text style={{textDecorationLine: completed ?"line-through":"none"}} onPress={handleClickText}>{index +". "+ text}</Text><Button onPress={handleClick} title="X" color="#ff0000"/></View>}exportdefault TodoItem
Bên trên là mã nguồn của 1 ứng dụng demo về 1 app Todos có thể chạy trên điện thoại hay web, mọi người có thể tham khảo.
Cảm ơn mọi người đã đọc bài viết.
Tham khảo
Nguồn: viblo.asia

